Indian Hiawatha

GoldenMotor.com

MEASURE TWICE

Well-Known Member
Jul 13, 2010
2,747
1,228
113
CA
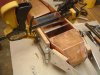
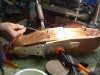
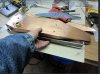
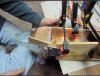
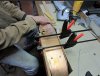
I see a simple jig to hold together for the brazing sides, or is that for just checking. The wood with flame near might possible burn, but a big solder iron if not right where heat is works I suspect.

I mention because I like to see what ingenuity of some things we all have scavenged to do our work and need not be without when it really does matter.

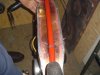
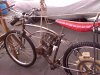
I welded some parts to allow use of the V-brakes on my build and getting the parts to be set in the right position and then not having the wheel get messed up, it was a series of intricate steps.

The thing that got me was that I could have taking the tire and tube off or just left the tire deflated so it could be installed and removed. The damn green slime inside the tube always lets some out when deflating and is a mess!

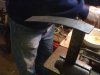
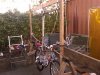
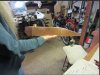
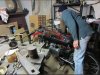
Here is my hoist I made for 1st lifting my outboard up onto a saw horse for rinsing, but came in handy as extra hands to hold the Briggs and sort of in my mind thought of how it might look with an engine platform made to hold it on the frame.

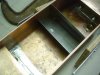
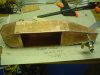
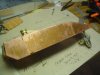
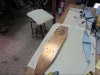
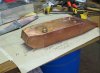
That tank is a piece of art work! Nice going, gonna keep seeing it as it develops.

MT
 

Attachments

Last edited:

silverbear

The Boy Who Never Grew Up
Jul 9, 2009
8,325
670
113
northeastern Minnesota
Measure Twice,
Yes, necessity is the mother of invention. You look around to see what you have at hand and give it a go. Looks like your hoist did what it needed to do. I like that Briggs!

While I'd like to say we had a master plan on how we would hold the pieces together for soldering, the truth is we were winging it, ready to try anything that worked and if need be stop mid stream to change horses (as the saying goes). And yes, you are quite right about the burning wood. More than once a wet sponge stopped the smoking.

Back now to show and tell. Dan had gone all the way in to the machine shop where he is employed during the work week to make up that piece of steel from their scrap pile and on the way home got a better idea or as he put it, he "got a brain fart", stopped at the hardware and picked up a couple of gate hinges. Here's what he did...

Instead of the long bar and wedges he employed these big strap hinges with quarter inch wooden pieces sandwiched between to avoid marring the copper and clamps. First we did just one side piece and on the other side had a piece of half inch pine board to clamp to. Then we tack soldered the side piece to the top section at the front and most of the side. It worked!

Rather than continuing on tack soldering to the other end of that side, we thought it best to go to the second side piece and also tack it in place the same as the first one. Then move the hinges and wood pieces to the tail end and finish tacking the whole tank. In other words we were trying to not get ahead of ourselves and discover one side fit fine and the other wouldn't. As it was we were using hands along with the clamps and tapping now and then with the leather mallet to persuade the pieces to fit together. Which they did!
(cont.)
SB
 

Attachments

  • Like
Reactions: Nightster

silverbear

The Boy Who Never Grew Up
Jul 9, 2009
8,325
670
113
northeastern Minnesota
So now we had the two sides tacked to the main piece from the front end to past midway on the side. It is starting to look like a gas tank! And that is where we ended the shop session, sure now that the remainder would tack together into a nice fit. We had to see how the brass bowled fuel filter will look and give it a quick fit into the frame for a first impression. Woohoo!

Next week we'll finish tacking and then do the finish soldering, trying to keep a running bead on all the parts that show. Maybe we can also get the brass hanger straps made up and mount it to the Indian. Oh boy. See you next week in the Tinsmith's shop.
SB
 

Attachments

  • Like
Reactions: Nightster

silverbear

The Boy Who Never Grew Up
Jul 9, 2009
8,325
670
113
northeastern Minnesota
Thank you Bill. I know that Dan appreciates your kind words He's a quiet guy, no bragging or tooting his own horn, a little uncomfortable with my taking pictures. Yes, he's an artisan of the first order. Dan is pleased with the tank, as am I, and we're both looking forward to it all done, on the bike and holding gas. I can hardly wait to shine it up to see it sparkle on it's first ride and then will let it oxidize and mellow into a softer and more timeless look.
SB
 
Last edited:

Allen_Wrench

Resident Mad Scientist
Feb 6, 2010
2,784
26
36
Indianapolis
Dan & SB, I have to admit: I've grown concerned that I haven't heard from Fundreamer in quite some time. Not only am I worried about the man, I haven't got much hope that I'll see the tank he'd started to make for me. Having resigned myself to making my own from brass or copper by solder or brazing, I've been studying this post and Tinsmith's previous tank post.
That said, if I can make my tank look half as good and still have either no leaks, or just pinholes to take care of, I will be a happy man. I've done some soldering and a little brazing in my time. Dan makes it look easy. I'm going to be studying this thread to the end. Good work.
 

silverbear

The Boy Who Never Grew Up
Jul 9, 2009
8,325
670
113
northeastern Minnesota
Allen,
Sorry to hear of things not working out with your tank. I know you've been waiting for a long time and hope Fundreamer is OK.
I'm with you on making your own. I get some credit for this gas tank when I'm mostly just the reporter and picture taker for Dan as he wings it making this tank. After this one I'm pretty much on my own and have no illusions that my solo attempt will look as good as his. But I'm also confident enough that if I take my time and make a prototype out of tin first to come up with a good pattern, then I think I can come up with a "half as good", which is still pretty darned good.

Cobra,
I don't plan to seal it from the inside. We made up three tanks last winter, two of tin and one of copper for the cantilever Schwinn frame. None leaked. I don't expect this one will either. If it did I think it could be repaired from the outside with solder, but Dan would be better to offer his opinion on that.
SB
 

Tinsmith

Well-Known Member
May 15, 2009
1,056
259
83
Maryland
Mr Cobra, I don't think we'll coat the inside of the tank. Rust won't ever be a problem and like SB said it would be repaired from the outside if it ever leaks. There might be a reason to coat it that I'm not aware of and if so hopefully someone will fill us in. Dan
 

harry76

Well-Known Member
Apr 16, 2011
2,557
47
48
Brisbane, Australia
Nice tank Silverbear, you could have moved the black bike in the final picture so we could get a better look :) but i know the wait will be worth it, i cant wait to see the finished product..... you must be excited as its now really coming together.
 

leaded50

New Member
Oct 29, 2011
179
0
0
Norway
I didn't know if there would be any kind of corrosion of seepage from fuel. i guess copper has it's perks.
Some perks,yes.... But gasoline compounds only, may tarnish to darken appearance the Copper's metallic surface.
Because copper reacts with gasoline not to create corrosive or otherwise directly damaging compounds, but rather to make the fuel go sourer, sooner, and into "varnish" of the oxidation of gasoline.

With the "newer" gasoline, who nearly ruins it self when standing over long time, by attracting water (& sulfur) , it could be a idea to mix some alky inside, to prevent the moisture. In a oil/gasoline mix,(by 2 stroke)this shouldnt be any quest, because the oil would prevent/secure the metal. Also some parts in carbs are made up of copper, and they hold up....

The tank work is becoming great! Awaiting finished pictures!!
 

silverbear

The Boy Who Never Grew Up
Jul 9, 2009
8,325
670
113
northeastern Minnesota
Good to know about the effect of copper on gasoline, making it want to varnish more easily. With this build having a two stroke engine that won't be a problem, but if it were a four stroke then a gas additive like Sta-bil would be a good idea. There will be inevitable gas dribbles in filling which I'll try to take care of with a rag when it occurs. The tank will darken as it oxidizes anyway, but if the gasoline dribbles make it look uneven and bad I can always polish the tank up and start over letting it age again. No decals on this tank.

Harry, setting the tank in place was an afterthought as we were putting things away and buttoning up the shop for the week. Dan's stretch Worksman was sitting next to it. Maybe next week when the tank is more together we'll take another couple pictures of it in place. I want to see how the fuel filter with the brass fuel bowl is going to look. What a find that was.
SB
 

silverbear

The Boy Who Never Grew Up
Jul 9, 2009
8,325
670
113
northeastern Minnesota
We made good progress on the gas tank today. The jig utilizing strap hinges with wooden spacers worked well in holding the tank together while it was being soldered.

Dan made up a piece of bent tin to act as a temporary brace inside the tank to keep the tank from compressing under the pressure of the hand clamp.

A block of sal amoniac helps to keep the 300 watt soldering iron tip clean. Sal amonica acts as an acid just as the paste and liquid flux. Periodically Dan has to clean it this way and reloads the tip with solder, effectively tinning it.

He made up the curved piece of metal you see in the vice so that he could fit the tank over this brace to help push the side against the long top piece, helping to assure a close fit and tight union.

Ideally Dan would drag the flat side of the tip along the joint, feeding solder as he goes for a nice flowing run. The thickness of the copper sucks the heat out of the iron quickly, so he used the very end to apply heat rather than the larger flat side. This makes dragging the iron more difficult and is an awkward position to hold the iron, but it works and is what was required in this situation
(cont.)
S.
 

Attachments

  • Like
Reactions: Nightster

silverbear

The Boy Who Never Grew Up
Jul 9, 2009
8,325
670
113
northeastern Minnesota
The tank is now together. All that remains in it's construction is to mount the transmission shift lever plate to the side of the tank which involves drilling two holes and soldering acorn nuts to the inside.

The shift lever connecting rod has been shippedl and hopefully will be here before the next shop session. The connecting rod will determine the placement of the mounting holes.

When that is done a plate will be soldered to the bottom of the tank to close it up. This week I'll be working on cleaning up the excess solder to make the tank look as nice as I can.
SB
 

Attachments

  • Like
Reactions: Nightster

silverbear

The Boy Who Never Grew Up
Jul 9, 2009
8,325
670
113
northeastern Minnesota
Thanks Harry.
Dan does nice work. I spent some time last evening cleaning up the flux, oxidation and such on the tank. Nice to see the luster coming out in the metal. Copper has such a warm look to it. Most of the solder you see will disappear.

I've been experimenting on the bottom where flaws won't show, on how best to clean the solder up. High spots can be sanded down pretty easily with a small drum sander on the dremel tool, rotating at slow speed as I don't want to gouge into the copper... just remove excess solder. When I get it close to level with the copper surface I use a bit of sandpaper by hand and then with finer sandpaper followed with fine steel wool. Seems to be an OK procedure.

Removing this solder has no effect on how well the tank will hold gasoline. It is the solder which has flowed under the flange which seals it up. This is why it is so important to prepare the surface to be soldered with steel wool, applying flux, bringing the copper up to temperature so that it will accept the solder. The solder has to flow into the flange. If it does, all is well.

The tank will look better by next weekend when we close in on the last things to be done... shift lever housing mounts, a plate on the bottom to close up the tank, and brass hangers to fix the tank to the bike frame.
SB