Indian Hiawatha

GoldenMotor.com

silverbear

The Boy Who Never Grew Up
Jul 9, 2009
8,325
670
113
northeastern Minnesota
SB, you ought to take Tim up on the stainless. You can hone your soldering skills with it and the copper will be a piece of cake. Dan
Do you mean that stainless steel can be soldered? I thought it had to be welded. Or is it a matter of what gauge it is? I have this idea that stainless is very difficult to bend, but I admit that I known nothing about it, really. What kind of solder do you use with it? How is it different to work with than tin or copper or brass? Interesting...
SB
 

harry76

Well-Known Member
Apr 16, 2011
2,557
47
48
Brisbane, Australia
I dont know if you can solder S/Steel but i havent found it any harder to bend, not by much anyways (mind you i am using a pan brake folder)...... i really hope you can solder s/steel as i can get plenty of it from work... for FREE :).... and i had thought of building a tank but didnt want to pay to have it tigged, and making ALL the tank hardware out of s/steel could be a little trickier????
 

Tinsmith

Well-Known Member
May 15, 2009
1,056
259
83
Maryland
Sorry guys I was just being an a...hole. It has to be welded and yes Harry the lighter guage stuff isn't hard to bend and as you can see by Sportscar Pat's work it makes for a wonderful tank. I have done very little stainless welding, but like any of it practice is the answer. I'm not sure my old jump shear would like it very much cause it's tuff stuff and hard on cutting edges. I think if we make a steel tank for SB we'll use some 1/8" stuff so he can try welding it. It'll be a little more forgiving (blow thru) than say 20 guage. I had a good number of pinholes on my first welded steel tank, but it just takes patience. You do get alot more practice grinding and sanding when you are learning how to build a tank than you do welding. At least I did. My apology for the bad joke guys! Dan
 

silverbear

The Boy Who Never Grew Up
Jul 9, 2009
8,325
670
113
northeastern Minnesota
Well, now you know just how little I understand this stuff. Since I'e gone zzzt maybe twice with the welder I don't think I'm a good candidate for stainless. I'd rather be successful with regular steel first. I like that you can go back and grind it out, weld some more, grind some more and keep at until it holds gas. But I think the next tank will be copper if I can pull it off. If I don't do it fresh on the heels of your Hiawatha tank with you to consult and guide me along the way I would tend to forget over time and never do it. But once I've done it myself, then it is mine even if it is not up to the caliber of your work, Dan. Joking with the green guy is traditional in a shop, isn't it? It's all good. Ha!
SB
 

leaded50

New Member
Oct 29, 2011
179
0
0
Norway
A quick note on tank welding... if you can regulate heat enough to not burn trough or distort the metal, try to make a constant weld "without" ending... its the repeated stop/start on the welds who normally would make a leak! Only way to hope for a fix, is good grinding on the stop/ before starting again. The "old smiths" used gaswelding, and that does it moore easy, its more meltet together, and tread does give moore if needed, the modern type TIG does nearly the same, and both does the weld "softer" to work on without breaking, as the easy use MIG.

Stainless get easy to weld, as steel, but sometimes need special tread in MIG, and have some dangerous fumes........and plumbers have done s.steel soldering in some ages...but how it hold up in a twisting frame on a bike???? Perhaps..........?
 

silverbear

The Boy Who Never Grew Up
Jul 9, 2009
8,325
670
113
northeastern Minnesota
Leaded,
Even with soldering, regulating the heat and keeping the iron moving along is key to a nice soldering job. I know that much and have a good bit of soldering experience in the stained glass trade. But I know nothing about welding, so I think for now making a tank of tin or copper would come more easily for me than welding a steel tank. I have great admiration for the stainless tanks Sportscarpat makes. I have no such aspirations. If I can learn to weld regular steel well enough to stick things together that will be a great thing and plenty good enough for me.

The more I involve myself in making tanks (or just helping), the more I appreciate how much is involved in time and skill. People who expect someone to make them a custom gas tank at discount prices are not being realistic. For this reason, custom in frame gas tanks will remain something special, by themselves elevating a build to another level.
SB
 

leaded50

New Member
Oct 29, 2011
179
0
0
Norway
I know Silverbear, but...its easy to get stuff to stick together with welding....problem is to get not all around it dissilved, or distorted... he,he!

And i agree on the last comments, the skill do do a tank right, AND not leaking, is skills to learn of many faulty ones! It cant get cheap!

But a great tip to do small fixes in leaking tanks are to use 2-part epoxyglue (not shure everyone is great, but here the gasstation type function superb!) over the small holes, it stop the leaks, and keep up for gas/etanol,etc. Its trued in the automotive repair industri for fast & inexpensive instant fix. I also had used it on radiator/coolant tanks for fast help, and it holds up! Tanks i know it had been used on 10-20 years ago get rusted apart, but the glued holes remain intact......

Well, a cooper tank would whatever look nicest, and thats only nice when soldered!!
Keep up!!
 

Tinsmith

Well-Known Member
May 15, 2009
1,056
259
83
Maryland
SB, I wasn't really taking a jab at you, but the idea of soldering the stainless that Tim offered. I did talk with an "Old School" radiator guy today and he told of repairing stainless with a brass patch, silver solder, and acetylene torch. It was agreed that trying to solder a stainless tank together would be quite difficult. I have watched the welder where I work weld sheet stainless and have tried it myself. He uses a tig welder and it is beautiful to watch. I have tried it a couple times and it does get easier rather quickly, but there are so many variables that it would take awhile to actually know what you are doing. Sheet stainless does move a lot when heat is applied, and many tack welds (close together) help with that problem. I'll bring home some scrap steel this week so you can practice "zzzt" ing if you'd like. Or we'll see if Tim will come show us how to solder the stainless. Heck , after seeing the tank he made he can probably do it. Leaded is right about the stopping and starting causing the leaks. On my first welded tank I had trouble moving the right speed with respect to my amperage and wire speed. When I could get a nice little run going the weld looked good and didn't have any pin holes. But I did get real good a grinding and sanding, cause the tank looks good. Dan
 

MEASURE TWICE

Well-Known Member
Jul 13, 2010
2,746
1,226
113
CA
Not having a lot of welding experience and tank building only saw someone’s conundrums when grinding smooth seams of a metal welded tank, I thought of this.
Although redoing again and again, that if it was not still working a tank liner that they sell and it is sloshed around inside and seal leaks I’ve heard of.

But though do they use a method of lapping weld with extra thickness at edges.

What I mean is the seam I guess may leak after grinding two edges that come together with too much of filler weld area removed. I understand that making the edge look straight and smooth is wanted and then grinding is tricky.

If the edges of all pieces to be joined are slightly thicker than the middle I’m thinking?

To do this I would take and weld ahead of assembling by welding the edges thicker with strips of metal.

Just thinking maybe a way?

In regards to safety and welding stainless steel I understand it has a small amount of chromium in it and is quite poisonous. I got a gas mask with twin cartridges, but it would not fit under the weld hood. I then went out on advice to a weld shop and got a low profile one that does fit under the weld hood.

Measure Twice
 

leaded50

New Member
Oct 29, 2011
179
0
0
Norway
[=MEASURE TWICE]
Some tank liners says to be functional, but some differences has happend the last years.... after (& moore) etanol was blended into the petrol, a lot of brands have trouble to keep up. The higher prosentage of etanol is ruining the stuff, it get easier than before dissolving it, at shorter time.

But though do they use a method of lapping weld with extra thickness at edges.

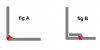
Joining metods in welding shown on the pic under. FigA show show egde to egde, and figB , overlapping type.
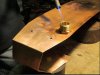
Welding are ways of melting, and adding metall. To make a joint holding up, it need to be hot enough to lay extra metal/melt trough, trough the joint. (figA+B,the red color) Trouble with it is to not get to much heat, then the metal could easy be distorted, and to little just laying on the outer side (not meltet trough). Metal does expand in heat, and only where heat is pointed it does, the rest is not heated (at least not similar degrees) and stay colder with not any expanding, therefore making distorting when to big differences.

The experienced welder know this and can regulate it so this dont happend, but also got melting trough, to get a good joint. The hobbyists with not so much experience would easy not get it done like this, a little to hot weld,distortion, to cold,and just "chicken****" (as called by experienced welders) on outside.
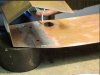
By distortion & , if any had happend under welding, when grinding afterwords to get nice & smooth shapes, gets quite easy holes grinded, or weakening the welds to much,because of the uneven shape, and you got leaks.
What i ment by the trouble with start/stopping welding who makes easy leaks, was start/stop welding does the handling with the heat easier aka; distortion. But a weld is normally harder (f.ex. by MIG welding)than the steel, and when starting again, the weld are not heated similar as it would be further down the welding, and quick pollution in the air, could create changes who gives a leak. When not grinding before starting again, you got thicker metal at the welding stop, and thicker metaljoining needs poweradjusting on the weldingmachine, thinner metal another adjustment...and this is not easy to do right under working... :)

If the edges of all pieces to be joined are slightly thicker than the middle I’m thinking?
To do this I would take and weld ahead of assembling by welding the edges thicker with strips of metal.
Just thinking maybe a way?


Trouble is welding strips on, just give to welds (both sides of the strips) does double the chances of distortion & leaks.. You could double it by flip edges, but then its trouble with melting trough, to hot on the outer to melt trough both......
:-||

On flat pieces where you reach the backside, then its quite easy to straighten if distorted, but its a reason to make leakproof tanks, arn´t cheap & easy to do, as you cant do this in a closed cell....! ( f.ex in S.steel and wanted it to be undistorted ,and not use filler/bondo )

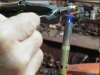
Great to hear you uses a breather on the welding, then you got a better chance to breath later in life too!!
 

Attachments

silverbear

The Boy Who Never Grew Up
Jul 9, 2009
8,325
670
113
northeastern Minnesota
We made some good progress on the gas tank today. First we set the tin prototype tank in place and decided where the filler bung should be located and the same for the tank hangers so that holes can be made for the acorn nuts which will be soldered to the inside of the tank. Dan drilled pilot holes into the steel version of what will be brass tank hangers to aide in locating the holes to be punched.

The opening for the gas filler was made with a heavy duty leather punch. The copper sheet was laid on his anvil with a plate made of lead to go between the copper and the anvil... he gave it a couple of good smacks with the hammer and the hole was made. Next week I'll ream out the hole a bit with a dremel tool so the bung fits snugly before soldering.

The smaller holes for hanger bolts were first marked with a tool that looks much like a nail set on the business end... just a tap for each one to help guide the sheet metal punch Dan used to make the actual holes.
(cont.)
SB
 

Attachments

  • Like
Reactions: Nightster

silverbear

The Boy Who Never Grew Up
Jul 9, 2009
8,325
670
113
northeastern Minnesota
The first photo in this series shows the holes punched for the bung and upper hangers. Not shown are holes for the underside hangers and the hole for the fuel outlet.

Next up is making the bends in the top piece which covers both ends, the top and parts of the bottom. The bottom will get a final panel soldered in place once everything else on the tank is finished, including the hanger for the gear shift lever which will not be ready until parts come from Germany. The tool Dan is using is called a 'finger brake'.

This stage of the process is critical because if just one bend is off then the piece can't be used... you'd have to make another piece and get it right... so it is a time for especially careful work. To see if all is well, Dan fits the side piece to the long top piece and ... it fits! Woohoo! Houston, we have liftoff!

Next Saturday should see the tank soldered together and done for all practical purposes, with just the shift plate and the bottom cover plate to be done once the shift lever parts are here. But the tank will be together and the copper gas line can be laid out. While there are other things to finish up on the build, both visually and mechanically the bike will be much closer to being roadworthy.
SB
 

Attachments

  • Like
Reactions: Nightster

timboellner

Member
Apr 1, 2009
435
0
16
Towson Maryland
It looks like you're really getting there. I guess the hard part now is waiting for parts to finish it up.
I'll be interested to know how easy or difficult the soldering went. 50/50 solder might be easier if Dan has any laying around. 95/5 is stronger but takes a little more heat.

What will you guys be using for a gas shut off valve this time? Have you found something that looks old-timey? I'm glad to see you had enough width to get the filler bung in. Something about filler bung just sounds wrong.

Hope you got a ride in on Saturday morning it was nice and warm here for the first 1/2 day. Got windy later on.

TiM
 

silverbear

The Boy Who Never Grew Up
Jul 9, 2009
8,325
670
113
northeastern Minnesota
Hey Tim,
The gas shut off is built in to the filter with brass fuel bowl. (back a page or two for a photo).

I don't know what Dan plans to use for solder, but he'll be using his big iron for the thick copper you gave me. He likes to use a small one around a hundred watts for tin work and I had brought my iron I used to use for making leaded stained glass windows which is 200 watts. We tried it and while it would have been about right for the cantilever copper tank we did last winter (not as thick a gauge of copper sheet), for this tank the big iron will get dusted off for duty. I'm guessing it's 300 watts.

Too cold to ride tomorrow, but it will be warm in the tinsmith's shop with a nice fire in the wood stove. We should get the tank soldered together tomorrow minus the bottom panel which will come when the shift plate is in place. Fasteddy tells me the parts are shipped from Germany, so they will go first to him in Vancouver and then my parts will get separated from ones he ordered for his build and he'll send mine along to me here in Maryland. That's the down side of using a foreign made antique engine. In a couple weeks the parts should be here I would think and then everything will be done on the gas tank and copper gas line.

Curtis Fox says the leaf spring fork is about ready to assemble and ship off from Minnesota in a week or so. It's coming together!
SB
 

draw

New Member
Jul 14, 2011
10
0
0
quesnel bc canada
Where can I buy 52 or bigger rear sprockets, also rear gas tanks that go under carrier (rat trap style) also seat posts that position the rider farther back?
 

silverbear

The Boy Who Never Grew Up
Jul 9, 2009
8,325
670
113
northeastern Minnesota
Hello Draw,
I'd try to post this question under swap and shop as it will get more views, I'm guessing. If I remember right you can get bigger sprockets from Pirate Cycles. 64 tooth I think. Seems to me that I recall a gas tank like that from boygofast on ebay and somebody else will have to steer you toward a lay back post. Try Venice Motor Bikes for that. He's one of the vendors here. Seems to me he was making them. He does good work. Good luck to you and welcome to the forum.
SB
 

silverbear

The Boy Who Never Grew Up
Jul 9, 2009
8,325
670
113
northeastern Minnesota
In the wee hours of the morning I found myself half-sleep-dreaming about the copper gas tank to be worked on in a few hours and a pome bubbled up from the distant medieval period of my life called Jr. High, maybe tenth grade, in between bouts of truancy where a pome from one of those old guys (dead) with a powdered wig and lace collar came to mind. I haven't thought of it for years, maybe ever, since I mostly stared out the window while in school. I may not remember it exactly, but here goes. I believe it was written by A. Nonny-Moose, one of my favorite pomesters and I think it was called "Ode To A Gas Tank"'

When it comes to gas
It's copper and brass.
Oh Yas! Oh yas!
It's copper and brass.
They do kick ass!

Makes me glad I didn't skip school that day. Education is a wonderful thing, I imagine. Now off to Tinsmith's workshop... see you there.
SB
 

silverbear

The Boy Who Never Grew Up
Jul 9, 2009
8,325
670
113
northeastern Minnesota
Next up on the gas tank was in prepping all the surfaces to be soldered with steel wool. All edges, each hole inside and out. Everything you can do to help the solder flow and bond with the metal is important and time well spent.

Next Dan "tins" the bung and edges of the hole it will be soldered to. While you want to use enough solder, you also don't want to overdo it or it will look bad. Nice job on the filler bung! Tinning is simply applying solder to both metals, the brass and the copper which are quite different and require different temperatures to make them ready to accept the solder. Tinning makes a metallic bridge between the two metals, so that the new solder applied and heated to temperature flows into the solder on the copper and and the solder on the brass.

Flux (acid) is applied to the metal to be soldered or it will not allow the solder to flow into the metal. Dan used both liquid and paste flux depending on the situation. On something requiring a good bit of heat he uses the paste which evaporates more slowly. The liquid can be applied more precisely. On the acorn nuts he uses a solder which has an acid core (flux is in the middle of the solder) which works well on something small.

The solder Dan is using is 50/50. For the soldering done in today's session a propane torch was used. Next week when the finish soldering will come he will use a large soldering iron, I believe of 300 watts. The propane torch produces more heat yet, necessary for bringing the brass up to temperature.
(cont.)
SB
 

Attachments

  • Like
Reactions: Nightster

silverbear

The Boy Who Never Grew Up
Jul 9, 2009
8,325
670
113
northeastern Minnesota
With the bung in place Dan did some final filing of the holes which will get brass acorn nuts soldered to the inside. He uses a small round file, like a chainsaw file, to ream out the punched holes to size. The acorn nuts are tinned and the holes where they will be soldered to. The same process is done for the fuel outlet brass bushing.

As a side note, he held the acorn nuts in position with aluminum bolts which will not accept the solder... so the nuts are where they need to be and there is no way for solder to foul the threads of the acorn nut.

Now the sides can be joined to the long top piece. Dan gave a good bit of thought in how to hold the pieces together. He thought first to use the long steel piece pictured in the last photo. The idea would be to clamp it to the side piece with a section of wood to protect the copper from marring and to spread the compression of a clamp. The ends would then be pulled into place by using wedges of wood to push the side piece into the top piece. It would have worked fine, I believe, but then he got another and better idea...
(cont.)
SB
 

Attachments

  • Like
Reactions: Nightster