Indian Hiawatha

GoldenMotor.com

leaded50

New Member
Oct 29, 2011
179
0
0
Norway
Found the recommended specs on oil for the old 2 cycle DKW motors:

Vintage two-stroke oil

Technical data:
Two-stroke oil-2T Classic
Density, 15 ° C, kg / m³ 386
Kin. Viscosity at 40 ° C mm / s 116
Kin. Viscosity at 100 ° C mm / s 12.3
Viscosity Index 96
Flash point, DIN 51376, ° C 246
Pour Point, DIN 51 597, ° C - 15
Sulphated Ash, D 874, 0.3% mass

Practice and tested in aggregates with filling instruction:
● API TC + +
● JASO FC
● TISI 1040
 

fasteddy

Well-Known Member
Feb 13, 2009
7,454
4,920
113
British Columbia Canada
http://www.google.ca/url?sa=t&rct=j...pFXWp8jsVGnVA2PIA&sig2=0Nenchlhsjh9_o1I7e-BIQ

I heard from the man that we bought the Sachs engines from. I posted the site above for anyone who wants to see his work. Click on the Scooter Museum then the logos on the left of the site and you can read about the make. If Dave Bagne's name is on it he is the man we bought the engines from. There are other people as well who restore only certain makes.
Dave loves motor wheels.

He is the man that found a number of new Whizzers Albians that were new and had been in storage for years. He lost most of his collection in a fire a few years ago but Curt, Silverbear and I saw some of the treasures that were still there but many were sold after the fire.
I'll post his reply in a minute.

Steve.
 

fasteddy

Well-Known Member
Feb 13, 2009
7,454
4,920
113
British Columbia Canada
Hi Steve: Yes you use Aero Shell 30 weight oil a non detergent & the best for 2 cycle engines because of the good stay put quailty. All the vinatge racing outboards use this. Originaly design for aircarft engines. Have a nice Xmas & greet the boys.

This is of course your judgement call but I'll stick with his judgement as a leading restorer of small engines, motor bikes and scooters.
My guess is that they are using aircraft oil because of the high quality.

Steve.
 

silverbear

The Boy Who Never Grew Up
Jul 9, 2009
8,325
670
113
northeastern Minnesota
Hi Steve: Yes you use Aero Shell 30 weight oil a non detergent & the best for 2 cycle engines because of the good stay put quailty. All the vinatge racing outboards use this. Originaly design for aircarft engines. Have a nice Xmas & greet the boys.

This is of course your judgement call but I'll stick with his judgement as a leading restorer of small engines, motor bikes and scooters.
My guess is that they are using aircraft oil because of the high quality.

Steve.
So where do you get it, for how much and at what mix ratio?
SB
 

fasteddy

Well-Known Member
Feb 13, 2009
7,454
4,920
113
British Columbia Canada
AeroShell Direct - AeroShell Turbine Oils, AeroShell Turbine Oil, Aviation Oils, Aviation Oil, Flight Jacket, Flight Jacket Micro Cloth, Flight Jacket Oil & Exhaust Removers, Flight Jacket Oil & Exhaust Remover, Flight Jacket Plexicoat, Flight Jacket

I found this site. It's $62 for a dozen quarts. I was thinking that as you get towards the start up time I'd buy a case and have it sent to you since the shipping into Canada would be a killer.
I believe the oil-gas ratio is 26 to 1 but we can check with the chap in Germany when we order the parts.

Steve.
 

silverbear

The Boy Who Never Grew Up
Jul 9, 2009
8,325
670
113
northeastern Minnesota
AeroShell Direct - AeroShell Turbine Oils, AeroShell Turbine Oil, Aviation Oils, Aviation Oil, Flight Jacket, Flight Jacket Micro Cloth, Flight Jacket Oil & Exhaust Removers, Flight Jacket Oil & Exhaust Remover, Flight Jacket Plexicoat, Flight Jacket

I found this site. It's $62 for a dozen quarts. I was thinking that as you get towards the start up time I'd buy a case and have it sent to you since the shipping into Canada would be a killer.
I believe the oil-gas ratio is 26 to 1 but we can check with the chap in Germany when we order the parts.

Steve.
Okay, I'm game. I don't doubt that other oils might be fine, but I'd as soon not worry about it and feel safe with what I'm using. I can always switch over to something else later if need be. It isn't cheap, but won't break the bank either, I guess. Figure the shipping and I'll split the cost with you. Six quarts should last awhile. In the mean time we may learn of something that is just as good.
SB
 

silverbear

The Boy Who Never Grew Up
Jul 9, 2009
8,325
670
113
northeastern Minnesota
With the copper side pieces made and now bent, Dan checked the fit of the top pattern piece and was not happy with it. So he made another modified pattern piece and decided that it was better, but not good enough, so he made a third one which satisfied him. So while it might seem we didn't make a lot of progress, we did make very necessary progress. If the pattern isn't right, nothing which follows will be right either. It is like painting a car... if the prep work is poor it doesn't matter how well you lay down the paint. It won't look good.

There is a lot going on with this tank. I figured out where the fuel bowl will go and now have to determine how we're going to affix the shift lever housing. On the original motorcycles this engine came with, the housing was bolted directly to the side of the gas tank. We're thinking to use acorn nuts soldered from the inside of the tank, just as the tank hangers will be anchored. This week I'll do a little research to determine the best placement for the shift lever which will be on the right hand side of the tank. For that reason the bung and fuel outlet will be on the left side.
(cont.)
SB
 

Attachments

silverbear

The Boy Who Never Grew Up
Jul 9, 2009
8,325
670
113
northeastern Minnesota
I drilled a wee vent hole in the filler cap and made a small baffle to fit under the rubber gasket. Without a vent of some kind either in the cap or elsewhere on the tank, vapor lock would result and in short order the gas would stop flowing to the carburetor. This little modification I learned from forum member ferball. I have used it with success on other tanks with the same type of cap, so I thank you once again for sharing, ferball.

The threading on the bottom portion of the coupling has been ground off with a sanding drum on a small rotary tool (like a dremel). I also drilled a couple of holes so that air would not get trapped above the base of the filler tube, else the tank would only fill to the bottom of the tube,wasting some of the tank's capacity.

Next shop session should see some more dramatic progress. We also cut things short today for a Christmas Eve day motorbike ride through the countryside, making for a Merry Christmas, indeed. See you in the Tinsmith's shop next year!
SB
 

Attachments

silverbear

The Boy Who Never Grew Up
Jul 9, 2009
8,325
670
113
northeastern Minnesota
So, at our last shop session Dan had cut out the two side pieces in copper and was making what he hoped was the final tin version of the long top piece which bends around to cover the top, both ends and part of the bottom. It is the most critical and most difficult piece in making the pattern.

Today he resumed where he left off last week by tack soldering the copper side to the tin top piece to see that the pattern piece fits as it should. He was glad he went to the trouble to do this test fit as the pattern needed tweaking at the last bend where it comes under the rear of the tank... it was a bit too tight and would have made it harder to make the three copper pieces come together as they should. Having discovered what he wanted to know he heated up the tack points and disconnected the copper side piece from the tin top section. Now on to the final copper version of the top piece and one step closer to the tank coming together..
(cont.)
SB
 

Attachments

  • Like
Reactions: Nightster

silverbear

The Boy Who Never Grew Up
Jul 9, 2009
8,325
670
113
northeastern Minnesota
Dan made the final adjustment to the top pattern piece and then scribed the outline onto the copper. He cut it out and it is now ready for a few holes to be made to accommodate the filler bung and tank hanger straps. They will be punched before making the bends in the top piece.

Also pictured is a brass back up plate I made for the shift housing which will bolt to the right side of the tank. Two holes will be drilled through the copper and brass acorn nuts will be soldered to the inside of the tank. It is critical that neither acorn nut ever come loose or there will be a major leak in the gas tank. The brass back up late is to guard against this possibility happening someday. This plate will be soldered to the inside of the tank's copper side piece. The holes in the brass piece have been filed out so that they can fit over the acorn nuts. Once they are soldered in place to the copper tank and to the brass back up plate and with the perimeter of the plate soldered to the copper, the union should be secure. Even if the brass bolts holding the shift housing to the tank are over tightened, the soldering should hold.

The final photo shows a steel version of the tank holders to be made of brass. There will be two holders on top of the tank and two under the bottom. Brass acorn nuts will be soldered to the inside of the gas tank. The hangers will be secured with brass bolts.
SB
 

Attachments

  • Like
Reactions: Nightster

harry76

Well-Known Member
Apr 16, 2011
2,557
47
48
Brisbane, Australia
That tank looks very nice, even just in mockup. Its coming together, I cant wait to see it on the bike. Ive said it before and ill say it again.... i just love copper
 

silverbear

The Boy Who Never Grew Up
Jul 9, 2009
8,325
670
113
northeastern Minnesota
Thanks, Harry.
Yes, I'm fond of copper and brass both. Too bad they are so expensive. If Tim Boelner had not given me that sheet of copper a year ago, this tank wouldn't be happening. I'm optimistic that once this build is done there will be enough copper left over to do a tank for my 50 Panther. Once the copper is gone it is either tin or I have to learn how to weld. Tim made a brass tank for his build last year... woohoo!
SB
 

silverbear

The Boy Who Never Grew Up
Jul 9, 2009
8,325
670
113
northeastern Minnesota
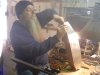
It's true that I'm never lacking for projects, and keep thinking I need to stop this craziness. The problem is that building is fun, every bit as much fun as riding. And I see some of the innovative ideas floating around here and start thinking up another project. And even when you've "finished" a bike, pretty soon the paint is suffering or you wish you'd done something differently or maybe just see ways you could make it look better and it is time for a makeover.

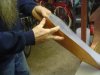
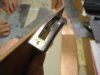
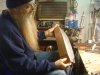
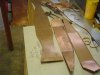
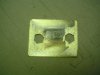
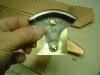
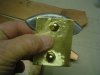
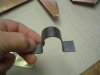
This tank has taken a lot more time and effort than I imagined it might and Dan needs to get going on his own projects before winter is gone, so if I do a tank for the Panther I'll try to apply what I'm learning as I watch Dan make the one in this thread. While the two tanks would be different since the frames are different, one a Schwinn and the other a Worksman, they are similar enough that I should be able to mimic (pretty much) what Dan has done and do the Panther tank myself. I may need him to look over my shoulder some as I'm laying out the long, top piece, but I think I can manage putting it together. But that's later on and there's this tank to finish up first. A couple more shop sessions should see it pretty well together. Can't wait to see it mounted in the frame! Thanks for the support, you guys.
SB
 

fasteddy

Well-Known Member
Feb 13, 2009
7,454
4,920
113
British Columbia Canada
I have to agree that the making is as much as riding and maybe a little more. The copper tank is going to be the pinnacale of the metal smiths art and for a bike very deserving of it.

Steve.
 

Tinsmith

Well-Known Member
May 15, 2009
1,056
259
83
Maryland
SB, you ought to take Tim up on the stainless. You can hone your soldering skills with it and the copper will be a piece of cake. Dan