Indian Hiawatha

GoldenMotor.com

Allen_Wrench

Resident Mad Scientist
Feb 6, 2010
2,784
26
36
Indianapolis
That is a very nice tank. I've been watching this thread VERY closely. I'm no stranger to the ins & outs of soldering, but what I've learned from Dan's construction techniques, the jigs, the planning and prep work, it all helped me better plan in my head how I'm going to tackle making my own tank. I'm sure I'll find myself thanking you guys over and over again once I've put a really nice in-frame tank - that I made myself - into my bike. Excellent educational post, gentleman!
 

silverbear

The Boy Who Never Grew Up
Jul 9, 2009
8,325
670
113
northeastern Minnesota
We made good progress today in Tinsmith's workshop. The parts arrived... sent from Germany to Fasteddy in British Columbia and then on to me in Maryland. You can tell at a glance these parts were not made in China.

Of immediate importance was the shift rod, needed to determine where to position the shift lever housing on the gas tank.

First off Dan wanted to make up the top tank hangers. We thought about doing them in brass, but what we have felt too flimsy, so we went with more stout steel which I'll paint red to match the frame. I forget what gauge the steel is... stiff, but capable of bending by hand with some effort.

Dan first made a little prototype out of tin to serve as a pattern, wanting to get the length of the U portion right. With that determined he bent two tabs out at 90 degrees. He made up a little bending jig using some round stock of the right diameter (you could use pipe or a chunk of bike frame) with a thick piece of flat stock behind it to act as a stop for the tab. These pieces are held firmly in the vice. Using both muscle power and something like a chisel (but not sharp) he bent the hangers and then drilled them for bolt holes.

We have decided to use just one hanger from below as all it needs to do is stabilize the tank. That will come later when it is time to close up the bottom of the tank.
(cont.)
SB
 

Attachments

Allen_Wrench

Resident Mad Scientist
Feb 6, 2010
2,784
26
36
Indianapolis
Very very nice..... i think ill be copying that jig
It's a pretty simple method and works great if you plan ahead a little bit. That's how I make steel hangers. Dan's probably been doing it longer; I still have to play around a bit to get things lined up right and do a bit of tweaking at the end.
 

silverbear

The Boy Who Never Grew Up
Jul 9, 2009
8,325
670
113
northeastern Minnesota
While Dan was making the tank hangers I made up the shift lever from a tracing Fasteddy sent me. I traced it out onto a piece of flat steel, cut it out with a hacksaw and finished the shaping with a grinder, a belt sander and finally the dremel tool cutoff wheel. It still needs to have a short threaded rod welded to the top end where the original wooden shift ball will go. At the bottom end a throttle ball (also known as a ball stud) will go as the connecting point for the socket on the shift rod. The shift lever will be painted black when all is done.
(cont.)
SB
 

Attachments

  • Like
Reactions: Nightster

silverbear

The Boy Who Never Grew Up
Jul 9, 2009
8,325
670
113
northeastern Minnesota
I'm very pleased with the way the tank is turning out. After some cleaning up of the excess solder and a going over with fine steel wool, it has a nice warm look I think. It rings my bells anyway.

The shift lever connecting rod which goes to the transmission is way too long, so we will shorten it and give it a slight dogleg bend so it clears the gas tank more easily and remains parallel to the side of the tank where the shift lever will be mounted.

We decided that is the stopping point for now. We'll make up the shortened rod and then mark the spots where holes will be drilled for the bolts which will hold the shift lever housing in place. To the inside, brass acorn nuts will be soldered in place. The lever will get mounted pretty much where you see it held in place in the photo. I think it's going to look good and be in a comfortable position to reach down and shift gears.

See you next weekend in the Tinsmith's shop...
SB
 

Attachments

  • Like
Reactions: Nightster

MEASURE TWICE

Well-Known Member
Jul 13, 2010
2,752
1,240
113
CA
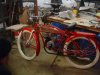
This bike your making is quite classy and looks near finishing time is soon!


I have made progress on my build, but have got under the weather the last few days, and I don't mean rain and wind. I actually took time to go wind surfing when that happened as there is not the usual thermal winds in the winter to go sailing.

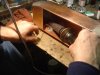
I have a jackshaft that I will rearrange to use a 10 inch pulley in place of a 2 inch pulley and with the same one the rear wheel have 25:1 and should be able to go with clutch engaged at 5mph for parade stuff.

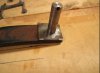
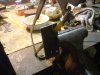
I have thought of making curved brackets like you tank holders, except that where I want to use them is on the inverted U-shaped tube for the banana seats sissy bar.

I know they must use tempered or very stiff metal on these as they are for clamps that have to hold the weight of the person sitting on the seat divided by the two tubes that clamp by the rear drop outs.

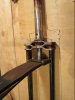
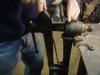
What I want a couple more pairs are for adding a way of holding the exhaust tube and muffler out under the banana seat and the rear tire. There is enough room for this and only time will tell if it is not, by both the seat too hot or rear tire affected.

I also found that a leaf screen meant for the down spouts on rain guttering fit nicely over the muffler. It would be in case I would accidentally touch it. The corrugated exhaust copper tube I will also think of maybe some guard although it is more out of the way.

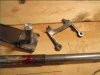
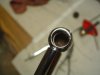
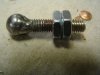
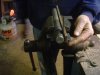
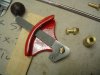
I found some electrical clamps that will support the light weight of the muffler and guard screen on the ½ inch sissy bar tubes. I wanted these electrical clamps to be ones that could be a little more beefy that could support more weight part of an art cover for the motor bike that comes after the bikes done.

I checked and found that I can buy a pair of these in chrome to use, but they are quite expensive with shipping and all. I could for the same price buy another sissy bar minus the banana seat to get two more clamps at a local bike shop.

If I could get extras fairly inexpensive that some one knows a source of let me know.

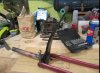
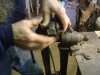
I think though I can try heating strips of metal and making a jig like you have done, only that I won’t put my thumb on the glowing metal to press it around a form!

Immersing in water I can try to get temper back into the metal. My cover for art cover made to be installed and removed will have to be light weight, so thin flexible wood or composite may be even OK with the electrical clamps I got.

There will be many more points I be attaching it to which will distribute the weight evenly. Those other points I will probably MIG weld some metal that I can bolt a cover on to.

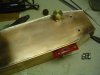
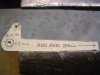
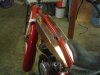
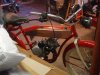
For the Hiawatha, I like the looks of the gas tank in copper and I think the aging affect when it darkens is OK for the bike color red of the frame that surrounds it.

MT

http://motorbicycling.com/showthread.php?p=358006#post358006
 
Last edited:

silverbear

The Boy Who Never Grew Up
Jul 9, 2009
8,325
670
113
northeastern Minnesota
Curtis Fox has sent me some photos of progress on the leaf spring fork for this build.

Photo #1
"Working on them. I got a piece of 7/8 coldroll and use it for fitting inside the tube,helps when streighting. Silverbear, your fork was not bent at the top but at the legs. As you can see I have a clear spot on my bench and laid it out and double checked all directions gotit as close as I could,almost perfict. I even took the time to take my big vice apart and fix it and bolt it down,C-clamps held it before. When streighting the fork I found that I will have to get under and bolt the bench to the wall in back,tips up when you pull hard."

Photo #2
"This is the neighbors idea to make the little stub shaft to fit up inside the fork. If you go back to the first oicture you can see a cross driled hole that will be welded full to hold the stub shaft.."

Photo #3
"A little better idea and you can see the cross driled hole,also the little side tabs I put on to hold the spring from turning"

Photo #4
"A little God sent merical I droped it and it broke the metal that came with the spring. It was soft enough to drill but high in carbin and cristalized after weld. So I made some new plates now they are flat were the others were curved,thats ok because the spring was curved to low and I was going to cold bend them. My neighbor said I could just hit them on the back side on the anvile and they will bend the other way. Never to old to learn. So now will dig out my anvile and go to it. Sure haveing fun great learning new stuff ............Curt"

(cont.)
SB
 

Attachments

silverbear

The Boy Who Never Grew Up
Jul 9, 2009
8,325
670
113
northeastern Minnesota
Photo #5
"Getting closer all welded up,that part done. Now to the bottom and the pivits. ............Curt"

Photo #6
"This is how the spring mounts and you can see it bowes down to much by beating I can make it streighter ...............Curt"


Thank you Curt! It's coming along. Can't wait to see the bottom portion.
SB
 

Attachments

silverbear

The Boy Who Never Grew Up
Jul 9, 2009
8,325
670
113
northeastern Minnesota
Gentlemen,
Thanks for the nice comments. While the gas tank portion of the build is coming closer to being done, there are a number of small things which need attending to before firing up the engine for a test ride.

Then there are things to finish up on the sidecar, mounting the body to the sidecar frame.

This build was intended to be a convertible in being able to use the bike as a two wheeler, with a removable sidecar and with an interchangeable alternate tri-car front end. This has been a long term project and will be ongoing for some time, at least until autumn of this year and maybe longer. Right now my focus is on stage one, the build as a light weight motorcycle/ motorbike. I expect to own and ride this bike until I am too old to ride anymore and then to pass it down to my son. I'd like to think it will be around for a long time to come, so I want to do as good a job as I can.

Thanks again to Curt and Dan and Steve for your contributions. You guys are the best!
SB
 

silverbear

The Boy Who Never Grew Up
Jul 9, 2009
8,325
670
113
northeastern Minnesota
Once again Dan & I made some progress on the tank today,but did not yet close in for the kill. All that's left is the bottom plate, but we wanted to go for a bike ride this afternoon and managed to beat the rain and then snow, but it was a mighty cool ride.

Dan's welder friend at work made the ball stud after work one day in about five minutes. He fished a ball bearing out of his tool box, measured it at one thousandth under the size of the socket, put the bearing in a vice, held a 6mm threaded rod against it with one hand and welded it into place. A wee bit of filing by Dan and we now have a ball stud. These guys amaze me.

By the way, once you put the ball into the socket there's no getting it out again without a special tool made for that purpose. I already put one of the socket couplings on the transmission end, so will not do a test fit on the other end... until it is ready to stay in place.

We used a section of 6mm all thread for the test rod, which I bent a bit and we now have a model for the chromed version to be cut off of the stock rod and then threaded. We drilled the mounting holes for the shift lever housing and soldered the acorn nuts inside. We discussed whether or not the two mounting holes would hold the shift plate securely enough, not knowing how much force will be required to shift the transmission. Se we decided to change the mount by abandoning the upper hole in favor of one to each side above, making a triangular bolt pattern which will be stronger than one hole directly above the other.

Dan also made up the single tank hanger for the bottom side. I'll get it and the top hangers painted this week while Dan intends to make up the threaded end of the shift lever to accept the wooden ball. That will leave just soldering the plate on the bottom to finish sealing up the tank. Everything takes longer when you try to do it right and only have a couple hours each week to work on it. Still, each Saturday sees us closer to finishing things up enough for a test run. See you next Saturday in the Tinsmith's shop.
SB

I tried to find a cable kit at Walmart today, but I guess they no longer carry them. Too bad as they were only $5.00 for a kit that included front and back brake cables and shift cables, too. Pretty soon I'll need them, so will try the hardware. Bike shops are last pricey resort.
 

Attachments

  • Like
Reactions: Nightster

harry76

Well-Known Member
Apr 16, 2011
2,557
47
48
Brisbane, Australia
Looking good Silverbear, that will be one of the best built and nicest tanks around.

Do you plan on leaving the tank as is, or maybe pinstripes or bike name/brand on side of tank?
 

silverbear

The Boy Who Never Grew Up
Jul 9, 2009
8,325
670
113
northeastern Minnesota
Harry,
Thanks for the compliment. I will again remind everyone that I am the helper and Dan's The Man. We're both pleased with how it is turning out. I can see that there will never be a lot of copper gas tanks around and for that reason it is worth the expense and effort in making something different and special.

Correction: I said we drilled holes into the side of the tank for mounting the shift lever housing. Not so; we used Dan's punch which makes for quick, accurate holes. A drill bit would work of course, but the punch is slick.

No paint or decals on the gas tank... just copper. The brass head badge says Indian on it, the fender ornament says Hiawatha and on the back of the sidecar it has a 1940's Indian script water decal. That's enough identification. I'm still not comfortable with the red color of the bike, but will wait and see. It is awfully flashy for this old fellow. I keep coming back to thinking that grey would be nice, understated and more in line with my nature. Grey with some pin striping maybe. I think that would look classy. Time will tell, and right now I'm more interested in getting this build on the road. I want to hear that engine and then feel it pulling the bike up to speed from a dead stop... put in the clutch, shift it into second gear and let her rip. Woohoo!
SB
 

curtisfox

Well-Known Member
Dec 29, 2008
6,048
3,960
113
minesota
Today 6am flash back how far out from the fork is the ornament? I was wondering if it would clear the leaf spring...........Curt
 

silverbear

The Boy Who Never Grew Up
Jul 9, 2009
8,325
670
113
northeastern Minnesota
Today 6am flash back how far out from the fork is the ornament? I was wondering if it would clear the leaf spring...........Curt
Curtis,
I have no idea and can't check until next weekend. I can't imagine there would be any interference, but will run a measurement when I can. How's the fork coming? Snow here in Maryland yesterday and this morning... big flakes drifting to earth in slow motion reminds me of home in Minnesota and got me wondering how you're doing. Nostalgia aside it sure is nice not having to shovel off roofs or plow the road. I'll leave that to you, my friend.
SB
 

silverbear

The Boy Who Never Grew Up
Jul 9, 2009
8,325
670
113
northeastern Minnesota
Try K-Mart for cable pack, they carry that here...

But I think it might be $6

-Kirk
Aha... will keep that in mind. What a miser I am. There's also a Pep Boys about the same distance away. Haven't been to one of those since I was a teenager. Be fun to wander around looking at mechanical candy, another man store. They should have bike stuff, too.
SB
 

Whozawhat

New Member
Jan 15, 2012
214
4
0
Canada
I just finished reading this entire thread and I must say WOW very nice. I am glad I caught up on this build.
 

MEASURE TWICE

Well-Known Member
Jul 13, 2010
2,752
1,240
113
CA
That ball and socket part, where is it used in this build? I am not sure if you have some other parts that have yet to be made to utilize it on the bike.

About cables, I will have to check if online or at the stores you mentioned they have the whole sets for less than the average bike shop. I have a few rummage parts type places where I am. One thought I found out they don't allow you to look for stuff in the parts yard, but the other they do. Even with that I found today a regular mtn bike I have trash picked and fixed up, I thought I needed a new shifter at the handle bar.

I checked all books at the library and Shamino pdf files. They all say no user serviceable parts on my type of shifter. The two lever on each shifter type for the 3 and the 8 shift 24 gearer had the 3 not going but 1 an 2.

The guy at this one bike place told me he could adjust both of them for $20 and I was going to have him do it since I could not get a brake shifter integral type just the same as I have on the bike for the $14 part I found online.

I was going to opt for this, but he said tomorrow morning. It’s supposed to storm then, so I said OK, but actually was trying lubrication the shifter and found this spring had one end come out of place and was half working because of it. I simple put it back and tightened it down and went riding in the park an hour before sun down.

I think back when I explained what I heard that there are no user serviceable parts in the thing and the bike shop guy said he could do it. I was sort of leaning toward asking how can I fix it myself, but that is not his business. He said that I'm an amateur and that he could fix it though.

He was testing bikes he fixes up and trys them out on the street. He saw me again and I told him I fixed it. I was going to return a seat post I bought from him and could not use with the shim I had for it and he was going to allow the return of the seat post and put it toward the work I was going to have him do.

I figured I come back another time to return the $5 seat post part when I have some need some other part and get credit for the seat post toward something else. I decided later though as maybe I being a do it yourself repair type, and only wanting parts may have him irked. Let it be another day and see how it goes:)

MT