Indian Hiawatha

GoldenMotor.com

silverbear

The Boy Who Never Grew Up
Jul 9, 2009
8,325
670
113
northeastern Minnesota
Whozawhat,
Thanks for the nice compliment. That's a lot of reading as this thread is getting long.

MT,
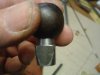
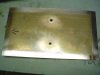
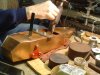
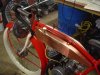
The ball and socket have to do with the means of shifting the two speed transmission built into the engine. On the engine is a ball stud and on the shift lever there is a corresponding ball stud, or at least there is supposed to be. My engine was missing a few things like cable guides and parts of the shift lever mechanism. I had the shift lever housing, but no shift lever and no connecting rod. On the bottom end of the shift lever is where the ball stud goes.

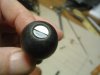
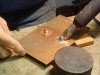
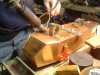
Now the lever is made, but finding a ball stud (also known as a throttle ball) was not working out. I tried NAPA and looked online without luck and figured I would need to take the socket with me to a carburetor or speed shop to search for one. Such a small and seemingly insignificant part, yet essential. I was mightily impressed with the ease Dan's freind made the needed ball socket in five minutes.

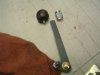
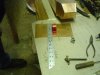
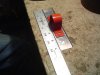
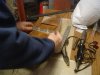
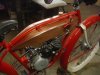
A connecting rod with sockets on each end pressed onto the ball studs permits the lever to control the transmission. The connecting rod purchased from Germany is almost twice as long as it needs to be for my build, so we made up a rod from all thread of the right length and bent it slightly to dogleg around the bottom edge of the tank. Later on we will use that as a model in shortening the chromed connecting rod from Germany... cutting it off to length, cutting new threads into the cut off end and bending it slightly. Another portion of the connecting rod hardware has a stiff spring inside to assure a positive engagement of the gears. The engine has a wet clutch and the shift lever housing is gated. The last thing I want to do is screw up this transmission, so a lot of care is going into this shifting business. In the end it will be worth it.

Unlike your situation, I don't have rummage places available to me and generally find that bike shops either don't have what I need for a motorbike or are priced pretty high for an old guy on a budget. It's always good when you can solve a problem yourself or come up with a part from your own "stuff".
SB
 

curtisfox

Well-Known Member
Dec 29, 2008
6,048
3,960
113
minesota
Curtis,
I have no idea and can't check until next weekend. I can't imagine there would be any interference, but will run a measurement when I can. How's the fork coming? Snow here in Maryland yesterday and this morning... big flakes drifting to earth in slow motion reminds me of home in Minnesota and got me wondering how you're doing. Nostalgia aside it sure is nice not having to shovel off roofs or plow the road. I'll leave that to you, my friend.
SB
Awesome here got up to 40 degrees yesterday I took a break and went up to the lake and did some work on my coverd bridge,sun shinning,but now back down to normal 20 dagree range for a week. I have only used my snowblower twice so far this year and only in town.No need to at the lake it seems to warm up and setal so candrive over it. Got the anvile dugout and raised up so now can beat the springs strieght and continue..........Curt
 

silverbear

The Boy Who Never Grew Up
Jul 9, 2009
8,325
670
113
northeastern Minnesota
Curtis,
The measurement you wanted is eleven inches from the head tube to the end of the headdress on the fender ornament. There should bbe plenty of room for the leaf spring.

Dan & I made good progress on the tank today, effectively finishing it. First photos show the piece Dan is making up for the top end of the shift lever. The squared off lower portion will have a slice taken out in the middle... a groove which the lever will fit in to and then be welded.

The bottom plate needed to be cut to size, holes drilled for the lower hanger and acorn nuts soldered to the inside of the plate.
(cont.)
SB
 

Attachments

silverbear

The Boy Who Never Grew Up
Jul 9, 2009
8,325
670
113
northeastern Minnesota
With the bottom plate cut to size and the acorn nuts soldered in place to receive the lower tank hanger we were ready to solder the plate ... once we figured out how to hold it snug while soldering.

Dan wanted the plate to the inside so the flanges on the sides would be exposed and he could be sure solder had flowed into the union. but how to hold it up? He made up a U shaped brace and drilled two holes in it so that he could use the acorn nuts to pull against.

This pulled the central area up nicely, but the ends had gaps. We needed something there to pull against, too. The answer revealed itself after some serious staring, with two simple temporary tabs soldered into place. They worked nicely
(cont.)
SB
 

Attachments

  • Like
Reactions: Nightster

silverbear

The Boy Who Never Grew Up
Jul 9, 2009
8,325
670
113
northeastern Minnesota
Once the corners were soldered we removed the temporary tabs, continued soldering up to the central bracket, removed it and finished it up.

This week I'll check for leaks using alcohol, but we don't expect any as it looks good. We made four tanks for the cantilever Schwinn last winter and none of them has leaked. So far, so good.

The last photo shows the shift lever (minus knob) attached to the housing and you can also see the shift lever connecting rod coming up from the engine's transmission to the area of the shift lever ball stud.

And that's it for the gas tank. I couldn't be more pleased with the results of Tinsmith's work. For a guy who was winging it in making this tank and who's expertise is not really in working with copper... well done sir, and many thanks!

See you next time in the Tinsmith's shop where I'll get to work on cables and such. Fasteddy has ordered the Aeroshell motor oil and perhaps sometime next month the engine can be started up for a test run. I'm also looking forward to painting the rims red to match the frame and mounting up the leaf spring front fork. Boy, is that going to look good.
SB
 

Attachments

  • Like
Reactions: Nightster

harry76

Well-Known Member
Apr 16, 2011
2,557
47
48
Brisbane, Australia
The tank is looking awesome, and i kinow you may not have thought this far ahead, but i think the tank would look 100x better if you did some red pinstriping or maybe a red scallop on the front of the tank.... i think it would tie the tank to the build a little more
 

silverbear

The Boy Who Never Grew Up
Jul 9, 2009
8,325
670
113
northeastern Minnesota
Harry,
The knob is original and came with the engine. The lever was missing, but it's nice to know that the ball has some history.

I don't know if I'll do anything more with the tank. First I need to finish cleaning it up and then I'd like to see how it looks as the copper takes on a patina with weathering. I think that alone may help it jump out less and kind of visually blend into the bike. I'll no doubt be fiddling with this bike for some time and if I decide it wants a decal or pin stripes then it will get them. Thanks for the suggestion.
SB
 

Tinsmith

Well-Known Member
May 15, 2009
1,056
259
83
Maryland
It's lights out on this end. Thanks for your interest and support in what we are doing. It's great being able to work with SB and have input from people to help us along.
Dan
 

curtisfox

Well-Known Member
Dec 29, 2008
6,048
3,960
113
minesota
COOL.... what is your shifter ball from? Im always on the lookout for one for my bike but they always seem to be the wrong size :-(
Looking for nobs look at garden tractors they have all kinds of different size shift nobs..............Curt
 

curtisfox

Well-Known Member
Dec 29, 2008
6,048
3,960
113
minesota
Silverbear I just went out in the garage and measured from the fork tube to the end of the spring is 11" But the head tube is 1 1/2" a 1/2" bigger so it should clear by a 1/4" close? as it is now it fallows the fender curve I am going to dig out a front wheel tomorrow and test fit and see were its at with a fender on. Will take s picture and post it to you..........Curt
 

harry76

Well-Known Member
Apr 16, 2011
2,557
47
48
Brisbane, Australia
Looking for nobs look at garden tractors they have all kinds of different size shift nobs..............Curt
Theres a knob that looks about the right size on the Cat loader i drive at work, but something tells me my collegues may notice it missing LOL.

I havent gone as far as looking at buying one, but i just know one will cross my path at work soon.
 

fasteddy

Well-Known Member
Feb 13, 2009
7,454
4,920
113
British Columbia Canada
Harry,
Two words. Duct tape.

I'd use a square block of wood a little bigger than you want and a sander with fine paper on it. Maybe 120 grit. Put a wood screw into the center of one of the flat sides and turn it around on the spinning sander.

I'll see if I can show you what I mean in the next day or two. Big hint. Wear heavy leather gloves. The screw gets hot and some times turns around on you. Not nice.

Steve.
 
Last edited:

fasteddy

Well-Known Member
Feb 13, 2009
7,454
4,920
113
British Columbia Canada
Tinsmith,
Glad you said that about Silverbears voyage. :}

A true work of art by a craftsman. Silverbear and I talked about the tank this summer and we agreed that Silverbear would provide his idea of what he wanted and you would make it real.
You did indeed do that. Congratulations to you both on a wonderful job so well done.

Steve.
 
Last edited:

harry76

Well-Known Member
Apr 16, 2011
2,557
47
48
Brisbane, Australia
Harry,
Two words. Duct tape.

I'd use a square block of wood a little bigger than you want and a sander with fine paper on it. Maybe 120 grit. Put a wood screw into the center of one of the flat sides and turn it around on the spinning sander.

I'll see if I can show you what I mean in the next day or two. Big hint. Wear heavy leather gloves. The screw gets hot and some times turns around on you. Not nice.

Steve.
Fasteddy, you lost me there, what are we talking about again? Are you talking about the knob? If so ill have to wait to see what you mean