what did you do to your motorized bicycle today?

Put my cylinder back on my whizzer with enlarged ports and heat coatings applied to head ,valves etc...lightened piston with dry film lubricants on the side ,thermal coating top....it's a bad puppy. Thankyou Mason man
 
Nice... looks like a good riding setup...

yeah, the guy that bought it liked it (still has one payment to make on it) - he wondered about longer, wider bars so I may trade him my long-horn pull backs off my moon dog bike (bars are comfortable for cruising, but have to pull stomach in to make a sharp turn)
 
Got the specialized full suspension frame stripped down to bare metal and the first coats of fresh paint applied before leaving the shop tonight, on the new roadbike, got it fully together and front brake set up and adjusted, I gotta say it's nice and strong for a rim brake, still need to pull rear wheel off and flip around so I can have the freewheel on the pedal side then I need to connect the rear sprocket to the fixie side, after reading and seeing how others have added the rear sprocket on the fixies I've decided to drill thru both sprockets and bolt them together with 6 bolts in the typical 6 bolt disc brake rotor pattern so I can use spacers or shims to get the best sprocket alignment. I'm gonna keep this bike simple but fast...
I also aquired another mountain bike today for like $20 but it's going to need a chain, new tube and tires, and some cleanup before it's ready for an engine, overall is in good shape but needs a little tlc so it's on the back burner until I get the other 2 bikes on the road.
for the stingray I'm just putting that one on hold as well until I get more time to spend on the frame, I got all the parts to make a complete bike there too but decided to do a few things different than originally planned... if I get that one on the road before this winter I'll be happy since I'm in no hurry to finish that one....
 
Pulled the cap off the exhaust on the ol' soldier & did a little more drilling. Some day I'd like to create a straight pipe for this bike just to see what happens. I also repositioned the air tank for the horn onto the lower left fork slider just to clean things up a bit.
I did a bit of polishing & planning to the current project and not much else. I am awaiting all sorts of stuff I don't just have laying around, including a wider axle for the rear wheel. Folks that don't bother answering inquiries force me to seek other sources, or even fabricate.
 

Attachments

  • 06122015 (7)4.jpg
    06122015 (7)4.jpg
    803.2 KB · Views: 157
Just finished staightening and truing my wheel today, was pulling over to the left too much- now I lots more work to do. here is pic of my threaded hub, and adaptor plate. Threads right on to the hub.
 

Attachments

  • wheel 001.jpg
    wheel 001.jpg
    180.1 KB · Views: 201
  • wheel 002.jpg
    wheel 002.jpg
    273.6 KB · Views: 160
im adding the white wire 6v to 12v adapter today and going to put the 5M light strip on my bike. going to be a light show on wheels LOL will post pics as soon as im done
 
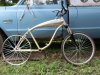
My bike uses the longer, offset manifold and is stock.
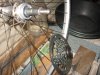
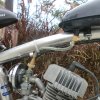
I'm doing battle with the screwy spraybar on a Dellorto SHA clone. It has this huge hole that is uncovered as you go past 3/4 throttle. Coincidentally the engine hits a rich blubbering trough right at 3/4 throttle. The lower hole is much larger than the carb jet and there is also an idle jet hole in the body.
The engine is geared so tall it will hit 30 @5700 rpm. No matter how much gas and air it gets this stock engine will never see 6500 rpm. I don't think the top hole is helping things.
I've been running a very small jet to keep it lean enough to wind out a little.

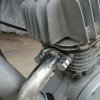
Today I went up a size on the jet and tried to solder the top hole shut. I did, but the solder was fouling the slide so it was picked off. Several attempts were made to flow it into the pipe, but it wouldn't do it right.
I mixed up a bit of JB weld and put a bit in the top hole. It's blocked. Forever. !

Now all the gas will have to draw through the slightly smaller mid range hole. I went up a jet size for insurance for the first test run tomorrow. (The JBW needs a little time.)

To fix a no-air-with-the-choke-on problem (it will hardly run with it on), I drilled out the choke plate air hole to 9/32". Can't hurt.

I'll find out tomorrow if the carb is now a paperweight, or not.

Havin some fun! ;)
 
Today I learned that ALL these brand new Chinese made engines need to be examined carefully, before installation!

My brand new engine kit, had 2 base gaskets installed from factory.

Ive learned that others have experienced cylinders that were installed backwards, and other engines with 3 head gaskets!
 
I added some fuel before heading out & then took the ol' soldier on out for a little cruise around my end of town. Stopped by the gas company & paid that bill and then just rode. The pleasure of this is that before I discovered this particular website simply cruising on that little sucker didn't happen. Now, I roll up to the local market and I'll have some guy lean out his window and ask "Hey, what does one of those cost?" usflg
 
wouldnt be surprised they work 12 year olds 11 hours a day no breaks for a whopping 15 cents a day what do you expect LOL
 
Had a stripped exhaust stud hole so I tapped out both holes to 5/16"-18:
Got a longer plug wire so I could mount the cdi under the engine:
Installed a small solid brass petcock to keep the fuel line away from the head:
 

Attachments

  • CIMG1137.JPG
    CIMG1137.JPG
    999.5 KB · Views: 182
  • CIMG1133.JPG
    CIMG1133.JPG
    1.2 MB · Views: 175
  • CIMG1134.JPG
    CIMG1134.JPG
    1.4 MB · Views: 1,857
Last edited:
My carb was heat soaking so bad it warped the bowl on my RT carb and I had to put the NT back on for now. It was sitting at too much of an angle on the short intake so I made a 6 inch piece of hose and angled it to the side of the seat tube. A quick test ride and the mid range felt stronger than ever ha ha. I also did more research and part gathering for my 4 stroke.
 
Last edited:
I received & installed my wide three piece crank into the Skyhawk frame I'm using for my current project, then realized it is tapped to receive 1 piece crank pedals. I had a couple of sets of nice, steel pedals tucked away for this. Unfortunately, they will not fit this crank.
I am a trifle surprised.
 
Just got done painting my frame, forks, and rims.

Found some point called Montana spray paint. They have some awesome colors to pick from. I went with a slimer green for the frame and forks, electric blue for the rims, and automotive orange for my hub adapter. The parts are in my garage drying now. Pictures will soon follow.....
 
i use the duplicolor metalcast paints and there regular engine paints all the time there great paints for these engines try the universal chrome they have its the BEST CHROME PAINT I HAVE EVER USED also try the clear effex paint its a prysmatic paint that will turn you paint job into a rainbow paint job and ive been painting for a loooong time i use to paint hot rods for the autorama here in detroit check out www.scarryfnlarrys.com
 
My Skyhawk frame is now a (barely) functioning ride. Tires, tubes, & front wheel arrived the past couple of days. I created a rim strip from an old tube, got everything mounted, replaced the rear axle with one that gives me some room, & dug through parts until I found a seat post, chain, and a unmatched set of pedals.
I've almost forgotten what it's like to use a coaster brake! Definitely some refining to be done, but the bicycle is here. Pretty soon it will be time to begin on the motor-bicycle.
 
Back
Top