
You are using an out of date browser. It may not display this or other websites correctly.
You should upgrade or use an alternative browser.
You should upgrade or use an alternative browser.
Sidecars?
- Thread starter mick29
- Start date
silverbear
The Boy Who Never Grew Up
Ah man, I know you're trying to be stoic and make the best of it, but what a disappointment. Will the present sidecar wheel then be your brother's front wheel? Does that have some kind of brake on it?
SB
SB
corgi1
New Member
Corgi1, I thought about that for a while but I'm wondering about having to keep two throttles at the same speed and what would happen if I didn't.
Steve.
Power to one side or the other would stear the bike ,I think I have heard that both motors can be on the same controller too (less amp imput for the same HP output climing hills and taking off)
cinelliphyle
New Member
I want badly to show you all my side car build but am a computer idiot and cant seem to manage the task. I am certain you will love my side car bike as well as my other unique builds.
BarelyAWake
New Member
cinelliphyle - don't let that slow ya down, we love pics here ") These links may be of some help;
These links may be of some help;
http://motorbicycling.com/f15/how-post-pictures-61.html
http://motorbicycling.com/f15/how-resize-post-pics-using-photobucket-13551.html
http://motorbicycling.com/f15/how-resize-post-pics-using-picasa-13741.html
These links may be of some help;http://motorbicycling.com/f15/how-post-pictures-61.html
http://motorbicycling.com/f15/how-resize-post-pics-using-photobucket-13551.html
http://motorbicycling.com/f15/how-resize-post-pics-using-picasa-13741.html
cinelliphyle
New Member
cinelliphyle
New Member
cinelliphyle
New Member
Here is the flyer for an event I organize up here in Washington every year (with lots of help). The artwork on the flyer is my own.

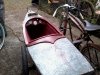
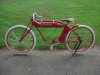
I've posted a few photos of the new frame attachments for the Monark and sidecar. I wasn't happy with the way I had it before and a quick and very short ride was enough to prove it.
Image hosting, free photo sharing & video sharing at Photobucket
I built a whole new mounting system that I think makes it safe and easy.
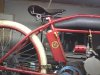
I used scrap from an old tent trailer. The down piece is tied to the seat and chain stay.
I welded a short piece to this so it ran along the chain stay to just short of the rear wheel nut. I would recommend using channel iron or have a sheet metal shop bend some channel for you. It will be worth it.
I cut the sidecar wheel mounts out of the old frame and welded them into some bent angle iron from Home Depot because the frame needed to be lighter.
The frame was built like the old one so I didn't take photos of it.
The only difference other than the sheet steel angle iron was that it was welded into the piece of metal running along the chain stay.
Make sure that the metal you use is wide enough to drill holes for the U bolts to hold it on to the bike. Center the metal on the chain stay because it has to be clamped there and the chain stay must be in the middle.
Yep, that's how I found out.
I cut three, 3" lengths of 1-5/8" outside diameter water pipe to hold the frame to the seat and chain stays. I cut about a 1/2" strip out of each side so when I was finished it looked like a clamshell.
I used water pipe instead of exhaust pipe because it is stronger and wouldn't bend.
Then I cut two donuts out of a hockey puck to fit inside each piece of pipe with a hole saw and drilled a hole in the center of them to fit the seat and chain stays.
Put the donuts on the stays, then the pipe halves, then put the muffler clamp on { both pieces } and then slide the mount over the threads on the muffler clamp and then put the nuts on and tighten it down.
I taped the pipe halves in place so they couldn't move while I put the clamp on them and the mount.
Two on the chain stay and one on the seat stay.
I cut a thin angled piece of wood to make up the angle on the two stays. You can see one of them in the photos I think. I left it unpainted so it showed up.
On the front I cut a clam shell of pipe out of 1-3/4" water pipe 4" long to fit the down tube and 3 donuts.
On one half of the clam shell I welded a 4" length of 3/4" water pipe across it. Drill 4, 1/4" holes. On all of these I welded nuts to the pipe so that the bolts could be tightened down.Turn a nut on the bolt, put it in the hole and weld the nut in place.
To make the brace cut a three foot length of 3/4" round bar in the middle on a 45 degree angle. Weld it at a 90 degree angle. Weld a small brace into it to add strength. I didn't think of it at the time but 3/4" rebar might be cheaper and easier to find.
On the frame drill a 3/4 inch hole in the front corner and weld another length of 3/4" bar. I used 3' with half in and half showing.
Take 2, 6" sections of 3/4" water pipe and weld them into a cross. One on top of the other with equal distances showing. I drilled 4 holes in each pipe and welded nuts and bolts in each one.
Slide the cross shaped pipe on the frame bar then slide the 90 degree angle brace in the other half. Slide the top half of the down tube clam shell with the pipe welded on it on to the other end of the brace and clamp the pipe halves together with the puck donuts and two pipe clamps.
I had to go and get longer clamps from Home Depot since the muffler clamps were a bit to short for my liking.
I know this is long and drawn out but I'm going to weld the same mount up for Silverbears canoe sidecar so I'll take photos and post them. It will be a couple of days before I can get to it though.
If this is done properly you should be able to move the sidecar between bikes
just by drilling new holes. SB and I will find out very shortly wether I'm right or not.
If you stayed with me this long God bless you. Your a brave person indeed.
Steve.
Last edited by a moderator:
This is not my idea alone. I shamlessly stole it from,
Early Motorcycles
costruction,operation and repair,
By Victor W. Page.
I got the book from Amazon.com
Around $30 if I remember right and worth every penny so if your budget allows you to buy one, do so. The book is full of tips and information that you should know when your doing an old bike copy.
Steve.
silverbear
The Boy Who Never Grew Up
Steve,
The new mounting system looks great and solid. The whole rig is stunning. All of your hard work and head scratching has paid off beautifully. Boy, is that going to stop traffic!
SB
The new mounting system looks great and solid. The whole rig is stunning. All of your hard work and head scratching has paid off beautifully. Boy, is that going to stop traffic!
SB
Thank you Silverbear. As we have said I do hope this inspires others to build a sidecar.
What you use for a body does not matter. I've said this before and had PM's say that it was fine for me to say but look at the body you built. After a building reproduction antique furniture since I was 14 and 43 years of restoring antique furniture I had better be able to pull something out of the hat or I've wasted my life.
On the other hand I keep the photos of my metal work and welding as low key as possible so the pros don't see it and can get some sleep at night. I compensate by using heavier material and more of it with the hope that it works.
Give it a try. Use bed rails,used water pipe, old bike wheel for the sidecar and join us.
The only bad thing is the welding. I don't know of a way out of that.
Steve.
turtle tedd
Member
Fasteddy..as I have said before..That Sidecar Bike should be in a museum..But that can probably wait until you croak..Real nice build..outstanding
Image hosting, free photo sharing & video sharing at Photobucket
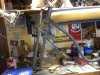
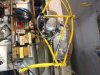
I cut and welded part of Silverbears sidecar frame build today. Thought I'd get the front brace and clamshell clamps done while I was here and near my tools.
Found out that you could add headings to the photos on photobucket so I have. Yes, I know everyone else knew about it but Steve and computers are rarely see in the same sentence and never in a nice way. Hope it helps.
Correction: When I said the pipes I used for the front sidecar brace were 4" and 6" that was the overall length of the pipe nipples I used. When the treads were cut off the bottom pipes were 4-1/4 and the top pipe was 2-1/2".
Silverbear and I should be working on his sidecar frame by next weekend. We will be posting as we go.
Steve.
Image hosting, free photo sharing & video sharing at Photobucket
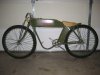
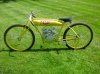
I have posted the photos of Silverbears frame build at long last. Very much like mine other than the top mount took quite a bit to figure out.
Creative staring while holding a cold can of Lost Lake did the trick and it was soon finished.
Other than the front end mount this build was made possible by Silverbears keen eye at the Ely town dump. Total cost for materials was $40.00.
Would have been $0 but no kind soul threw out any 3/4" rod though.
I found out Home Depot has 10' galvanized grounding rods in thier electrical section for $20. I paid $36 for 6' in the metal section without the galvanized coating.
Live and learn they say.
Steve.