Motorized Bicycle Take a Tip...Leave a Tip

GoldenMotor.com

Jumpa

New Member
Aug 12, 2011
607
2
0
Cape Cod
Simple tip that will save you a lot of hassle. The clutch cable spring (the smaller one, not the heat shield), just toss it and install without the cable. Will save you plenty of hassle. Also, use some WD40 on the cable innards.

Another tip, get a double brake lever and connect both front and back brakes to it. That way you engage both brakes with the same lever, leaving more real estate on the other end of the handlebar.

Cheers....
good idea except WD-40 is often misused as a lubricant when it s not.
It's main purposes is to remove moisturize and unfortunately will break down and remove what little grease a better use would be CLP lubricant on the cables WD-40 breaks down what little film may be on the cables from the factory eventually causing the cables to rust
 

CTripps

Active Member
Aug 22, 2011
1,310
1
38
Vancouver, B.C.
Simple tip that will save you a lot of hassle. The clutch cable spring (the smaller one, not the heat shield), just toss it and install without the cable. Will save you plenty of hassle. Also, use some WD40 on the cable innards.
I usually slide the cable from the sheath and put a thin coat of grease on the cable. Just get a small glob on your fingertip, and slide the cable through it between said finger and thumb. Work some extra in/on at each end of the sheath. Don't do it to the end of the cable where the cable stop goes on, though, or it'll be harder to keep it (the stop) from moving.
 

mr42ndstblvd

Member
Nov 10, 2013
53
0
6
oklahoma
for anybody who needs a clutch lever and dosent have time to waste a bicycle shifter thumb or grip shift works great its a lot harder to ride but if you need to get around it will work for ya i mounted a rear shifter from a 21 speed mtb on my bike and ran the "used" "rusted" cable to my clutch arm adjusted it and added the spring and it worked great its still on the bike today even though i sold the bike haha its also i cool mod if you dont have a locking clutch lever and you need to pedal around or move your bike in the garage because the clutch will lock in place by the shifter also a quick tip for the clutch cable spring junk the stock spring and get a firmer thicker one from home depot or lowes i fought with my bike forever trying to adjust my clutch to where it would fully disengage and push my lever back out turns out my spring just needed more stiffness
 

BoardTrackBomber

New Member
Nov 4, 2013
26
1
0
OK
I would like to share these few tips/tricks/bits of information that I have learned with my gasbike adventures so far. I'm sure some of these ideas or at least a variant of them have already been mentioned, but this is just what I've done and it flat out works.


Some of the clutch levers in the kits we've seen from our builds are very noisy. When you pull the lever to release the locking pin and engage the clutch, the pin would always make a loud, annoying metallic "TINK!!" sound... Well I grabbed my box of orings I had laying around and stuck the smallest one I had on there, doubled up so it would stay. The metallic noise is GONE! Nearly 100% silent now so that's good!
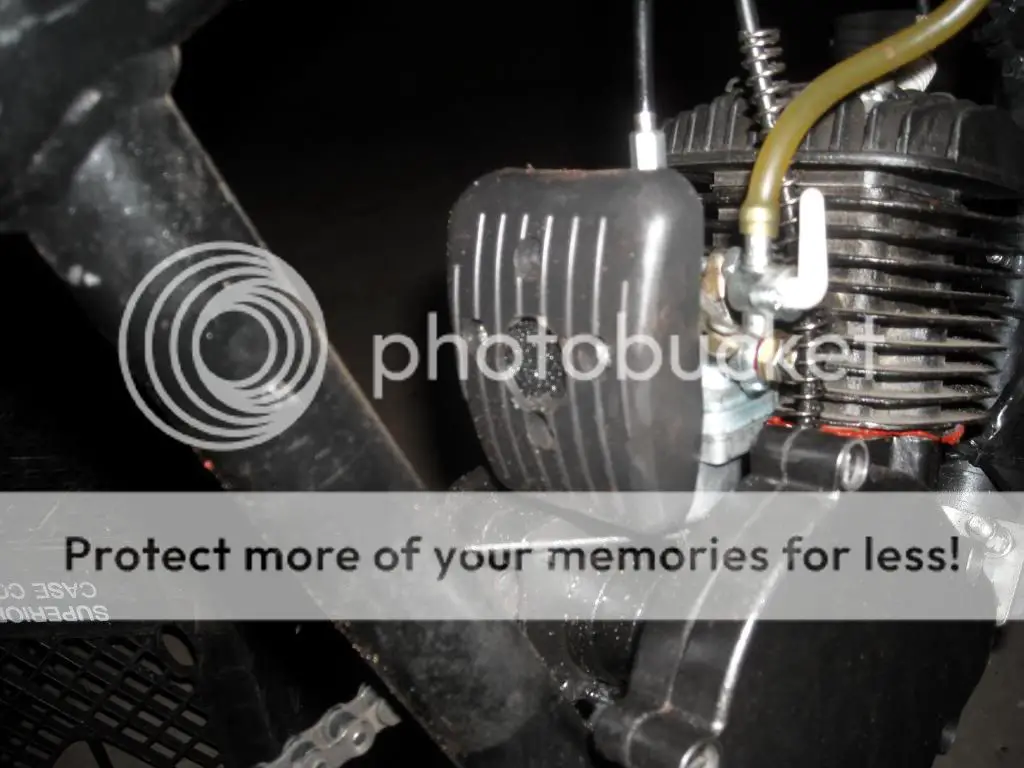

I know there is a lot of talk on modifiyng or outright replacing the stock air filter assembly. What I did to mine was drill a very large hole in the cover itself so that the carb can easily and efficiently induct all the air it needs and it still passes through the filter foam. I can actually feel the air flowing by my fingers when I put them there while the engine is running.
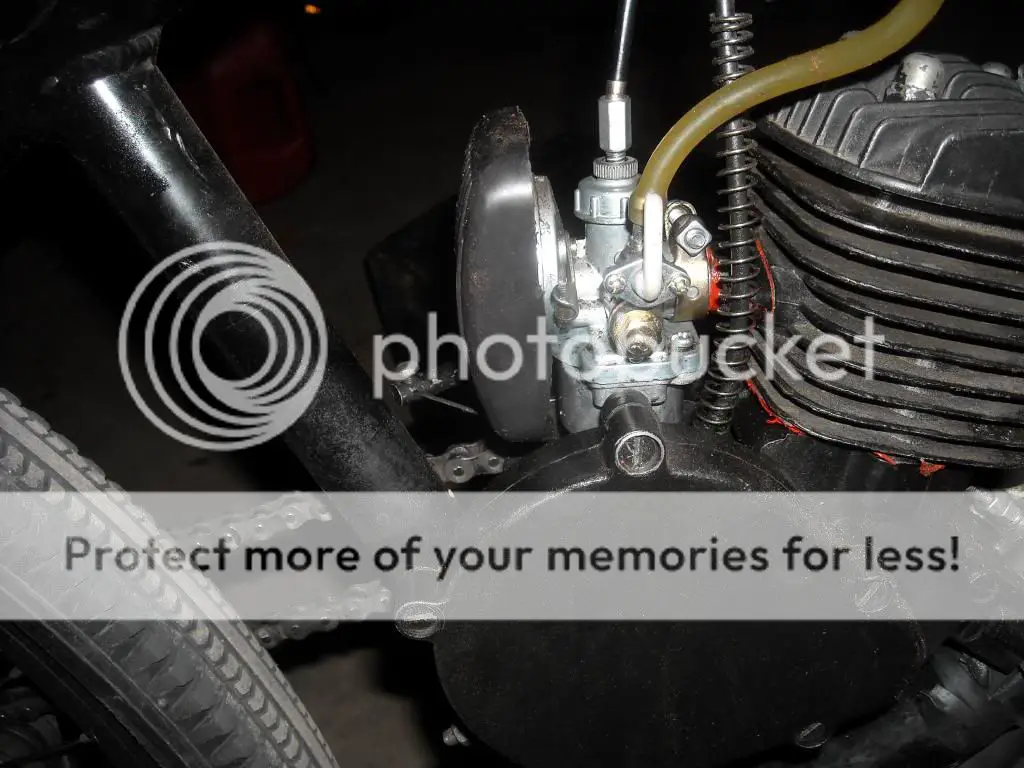

This one is more cosmetic, I just took a utility knife and trimmed off all the ugly extraneous plastic of the filter housing that would overhang the carb body. Looks much cleaner I think.
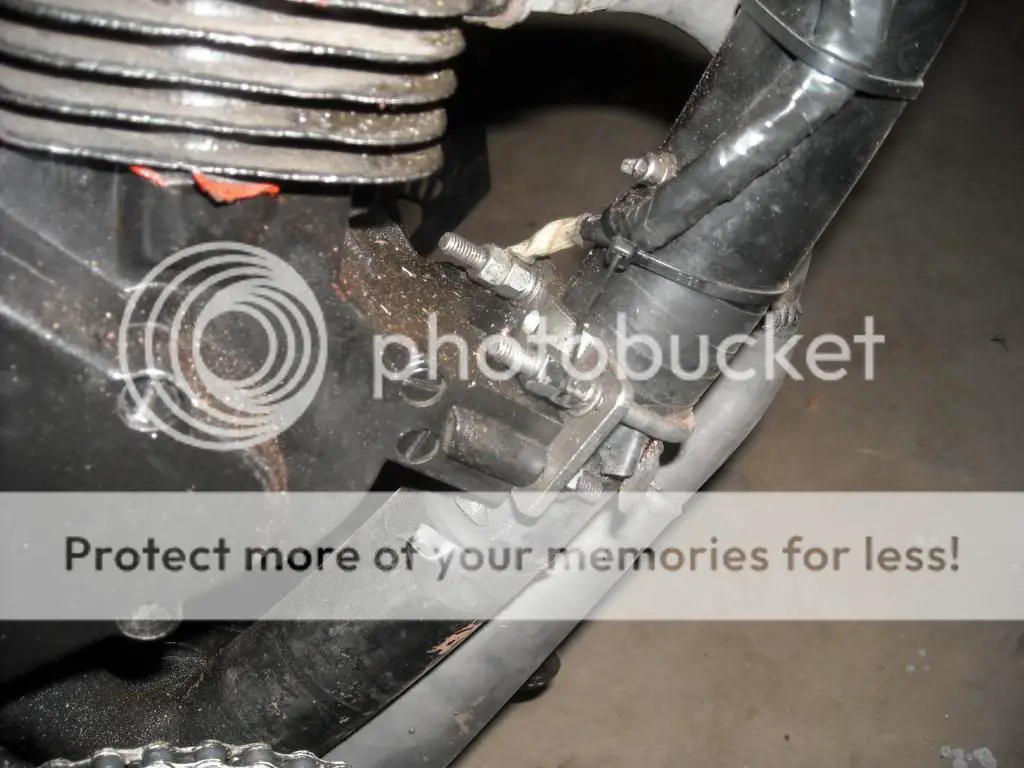


When I first built this 29er, I used the regular "C" shaped front mount strap with some longer bolts. No matter what I did here, the bolts ALWAYS broke. I had to use EZ-outs TWICE to extract the remains of two bolts that had broken off flush in the threaded hole itself. Then I noticed, wait a minute, these kits also have this other flat strap mount that bolts to the engine, and then is held to the bike frame by a ubolt. Not a big or complicated thing but still something to note. If you're motorizing a bike with a larger than normal down tube as is the case with this one, you definitely want to use this style mount, or even better perhaps, fabricate your own. Since I swapped to this style, no more broken bolts.
Which brings me to my final tip. I used to use loctite and lockwashers everywhere, but for some reason I still had fasteners vibrating loose!!! My solution? Again nothing new or groundbreaking but it works: double nut EVERYTHING. Everything you have the room for it I reccommend doubling up the nuts.
 
Last edited:

allen standley

Well-Known Member
Oct 22, 2011
1,126
238
63
Bangor, Maine
When you find your clutch arm is continually needing adjustment- and seems to be wanked way too far in to disengage- It may be a good idea to pull the 5 bolted clutch cover - and with a rubber mallet or the palm of your hand give the clutch face a sturdy thump! if it pushes in - pull off the small sprocket drive cover and make sure that nut is tight! This can shear your half moon (god forbid) at worse ruin your clutch shaft too. If the star washer is flattened do not reuse it. find another similar @ hardware store. This may be the only place where you would EVER use red locktite. .flg.
 

Jumpa

New Member
Aug 12, 2011
607
2
0
Cape Cod
Some of the bikes I've built over the years have the cables running along the top of the tank tube ive re-routed them Ive eliminated them however the best idea Ive had to deal with this is to use a screw from an old bake lever that has the slot cut in it First I cut some rubber tubing lay that out flat then I put 1 or 2 on each cable . One does it because I rest the tank on the welded cable mount near the gooseneck Th cable then moves freely under the tank between the screws and the tank stays snug even though the contact points are greatly reduced & the rubber helps from scratching vibration etc .I took a photo of a demo kinda brite "the flash went off" but if you look close you'll get the idea
 

Attachments

paintgun

New Member
Nov 17, 2013
90
0
0
Illinois
Here is a little tip that has been useful for me at times.

After measuring my front wheel I always write down the code on my speedo just in case it resets when I am out on the road and cannot remember what it was.
Now why didn't I think of that? Oh ya. You beat me to it. Thanks, Dave.
 

bluegoatwoods

Active Member
Jul 29, 2012
1,581
6
38
Central Illinois
Here's an easy and useful mod.

Choke.jpg

sorry about the poor quality photo. But it's a piece of aluminum strip cut to about 1 sq inch attached to the choke lever. I hope you can see how I fastened it. But even if not, you can figure something out.

This allows you to adjust your choke easily even with gloves on.

On an older bike of mine I arranged a cable and spring arrangement with a thumb shifter to open and close the choke. I liked it. But this is so much more simple and works just about as well.
 

slayer60973

New Member
Dec 24, 2012
96
0
0
West Michigan
This one's kinda anti theft/a-hole resistant. For quick release levers, take a couple paper clips and wrap then twist them around/through the hole in the end of the quick release if there is one around the front fork and rear frame tubes. I figured it might be handy cause most people don't carry wire snips with them. I'll upload pics in a little while. Ride safe guys.
Pics.

Tools needed, pretty simple http://s29.postimg.org/wd61gk8pj/20131212_115155.jpg

Un bend the paper clip and wrap around/through the lever and frame
http://s21.postimg.org/6zbtahtbr/20131212_115233.jpg

Twist it up and wrap the excess around the lever. I'd double wrap it justt in case. People can be heartless.
http://s11.postimg.org/fis7q1u9v/20131212_115402.jpg

And last but not least, my baby. She needs a name... :/
Been waiting for the top hat adapter for a month....
http://s10.postimg.org/i3yr3umax/20131212_115423.jpg
 
Last edited:

CTripps

Active Member
Aug 22, 2011
1,310
1
38
Vancouver, B.C.
This one's kinda anti theft/a-hole resistant. For quick release levers, take a couple paper clips and wrap then twist them around/through the hole in the end of the quick release if there is one around the front fork and rear frame tubes. I figured it might be handy cause most people don't carry wire snips with them. I'll upload pics in a little while. Ride safe guys.
When I'm putting my quick release wheels back on, I line everything up and snug up the axle nut/qr lever until it will just barely close by hand. Then I open it up, give the axle nut another half turn or so and swing the lever over. At this point, I need to slide the box end of my 14MM wrench over the lever and use it to swing the lever to the locked position. It takes a lot more effort to pull a wheel off that way (and I have no worries about ever having a wheel coming off trying to make it on it's own).
 

slayer60973

New Member
Dec 24, 2012
96
0
0
West Michigan
When I'm putting my quick release wheels back on, I line everything up and snug up the axle nut/qr lever until it will just barely close by hand. Then I open it up, give the axle nut another half turn or so and swing the lever over. At this point, I need to slide the box end of my 14MM wrench over the lever and use it to swing the lever to the locked position. It takes a lot more effort to pull a wheel off that way (and I have no worries about ever having a wheel coming off trying to make it on it's own).
That's good advice. but it's more for going into the store or some other place and not having to worry about someone loosening your wheels. :) like I said most people don't carry wire cutters. And it's hard as f to unwind a tightly wound paper clip with bare fingers.
 
Last edited:

CTripps

Active Member
Aug 22, 2011
1,310
1
38
Vancouver, B.C.
That's good advice. but it's more for going into the store or some other place and not having to worry about someone loosening your wheels. :)
You're welcome to try and loosen one of my wheels by hand if you want to. ;)

A hose clamp wrapped around the fork/chainstay holding the lever down can also make it a right pain in the derriere for someone to loosen things.
 

slayer60973

New Member
Dec 24, 2012
96
0
0
West Michigan
You're welcome to try and loosen one of my wheels by hand if you want to. ;)

A hose clamp wrapped around the fork/chainstay holding the lever down can also make it a right pain in the derriere for someone to loosen things.
Vancouver's a long ways from here, I'll take a raincheck. Lol, agreed on the hose clamps.
 

MEASURE TWICE

Well-Known Member
Jul 13, 2010
2,773
1,269
113
CA
Could internal to the hub be a breaker contact that opens when undoing the lever. Then a field collapse on the hidden high voltage coil that sets up a potential differential between frame (ground) and the lever being undone. Trouble is that the wrong person might be handling it.

There could be like wheel lug key for the special wrench and then even a thief with allen-wrenches might give up.

I have saved from an old vehicle the key and 4 lugs. I think I'll try my MIG out on them as they are steel and then who can steal?

MT
 
Last edited:

allen standley

Well-Known Member
Oct 22, 2011
1,126
238
63
Bangor, Maine
dance1Way too much thinking on this. replace the quick release with solid axles and Just lock up your bike. That's my suggestion on the topic for what it's worth.
 
Last edited:

MEASURE TWICE

Well-Known Member
Jul 13, 2010
2,773
1,269
113
CA
OK, yea.... a cable or chain that can go around immovable object and through the frame and both wheels.

MT
 

mirage

Member
Oct 31, 2010
79
0
6
england
how to make a vertical recoil pull starter, so that the pull cord is at 90 degrees, so you can start the bike while in motion and coming to a hill, this you cant do on the normal system, yes it is better if you turn the recoil housing one screw hole forward but it cuts the cord, i use steel cable on mine. SO take off the starter, draw round it on a piece of cardboard ie cereal carton. mark the holes ect, now move the starter on the cardboard round till it is the vertical postion, ie handle pull at the top. now draw round it again making an allowance for the new lugs, mark the holes again, cut it out, as a template, offer it up the the engine to check it is correct, now find a bit of ally sheet about 1/8 in thick, on nylon or plastic sheet, and make the adapter plate, then fix the stater two it, and you have a new perfect position starter, i will tell you how to fasten the steel cable to the pulley, with a simple nipple trick no one has thought of.