
You are using an out of date browser. It may not display this or other websites correctly.
You should upgrade or use an alternative browser.
You should upgrade or use an alternative browser.
Motorized Bicycle Take a Tip...Leave a Tip
dodge dude94
New Member
Surface prep also plays a huge part. I've been painting my project truck and had some issues with the paint crinkling on the tailgate. Turns out I had not let it dry well enough before acetoning and shooting clear...then base since I had to fix it.
Make sure everything is clean and properly dry. When shooting primer, I like to let it cure overnight before I shoot my base. Probably not entirely necessary, but when you're doing entire body panels on a pickup, it takes a long time. lol
Make sure everything is clean and properly dry. When shooting primer, I like to let it cure overnight before I shoot my base. Probably not entirely necessary, but when you're doing entire body panels on a pickup, it takes a long time. lol
dodge dude94
New Member
I have the same issue when I use acetone it seems. I just try to brush it off before shooting my primer or base.
hotshots22
New Member
My Tip: Removing the Coaster Brake
Yesterday I removed the coaster as it been a problem from the start. First couldn't get around the new 44t gear.. 2nd couldn't make a bracket to hold the new bent arm.. 3rd Make bracket and it broke when riding 3 times getting home..
4th Removing the whole coaster brake pads from the hub and adding 3 washers.. 5th find out that now it free wheels nice but it takes 2 cycles to get the gear to engage..
Solution:
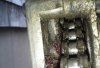
Ended up taking everyones idea and did the washers and spring action. Ill attached a photo of what it looks like and so far tonight it works.
What I did is build from the axle the cone > bearing > 2 washers > Spring from coaster clutch > 2 more washers > then the clutch > and the rest of the build leaving the same.
How it runs:
It engages right off the bat ! Quickly every time no soft spot.. problem back peddling is not really there.. 1 or 2 back pedals and everything gets tight and you can feel the spring..
Not sure how long this will hold up but its very tight and hopefully will be my trick..


Yesterday I removed the coaster as it been a problem from the start. First couldn't get around the new 44t gear.. 2nd couldn't make a bracket to hold the new bent arm.. 3rd Make bracket and it broke when riding 3 times getting home..
4th Removing the whole coaster brake pads from the hub and adding 3 washers.. 5th find out that now it free wheels nice but it takes 2 cycles to get the gear to engage..
Solution:
Ended up taking everyones idea and did the washers and spring action. Ill attached a photo of what it looks like and so far tonight it works.
What I did is build from the axle the cone > bearing > 2 washers > Spring from coaster clutch > 2 more washers > then the clutch > and the rest of the build leaving the same.
How it runs:
It engages right off the bat ! Quickly every time no soft spot.. problem back peddling is not really there.. 1 or 2 back pedals and everything gets tight and you can feel the spring..
Not sure how long this will hold up but its very tight and hopefully will be my trick..
I wouldn't trust that fix-a-flat stuff. Start with a new, unpatched (preferably thick) tube and Slime it yourself. I recommend also using a decent tire liner like Mr. Tuffy. I've had 3 or 4 tube-killing puncture flats in 20 years and I've gone at least 100,000 miles on bicycles in that time. Over 15,000 3 years in a row in the 90's!
You _can_ Slime a tube that already has punctures. I've done it several times. As long as they aren't serious, flat-in-3-minutes punctures, 6-8oz of Slime can prolly seal it. Any patches won't stay on the tube, and you won't be able to patch that tube ever again tho. Slime may also lose it's sealing if your tire is sitting in direct sunlight for a few hours. Then you have to pump it up and roll it for awhile to seal it back up.
Carrying the fix-a-flat stuff is more bulky and suspect than a new tube. Myself, I haven't carried a spare tube in over a decade.
I just go to walmart and buy foam tubes, no air=no flats, only issue is a little more road vibration
Jumpa
New Member
Gotta love riding in New EnglandEvery time I use a tack cloth I get a linty, somewhat sticky residue that ruins the next coat.
It seems like an anti-cleaning cloth to me.
What do you all do to avoid this?
this is fro riding on the tar roads I think the dirt roads may be cleaner
Attachments
Jumpa
New Member
My Tip: Removing the Coaster Brake
Yesterday I removed the coaster as it been a problem from the start. First couldn't get around the new 44t gear.. 2nd couldn't make a bracket to hold the new bent arm.. 3rd Make bracket and it broke when riding 3 times getting home..
4th Removing the whole coaster brake pads from the hub and adding 3 washers.. 5th find out that now it free wheels nice but it takes 2 cycles to get the gear to engage..
Solution:
Ended up taking everyones idea and did the washers and spring action. Ill attached a photo of what it looks like and so far tonight it works.
What I did is build from the axle the cone > bearing > 2 washers > Spring from coaster clutch > 2 more washers > then the clutch > and the rest of the build leaving the same.
How it runs:
It engages right off the bat ! Quickly every time no soft spot.. problem back peddling is not really there.. 1 or 2 back pedals and everything gets tight and you can feel the spring..
Not sure how long this will hold up but its very tight and hopefully will be my trick..
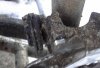
When I look at that hub all i see is PAIN .. I wouldn't trust that over 5 mph
!!
hotshots22
New Member
Well I now trust the hub more than my clutch cable as that went currplunk as soon as the motor started hitting a solid 35mph
hotshots22
New Member
Looking at the picture it does look like cracks but I polished the components before grease and they are all in great condition.
I can tell you if you take your feet off the peddal sit will keep spinng in the forward direction but so far so good
I can tell you if you take your feet off the peddal sit will keep spinng in the forward direction but so far so good
motorbikemike88
New Member
Don't use gasbike.net, they sell parts that don't even work with standered motorbikes, I had to pay to send the non-functioning part back because they didn't send a return sticker, they then told me I have to pay so they can put it back on the shelve, and for 3 months still havnt seen my return. No one is responding to my e-mails and no one can help on the phone. Horrible company, wouldn't recommend the company. Poor poor service, to no service at all... Allot of d.I.y. projects, awesome.
Things I've changed:
The gas tank, full gallon
Changed front end fork to front end Springer
Replaced muffler, because it dirtys one shoe with a long pipe muffler a.k.a. poo poo pipe
flipped ans slammed handle bars for a boardtrack bike vibe
Just a few things I could think of that Ive changed
Things I've changed:
The gas tank, full gallon
Changed front end fork to front end Springer
Replaced muffler, because it dirtys one shoe with a long pipe muffler a.k.a. poo poo pipe
flipped ans slammed handle bars for a boardtrack bike vibe
Just a few things I could think of that Ive changed
GearNut
Active Member
First make doubly sure that the wheel bearings are in good condition, well greased and adjusted properly.
I recommend using an old front fork clamped in a vice as a wheel stand or another bike with the same sized wheels resting up-side-down so you can use the fork as a wheel stand.
Spin the wheel and let is come to a stop on it's own. It will come to a stop with the heaviest part down. Add some weight to the spoke nipple at the top of the wheel and repeat the spin and let it stop procedure.
Spin it again to be sure that the wheel stops in the same position to be sure that the wheel is still out of balance.
If it is still out of balance, once again the heaviest part will be down.
Repeat the add weight to the top and spin procedures until the wheel stops randomly.
The wheel will be balanced when it comes to a stop at random positions, not favoring a particular spot a the bottom after each spin.
desertsteve
New Member
A little off the current line of discussion but I just felt the urge to throw this in. This came up on another thread but it applies here also. When I first started riding motorized bicycles one of the first things I did was go down to the local Harbor Freight and bought the brightest safety vest they had. I put it on every time I ride, no exceptions.
Absolutely desertsteve. 2 reasons I decided to build one of these. 1 I think they're cool. 2 I want some way of fighting the ever growing fuel prices. Motorcycles prices seemed to have sky rocketed over the past 5 years or so. Hard to find a good used one for a decent price that don't need a ton of work.
My ride to work is 15 miles one way. Thank God it's all country roads with little traffic, but I still want to be seen. So I have already thought about getting a good safety vest. It should look good over my leather jacket. lol. I might even try and get me one of them orange bicycle flags if you could still find them.
My ride to work is 15 miles one way. Thank God it's all country roads with little traffic, but I still want to be seen. So I have already thought about getting a good safety vest. It should look good over my leather jacket. lol. I might even try and get me one of them orange bicycle flags if you could still find them.
Southgate Jonny
Member
I ALWAYS ride with this super bright orange pack:

Under 25 bucks from red flare kits.
Under 25 bucks from red flare kits.