Lurker's V-twin build

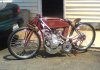
The Summit Single stage paint is formulated to work as a topcoat. Clearcoating is neither necessary or required. You can clearcoat it for a deeper gloss if you want, and it accepts it with no problems, but it'll stand up to the elements just fine as a topcoat.

I know because I work there and they've tested it on several employees vehicles.

MHF
 
This paint is a great product. I cant believe the results I was able to achieve with it. I have a minimal amount of experience with automotive paint, but I was able to achieve professional results.

MHF said you can add a clear coat but I really don't see how you could get any more gloss out of this paint, and I mean that in a good way. It has so much of it, it's almost fake looking.
 
Bike is looking awesome. I love the paint job and your pinstriping, did you do the pinstriping freehand with a brush?
 
Thanks harry, The pin striping has been a combination of meticulous masking, to achieve a factory look and freehand. I am working on painting the logo on the tank and I will post some more photos of that when I finish. Just to show you what I mean.
 
Here is a sneak peak at my logo. I have the main portion if it done. In the middle will be text. I had to throw it in the frame too just to see how it would look.

I was also able to get all of the pin striping done on the left side of the bike today but I took these photos before that. I gotta keep some of it a surprise, ya know.
 

Attachments

  • DSC00283.JPG
    DSC00283.JPG
    172.1 KB · Views: 288
  • DSC00281.JPG
    DSC00281.JPG
    155.7 KB · Views: 295
  • DSC00284.JPG
    DSC00284.JPG
    162.6 KB · Views: 1,063
AWESOME!!!!!!!!!!!!!!!!! I love it!!!!!!!!!!!!

The pinstriping looks top notch..... Also the motor now looks a little smaller and a lot more at home now there is some paint.

Just wondering, are you leaving the wheels chrome? I think red or gold would look great..... while im not usually a fan of chrome rims, i must say your chrome wheels do compliment all the polishing on your motor, you have been busy.... Keep it up!!!!!!!
 
Absolutely superb craftsmanship!
I actually want some pin striping done on the fan shroud of my HuaSheng.
I figure that if I practice alot with a Beugler tool first it might not look so amateurish.
If it comes out anywhere similar to the top quality of your pinstriping I would be happy.
 
Lurker,

That is one amazing looking bike! The pin striping you did looks spectacular! With that V-Twin power plant underneath your sure to go pretty fast. I like what you did with the tank to. You will have to post a riding video when you finish. Can't wait to see the rest of the pin striping.
 
Wow. The pin striping looks too good to be real. The color is perfect for the bike. And the bike has ATTITUDE! Okay, now we need a YouTube of this thing screamin' past a camera.
 
Thanks for the kind words guys. This weekend I finished the pin striping on the frame, and ordered some grips for the handlebars that should be here later this week.

I made about 6 attempts to hand letter the logo on the tank today but to no avail. I had the wrong brush and the art supply store is closed on sunday. After work tomorrow I will pick up another brush and make another attempt at it. If I'm successful I will post a photo of it.

Allen, don't you worry once this bike is done I plan to take lots of high quality photos and videos for everyone here to enjoy.
 
Hi Lurker... Are you hand brushing the pin striping....what # brushes are you using ...or are you using a Beugler striping tool........DD
 
What can I say that everyone else has not already? A true work of art Lurker. I do hope that you get her into a photo studio for a series of professional shots.
 
Ok so some of you have been asking me about my method of pin striping and here is the general break down. I wanted a look that was very square and crisp so in order to achieve that I used a process of measuring and masking.

materials
1/2" artist tape
1/4" artist tape
1/8" artist tape

00 Kafka longliner brush
3 Kafka scroll brush

1shot gold paint

Below it the process photos
In the first photo you will see everything is measured and masked.
The second I use the scroll brush to paint it in
The last photo is the final product.

After numerous attempts to hand letter the text I gave up and just did the masking method that I used on the rest of the bike.

I'm sure some of you are wondering what VEKST is. Well let me explain, basically it is a pen name for all of my artistic endeavors. I do lots of screen printing and hopefully more motorcycle building that is all under this name.

Secondly it is the phonetic spelling of vexed.
vexed (vekst) adj.
1. Irritated, distressed, or annoyed.
2. Much discussed or debated.
 

Attachments

  • DSC00285.JPG
    DSC00285.JPG
    163.2 KB · Views: 218
  • DSC00287.JPG
    DSC00287.JPG
    171.7 KB · Views: 222
  • DSC00288.JPG
    DSC00288.JPG
    163.2 KB · Views: 223
Last edited:
Well it's basically done. I have a few small things left to do to it still but all the hard stuff is out of the way. I would like to make a number plate to cover up that ugly front brake and a some other misc. stuff.

How fitting is it that I would finish this tribute to american history on the 4th of July? Pretty cool I think.
 

Attachments

  • DSC00289.JPG
    DSC00289.JPG
    210.6 KB · Views: 389
Back
Top