Fabricating a Fairing

Gilbert, somewhere early in this project thread I think the words Road Warrior were mentioned. Your last photos struck me, Road Warrior it is. The light of day will reveal the your efforts true awesomeness. Have you calculated drag reduction vs. weight increase? Or just note empirical results.
Tom from Rubicon
 
Last edited:
Gilbert, somewhere early in this project thread I think the words Road Warrior were mentioned. Your last photos struck me, Road Warrior it is. The light of day will reveal the your efforts true awesomeness. Have you calculated drag reduction vs. weight increase? Or just note empirical results.
Tom from Rubicon

Hey Tom,

I have not done any calculations on speed gains, and to be honest, with the added weight I might be slower on the track. I hope to have the fairing finished before the next So Cal Motorized Bike Race on March 30th, where I plan to race with the fairing on.

Not sure how to do a calculation for the drag reduction on paper, and I’m not sure how I’ll even be able to ascertain the difference on the track. But it will hopefully look cool. Probably doing it for looks as much as anything else.
 
Road warrior s fine, I loved the original movies. I do aspire to something a little more refined than the “Road Warrior” look, but I do often seem to fall short of that. Keeping everything bare metal definitely contributes to that.

Thanks for responding and liking.

Gilbert
 
Last edited:
Categorizing isn't important nor is value judgement or my likes or dislike, however I judge & place your work top notch "cause I like it & that's on me!

Rick C.
 
Hello Everyone,

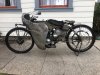
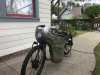
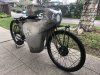
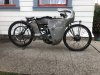
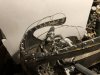
Thank you all for the kind words, it’s very encouraging. Finally finished the sheet metal work. It looks ok from 20 feet away, but up close, it’s quite wavy and lumpy. It is what it is.

I had to get extra sheet metal because I screwed up a couple of pieces. I think I ended up getting 26 gauge and I originally used 24 gauge. I’m not too good at measuring thickness, so not sure on numbers, but the new stuff I got was thinner, easier to shape and still held its bend. I considered redoing all the panels in the new lighter sheet to save weight, but then I said, “Nah, too much time”.

I weighed the fairing and I got approximately 13 lbs.

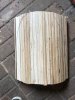
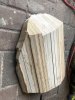
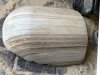
Started working on the buck/mold for the plexi windshield I plan to make. I used a bunch of 3/4” plywood pieces to make a block, then started whitteling it down. Still more shaping to do, then spackle and sand to get a smooth finish. I was then hoping to heatt up a sheet of plexi in the oven and drape it over this buck. Looks like a potential for wrinkling. We’ll see how it goes.
 

Attachments

  • 8EA3BA36-8A1C-493B-BFE5-1F782C3236F9.jpeg
    8EA3BA36-8A1C-493B-BFE5-1F782C3236F9.jpeg
    132.4 KB · Views: 272
  • 3C8D347C-2A4E-4B0A-9ED2-276A6AAA4957.jpeg
    3C8D347C-2A4E-4B0A-9ED2-276A6AAA4957.jpeg
    128.3 KB · Views: 272
  • 57207461-62A3-439D-BCD3-95F5C001A798.jpeg
    57207461-62A3-439D-BCD3-95F5C001A798.jpeg
    159.6 KB · Views: 268
  • 85DB4480-C688-42DE-B706-73E9CDF2F02E.jpeg
    85DB4480-C688-42DE-B706-73E9CDF2F02E.jpeg
    171.7 KB · Views: 392
  • 7898ECB5-060E-45E1-9DE6-537B8EC9BA52.jpeg
    7898ECB5-060E-45E1-9DE6-537B8EC9BA52.jpeg
    140.3 KB · Views: 364
  • D7205317-A4CB-46B0-8AE2-66B1CB14EC96.jpeg
    D7205317-A4CB-46B0-8AE2-66B1CB14EC96.jpeg
    135.1 KB · Views: 278
  • 49D2DE7B-F12A-4182-BC31-CA17A4578CB6.jpeg
    49D2DE7B-F12A-4182-BC31-CA17A4578CB6.jpeg
    144.7 KB · Views: 260
  • CD71C122-CB97-43EE-83F2-754E48A645EB.jpeg
    CD71C122-CB97-43EE-83F2-754E48A645EB.jpeg
    148.3 KB · Views: 259
  • 597EBCD0-58E9-47C6-B9C6-5C05B3E5EB67.jpeg
    597EBCD0-58E9-47C6-B9C6-5C05B3E5EB67.jpeg
    147.8 KB · Views: 252
Yep! Your bike is an era race tribute replica that still competes & provides a ride to and from as well so the fairing looks the part perfectly...not a trailer poser, but veteran racer that seems to call out "let's race boys!

I've rather liked this look from the start.

Rick C.
 
Finally finished the sheet metal work. It looks ok from 20 feet away, but up close, it’s quite wavy and lumpy. It is what it is.
Gilbert, think golf ball. Quoting Scientific American "The turbulent boundary layer of air that clings to the ball's surface achieved through dimple pattern . This allows the smoothly flowing air to follow the ball's surface a little farther around the back side of the ball, thereby decreasing the size of the wake."
I'm no Golfer but flow dynamics I am good at.
Comparing times last year to this year are eagerly awaited.
Tom
 
I am now working on the plexiglass mold to form my windshield. I started shaping the wooden buck, but it wasn’t looking right, so I made another coat hanger frame/armature to delineate the shape more clearly.

Upon comparing my new coat hanger shape to my wooden buck, I will have to re-do the buck. The nose is too skinny and I have to add material.

At least I have a better vision of the final shape for the windshield.
 

Attachments

  • BE29B2E1-3966-489F-AFF5-DC5A6D6E7E09.jpeg
    BE29B2E1-3966-489F-AFF5-DC5A6D6E7E09.jpeg
    76.1 KB · Views: 254
  • 38CA17DA-774D-452A-A004-CF49765D3BFA.jpeg
    38CA17DA-774D-452A-A004-CF49765D3BFA.jpeg
    50.2 KB · Views: 233
  • 517BE9C3-20C5-42B9-AD2D-2DFF4DDF40A4.jpeg
    517BE9C3-20C5-42B9-AD2D-2DFF4DDF40A4.jpeg
    50.9 KB · Views: 222
  • 1618CC7D-7C8E-4B74-B162-9BE0CBED9099.jpeg
    1618CC7D-7C8E-4B74-B162-9BE0CBED9099.jpeg
    51.7 KB · Views: 232
  • 1A6623B7-9988-4BC6-B613-84B186546C80.jpeg
    1A6623B7-9988-4BC6-B613-84B186546C80.jpeg
    44.1 KB · Views: 210
Back
Top