Fabricating a Fairing

Hey Motomagz,
You were worried about the decapitation thing, or the look of the fairing? Ha ha

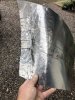
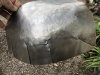
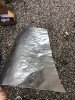
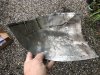
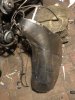
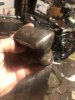
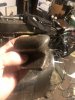
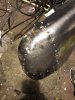
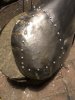
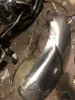
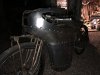
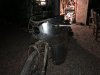
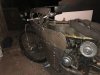
Yes, i’m going to keep the fairing bare metal with aluminum rivets along the three horizontal seems on each side of the fairing, as well as along the perimeter of the frame.

I’m hoping for it to look like an old airplane, but it probably will end up looking mad max.
 
Last edited:
Started shaping the sheet metal panels. Turns out, I’m not very good at it. I ended up with some pretty lumpy pieces. The middle panel turned out to be the hardest so far. Something about the concave curve bending into a convex curve.

I also had trouble getting my seems to lay down tight on my test fitting with self-tapping sheet metal screws. I’ll have to pay attention while riveting to avoid wrinkles.
Here are my crappy attempts so far.

Next, I will braze all the cut seams I made to assist in shaping, then bend over all exposed edges before I am ready to rivet.
 

Attachments

  • E73BE1E7-A072-42FA-BEE5-7E2E9873E939.jpeg
    E73BE1E7-A072-42FA-BEE5-7E2E9873E939.jpeg
    130.4 KB · Views: 299
  • 08CA7137-4E02-4A33-B3DF-BFAD88920D03.jpeg
    08CA7137-4E02-4A33-B3DF-BFAD88920D03.jpeg
    100.5 KB · Views: 305
  • E34BF199-2873-4236-AD3F-D66CF6354C39.jpeg
    E34BF199-2873-4236-AD3F-D66CF6354C39.jpeg
    150.6 KB · Views: 292
  • E6E5D465-250D-4F2B-B127-0897F5EC4CA7.jpeg
    E6E5D465-250D-4F2B-B127-0897F5EC4CA7.jpeg
    91.1 KB · Views: 307
  • 916A4AE8-279F-4E85-BC6A-6C9B5EE36950.jpeg
    916A4AE8-279F-4E85-BC6A-6C9B5EE36950.jpeg
    166.8 KB · Views: 282
It is a learning experience. I suppose Bondo is out as you want to see the metal show. You know some paint that looks like metal can look the part. But really if that was a way to do the fairing then why not also use 3D printer. But seriously working the metal is a way to really get into it. There is uniqueness going on with style, with what was said of like steam punk I'd say keep on!.
 
If you look at YouTube videos of this type of work you will see them using an English wheel and a planishing hammer. This rolls and hammers out the dents and helps form the shape.
I think if you put in Metal Forming you will be overwhelmed with information.

Steve.
 
Hey Steve, thanks for the reply. I have watched videos/shows where people use both the planishing hammer and the English wheel. They are both awesome tools! Unfortunately, my workshop is a 10 foot by 12 foot garden shed, where I use the most rudimentary of tools. I don’t even have a drill press, I use a Sears tool that holds a hand drill for a drill press. I have an oxy-acetylene torch, 4” angle grinder, die grinder, metal jigsaw, and various hand tools. No bandsaw, no bench grinder, no sanding disc/belt sander combo, no lathe or mill machine.

It looks like a harbor freight English wheel is $300 bucks or so, not bad, but I just don’t have any room to put it in my shed. I recently bought an air compressor, and that is already blocking access to my tool cabinet.
I have to move it around all the time.
So I am basically trying to reproduce the effects of an English wheel with hammers and dolly’s. Here are two pictures of my tools. The double profile dolly is very useful, I also use a trailer hitch for a dolly, then I have a hand planishing hammer, plastic shaping hammer, slapping hammer, and a home-shaped rubber hammer. Oh and I also have a tree stump with a circular bowl grinded into it to pound some metal into. I got the lumpy panel a little smoother, but I think I will need to lower my expectations on the smoothness of my curved surfaces.

Peace
 

Attachments

  • 7F638EEA-E6C5-49EF-B42F-407A647C8748.jpeg
    7F638EEA-E6C5-49EF-B42F-407A647C8748.jpeg
    64.3 KB · Views: 254
  • EB195BC8-7509-44B7-BEF1-BA6BBEF4EBE2.jpeg
    EB195BC8-7509-44B7-BEF1-BA6BBEF4EBE2.jpeg
    108.1 KB · Views: 310
  • 670A6CE3-2505-4C73-A6D6-D3BFDFF28327.jpeg
    670A6CE3-2505-4C73-A6D6-D3BFDFF28327.jpeg
    67.7 KB · Views: 262
Enough room. The curse of everyone because no matter how much you have it never seems to be enough.

By a chance meeting I was fortunate enough to be able to watch and occasionally work with an English chap who built custom car bodies for sports cars. Interesting to watch an MGA become an unrecognizable race styled thoroughbred.

When he had rough formed a panel on a sand bag or one of half a dozen stumps with various dished shapes on the tops he would hammer and dolly it smoother then to finish it he would use a dolly that matched the curves he was working on and he used a slapping hammer or a slapping file to shrink the high spots.

A light sanding would show high and low spots that he would work until he was happy with it. A body file would take care of any spots that needed a final smoothing.

Your photos show what he would work with and if it were me I'd weld/braze up the seams and hammer and dolly the sections as smooth as you can and then go over then with a slapper and dolly to smooth them out further. Keep holding them against the
framework that your going to attach them to so you will know if they are getting out of shape or closer to what you want.

Steve.
 
Went looking on the net to see if I could find someone who was doing what Bill did and it seems he may have been the only one doing it that way. He always said the most people would take it to the wheel now as he was gathering up his favourite tools.

Looks like conventional wisdom is to roll it out on a wheel once it's shaped.

Steve.
 
Thanks Steve, that’s sound advice. I will be following it. I have brazed the cuts I made to form the tight bends and I have got the convex curve a little smoother. The brazed stuff will be different, probably won’t get it that smooth, but it’s at the fairing behind the front wheel, so hopefully it won’t be seen much.

Thanks Steve,

Gilbert
 
Hello Everybody,

I’ve been able to get some evening hours after 9:00 to spend in the shed. After much wrestling with the middle panel which had brazed seem jpimts where I made relief cuts to assist in bending, I scrapped the first try in metal and re-did the panel without the relief cuts, it went much better.

I was finally able to get a fairly good fit to the frame and put in my first panels with aircraft rivets. It’s pretty lumpy still, but I have made my peace with my lack of refined sheet metal shaping skills, and have learned to accept the bumps. So far it looks more LARP-knights-of-the-realm, than WWII aircraft, but we’ll see.

I used a pocket nailer and air compressor for my riveting.

Gilbert
 

Attachments

  • 8E7031D2-4849-43DC-AF14-D52E2CFFD956.jpeg
    8E7031D2-4849-43DC-AF14-D52E2CFFD956.jpeg
    110.2 KB · Views: 269
  • E5A0DA40-800C-444C-9E05-2939A3616894.jpeg
    E5A0DA40-800C-444C-9E05-2939A3616894.jpeg
    85 KB · Views: 283
  • A37D6843-4F77-4EEA-9A32-8B7B0240E4C8.jpeg
    A37D6843-4F77-4EEA-9A32-8B7B0240E4C8.jpeg
    96.2 KB · Views: 278
Last edited:
Looks good. Never thought about a palm nailer for a rivet setter. Brilliant idea. It's extremely hard to work out ridges where it's been welded or brazed once they are done.

Steve.
 
Looking good. If metal becomes too tough you can always glass it. I wouldn’t even mess with foam too much, if you can get a fairly solid form with paper you can lay one layer of glass down to prevent warping, then your final layers when it’s dry.
 
I got one side of the fairing almost complete!!!

The panel that goes over the handlebars has more curve than I thought, so I may have to pull the rivets and bang on it some more to tighten the curve near the headlight.

Sorry again for the night pics, I know they’re not very good, I just get excited when I finish another piece of this long project and I want to share the progress.

Gilbert
 

Attachments

  • 7D238E5E-AEDF-4DFC-879D-35D2AABD6979.jpeg
    7D238E5E-AEDF-4DFC-879D-35D2AABD6979.jpeg
    92.8 KB · Views: 303
  • 0A52B44C-16AD-4015-AA76-29E5482ECBB3.jpeg
    0A52B44C-16AD-4015-AA76-29E5482ECBB3.jpeg
    88.2 KB · Views: 268
  • 5E9DC890-7C0D-459C-94C6-86792C4BD598.jpeg
    5E9DC890-7C0D-459C-94C6-86792C4BD598.jpeg
    99.2 KB · Views: 281
  • 48224480-A8F4-404E-AED1-999F6A571886.jpeg
    48224480-A8F4-404E-AED1-999F6A571886.jpeg
    84.2 KB · Views: 288
Back
Top