
You are using an out of date browser. It may not display this or other websites correctly.
You should upgrade or use an alternative browser.
You should upgrade or use an alternative browser.
Fabricating a Fairing
- Thread starter Gbrebes
- Start date
bairdco
a guy who makes cool bikes
That's the ugly 70's one. Mine should look like this. But let's not hijack gilberts thread with my no-pedals little motorcycle...I just found the Testi, very classy.

Gbrebes
Well-Known Member
Hey Everybody,
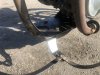
No progress on the rebuild of my fairing frame as of yet, sorry to say. But I did get a chance to make a steering stop so that I don’t crunch my thumb on the gas tank. It bolts onto my lead spring clamp mount at the crown of the fork.
Gilbert
No progress on the rebuild of my fairing frame as of yet, sorry to say. But I did get a chance to make a steering stop so that I don’t crunch my thumb on the gas tank. It bolts onto my lead spring clamp mount at the crown of the fork.
Gilbert
Attachments
Gbrebes
Well-Known Member
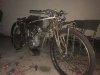
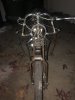
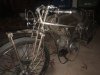
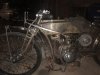
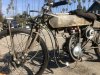
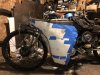
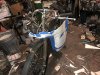
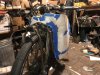
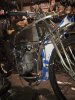
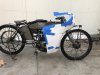
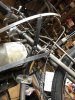
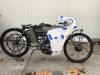
Got some work done the last couple of days. I made a new, thicker light bezel, and I bent some new lower frame legs.
I also made lower and upper brackets, so I was able to mount the frame onto the bike. It fit pretty good, I have the clearances around the forks and handlebars in a static test in the shop.
Sorry for the not very clear shots, it got dark before I got done.
I also made lower and upper brackets, so I was able to mount the frame onto the bike. It fit pretty good, I have the clearances around the forks and handlebars in a static test in the shop.
Sorry for the not very clear shots, it got dark before I got done.
Attachments
Gbrebes
Well-Known Member
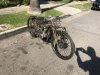
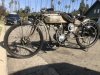
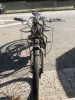
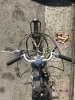
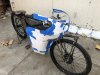
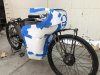
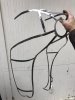
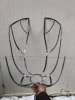
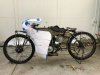
Those night time pictures were pretty horrible! I tried it again in the daylight. It’s hard to get clear pictures, the fairing frame blends into the metal bike.
I started putting some pieces of thick art paper onto the frame to get an idea of the bends I have to make with the sheet metal. I’m not really confident in shaping the curves, so I thinking of splitting the area into panels and use rivets, kind of like on an airplane. I have a pop riveter, bug I like the look of the solid head aircraft rivets.
I started putting some pieces of thick art paper onto the frame to get an idea of the bends I have to make with the sheet metal. I’m not really confident in shaping the curves, so I thinking of splitting the area into panels and use rivets, kind of like on an airplane. I have a pop riveter, bug I like the look of the solid head aircraft rivets.
Attachments
-
 99618323-508E-499A-93DF-7669D6AEFF3E.png489.9 KB · Views: 491
 -
 90A6BBFC-955A-4B0C-B636-7556ED7FA3B5.jpeg170.7 KB · Views: 466
 -
 56FD706C-D6F9-4E60-AEB2-DA4362AB40A8.jpeg157.8 KB · Views: 462
 -
 640CBD86-FD04-4634-AA38-652EEA725AE8.jpeg160.2 KB · Views: 472
 -
 999ED1D9-AC49-4D7B-A556-DB67A4981069.jpeg128.8 KB · Views: 452
 -
 05EF6648-E2BF-4664-A848-A82ACCA8ED77.jpeg157.1 KB · Views: 447
 -
 130907B7-013F-419F-B5EF-8C8FD08D4AC6.jpeg212.4 KB · Views: 454
Gbrebes
Well-Known Member
Good Evening Everyone,
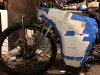
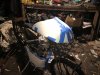
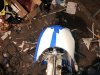
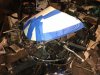
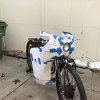
I was able to get a little more work done. I re-configured the mount from the upper fairing to frame, located it under the tank rather than on top of tank. I was then able to add 2 horizontal seam pieces to the left side. Once the seams were placed, I could mock up some Bristol board pieces for panel patterns.
The pictures are not good, but you might see I will be using three panels for each side of the fairing below the handlebars.
I will try to get better pictures with a blank background. I will also take pictures with the Bristol board off to show the frame.
Gilbert
Attachments
There was a lot of talk about that in the velocars, even paper machay, or what ever it's called LOL..........Curt
https://motorbicycling.com/threads/velocars-and-other-interesting-vehicles.34913/
https://motorbicycling.com/threads/velocars-and-other-interesting-vehicles.34913/
Ludwig II
Well-Known Member
Papier mache. Churned up paper and an adhesive, applied to a support structure of some sort. We used chicken wire at school. I can't remember what the sculpture/object we made was.
There are lots of ways of making a lightweight hollow shell. I knew a man who made a fibreglass petrol tank by applying glass and resin outside a polystyrene form, and once he was satisfied it would hold up, melted the polystyrene out with a solvent. It worked very well, and allowed a really complex shape to be made cheaply.
There are lots of ways of making a lightweight hollow shell. I knew a man who made a fibreglass petrol tank by applying glass and resin outside a polystyrene form, and once he was satisfied it would hold up, melted the polystyrene out with a solvent. It worked very well, and allowed a really complex shape to be made cheaply.
Venice Motor Bikes
Custom Builder / Dealer/Los Angeles
It's looking good Gilbert!!! I can't wait to see the next step. ")
Gbrebes
Well-Known Member
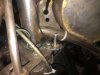
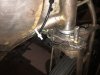
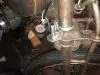
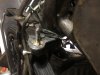
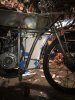
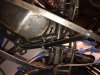
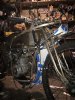
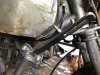
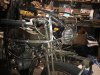
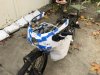
More pictures from the man cave. I was able to weld the two horizontal seam ribs on the right side of the fairing. I took pictures of the new mounting bracket under the gas tank, and of the right side of the frame without sheeting on it.
Attachments
-
 06F6C9F4-0C82-4B82-B656-595C47480059.jpeg123.3 KB · Views: 429
 -
 E5D39EBB-FD56-4574-9B18-869817AEB882.jpeg113 KB · Views: 420
 -
 705C9B5E-DBE0-4AC7-BF73-CF5C31834BF6.jpeg96.4 KB · Views: 447
 -
 685D7EF9-5AD5-4936-ADAA-5EB647DE79CA.jpeg94 KB · Views: 411
 -
 E4D9E735-766B-4B68-9A11-6814BAA7E584.jpeg125 KB · Views: 441
Gbrebes
Well-Known Member
Good Evening Gentlemen, and Ladies, if there are any hear? I don’t think so.
Anyway, I got a little more work done today and yesterday. I was able to install the upper arms of the fairing that holds the plexiglass face shield. I was then able to mock up the upper patterns for the fairing that goes above the handlebars. I was also able to make and install the front plexiglass seam frame piece on the fairing frame, along with 2 vertical ribs near the handlebar grip cut-out.
I included some shots of the frame with the final pieces in the very cluttered shack/shop. Sorry for the confusing backdrop.
I also got a chance to mess around with a plexiglasss facesheild pattern. It’s pretty rough, but it’s a step.
Attachments
-
 8CA43BFF-3F00-4651-A715-4883E6DF25CB.jpeg106.8 KB · Views: 447
 -
 ED81CBF1-5A3F-454C-816B-330DA25C054A.jpeg107.9 KB · Views: 440
 -
 927E2619-6B45-4CBE-B6C7-D207C9FDFADE.jpeg101.7 KB · Views: 467
 -
 33627A8C-8579-4F1B-BC48-531FED1EBE8E.jpeg129 KB · Views: 461
 -
 7A9CB3CE-182C-461C-9A2B-55377678CEF0.jpeg107.3 KB · Views: 443
 -
 C4C526CD-6825-4BF3-A830-03630C813A37.jpeg117.2 KB · Views: 419
 -
 BA9331D5-FAB1-4EEE-A8A9-F583E9B28072.jpeg114.5 KB · Views: 424
Last edited:
MEASURE TWICE
Well-Known Member
Pardon if I could not tell from the picture, but is there yet not any attachment of the support frame of the fairing to the bike handle bars or anything else as of yet? It is just resting in place before you make final work? Looks like nice braising of metal to create the support frame! A place for a headlamp looks like too.
Gbrebes
Well-Known Member
Hi MT,
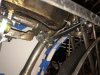
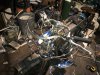
Yes, I have mounts for the frame. I am currently using four brackets, two on the bottom attached to the engine mounting plate, and two that bolt to the fairing frame just below the handlebar grips.
These two brackets run in a Vee shape to a bracket that bolts to the downtube. I took a picture of the upper brackets, and the lower brackets are somewhere on page 1 I think.
And yes, I did make a bezel to hold a headlamp.
Regarding coat hanger and painted fabric, I used coat hanger for my original mock-up, and it’s very bendy and flimsy, I don’t think it would work.
Attachments
-
 66F2A910-3758-4040-879B-DA0AB43BDC95.jpeg106.6 KB · Views: 406
 -
 DD44C3BF-D83B-452B-8E19-58C08454D5DF.jpeg123 KB · Views: 420
 -
 946AC156-48AE-4DC1-9770-7C905A07183C.jpeg66.2 KB · Views: 431
 -
 91157AEB-2EA3-4AAF-9402-DBB2A65A4D6E.jpeg74.1 KB · Views: 442
 -
 71A4D48E-7894-4B61-8E50-BC489B04CB46.jpeg117.2 KB · Views: 414
Gbrebes
Well-Known Member
Hello Everyone,
I think I have my final paper patterns done for the sheet metal. It’s kind of tricky getting the pieces placed correctly for clearance and the paper is still lumpy in different bending zones, so I will be doing some hammer shaping and cutting and brazing to the sheet metal
Now comes the hard part.
I think I have my final paper patterns done for the sheet metal. It’s kind of tricky getting the pieces placed correctly for clearance and the paper is still lumpy in different bending zones, so I will be doing some hammer shaping and cutting and brazing to the sheet metal
Now comes the hard part.
Attachments
-
 8D4DC1FD-C3BE-4C1C-B5A1-F17110910813.jpeg108.6 KB · Views: 431
 -
 1D113284-49B3-4935-BAB4-665ABAA330E2.jpeg115.4 KB · Views: 420
 -
 A26BF923-BF9C-435B-88C1-FF839449BA07.jpeg102.1 KB · Views: 439
 -
 147975E4-BCB0-422B-87D9-D53E6DFDC244.jpeg134.4 KB · Views: 433
 -
 896A1BE4-B220-4F9A-BE79-57F3EE6EFC50.jpeg133 KB · Views: 411