The Rustoration Build Off

GoldenMotor.com

bairdco

a guy who makes cool bikes
Aug 18, 2009
6,537
264
63
living the dream in southern california
when you get your frame stripped to bare metal, you can wipe it down with WD40 if you're not ready to prime it. if you coat it good enough, you could probably leave it in the backyard for a month with no probs.

i had an old stripped bike awhile back, and i'd rub a coat of WD in about every other month, and it'd sit outside all day at Newport Beach with no rust at all.

just make sure you clean it off with denatured alcohol or something before painting.

i dunno anything about the new sturmey hubs. had some of the old ones and they worked great. should be good, sturmey archer's been around forever...

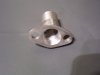
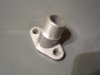
i'm also thinking of going for a thin-walled, steel tank. i was all excited about using aluminum, since i got alumiweld soldering down pretty good, but trying to find something for a tank bung is almost impossible (my latest idea was the bottom end off a Mag-Light flashlight,) plus tapping holes in thin aluminum probably won't last.

i've been practising steel brazing with a bernzo map torch, and that's pretty easy, i can get sheet metal and threaded pipe anywhere, so i'm goin' for it.
 

BarelyAWake

New Member
Jul 21, 2009
7,194
21
0
Maine
Yeah - that was some of the issues we discussed regarding aluminum, tho yer Mag Light idea is a great one man! Kinda wish you were goin' that route as I woulda loved to see it.

I thought about the WD40 trick as it is a good 'un but for two things - I wanted to get a good look at what imperfections would show w/paint and I honestly hate WD40, I've only PB Blaster in the house and that stuff don't come off... which is of course why I like it lol

Denatured alcohol is good stuff, for those whom may not know - acetone works just a lil better for greasy, but it is harsher in both smell & on yer skin. It does take a lil longer to evaporate... guess it's personal choice but I use denatured alcohol for washing wood projects and acetone for metals (BTW alcohol stove fuel = denatured alcohol, if yer lookin' fer some) ...don't drink it crazy bastids o.o

I should brush up on my brazing skills... but I'd rather hand the tank mess over to my buddy to just weld and get it done with :D

Lookin' forward to the Sturmey Dyno hub, I'm hopin' it'll put up with the constant high RPM usage... we'll see...
 
Last edited:

silverbear

The Boy Who Never Grew Up
Jul 9, 2009
8,325
670
113
northeastern Minnesota
Bairdco,
I'm guessing that the rear rack which was original to your bike was also used on some other makes and supplied by the same manufacturer, maybe Wald. It might be worth studying the pictures closely to see. You're right about the amount of gas an in frame tank would hold on that bike... there isn't a whole lot of room. It would look cool, though. Do you have to have a rear rack to have a behind and under the seat tank? Seems to me I saw one on a bike VeniceBoy built for his girlfriend that looks great and has no rack. Or maybe I'm remembering wrong. In frame would sure look cool, though.

BarelyAWake,
It looks like you're getting there. The new hubs you have in mind sound good. So will you use the original wheels then and lace them up yourself? How heavy a spoke can you use with that? If you go that route, take as you go photos, please.
I was going to give the frame a coat of primer today, then realized all I have is the light gray primer. With a dark blue paint and black trim it makes more sense to use the dark gray primer, I think, so I'll just strip today and primer it later in the week. I'm trying to find a source in the area for Trophy Blue Dupli Color engine enamel. I looked it up on their web site and it is really dark and will look good, but that color isn't carried by anyone around here so I'll see if Napa will special order it for me. Great color. The Gothic fenders are what convinced me to go with the blue and black... kind of a Gothic, night rider thing.
I guess the black wall tires make the most sense. Bairdco is right about grease getting on the white and messing things up. This is meant to be a rider, so black walls it is.
Yeah, I like the JB Weld for epoxy work. It is very dense and strong, so holds up well. I won't need much and I'm not too worried about my fenders and guards looking perfect. They won't be. After all, they've been through the war of time and owner abuse, seventy years worth, so they are what they are. Still, I'll do my best to make them look lots better than they do now. I'm no great painter anyway and this will be a rattle can paint job.
I appreciate others' opinions here. It sure is nice bouncing ideas off somebody else to see if they still sound good when they come back to ya. I'm having a lot of fun with this project and you guys are part of the fun.

Steve,
Prince Edward Island sounds a whole lot more affordable than BC. That farm house sounds like a dream. One of those outbuildings could be a tinker shop. That's what I want, a tinker shop with a real floor, storage areas, a workbench and a wood stove. Let it snow, who cares? It does get cold there, I imagine. Probably like Maine to the south. You'd be in a good spot for a sail boat, yes? Maybe you can have it all!
Coffee's gone, the dog wants to take me for a walk and the bike project is calling.
SB
 

bairdco

a guy who makes cool bikes
Aug 18, 2009
6,537
264
63
living the dream in southern california
i always have a can around, but i've never used WD40 to loosen bolts. it's almost always for cleaning or rustproofing. i mean, that's what it was used for originally, to keep rust from forming on Atlas missles. works great for that.

hey BA, i was thinking last night, you'll need to find a way to mount the rear sprocket to the drum hub. it's way bigger. jim might have to charge you double for a giant adapter...

i checked out all the Colson bikes i could find online, and the rear rack thing wouldn't work well, either. it follows the contour of the fender (which is weird, since most of them will eventually bend from people sitting on them, and conform naturally.) i don't think they were made or used by anyone else, looks like they were an exclusive Colson design.

i've got another idea for the in-frame, though, and i'm hoping it'll get me at least half a gallon, like the peanut. i really don't want to go with anything else. i've mocked up rear jugs, pineapple juice can, mini heineken keg on a rack... nothing looks right, and with this bike, i'm not gonna settle for anything (i'm already mad at the pedals. they're too new.)

gearwise, i've got a 36, 34, 32, 30, and a 28 (figured i had to stock up;),) so with the smaller diameter wheels, i think i can find one that'll work to keep up with the older boys. plus, the motor's been de-burred, matched,ported, polished, lapped, put on backwards... if it works, it should be a screamer.

(edit: just noticed a thread by Charged-reactor with the same drum brake sprocket problem. somebody'll come up with somethin...)
 
Last edited:

bairdco

a guy who makes cool bikes
Aug 18, 2009
6,537
264
63
living the dream in southern california
just so you guys don't think i'm slipping, i got some Wald "scout" handlebars today for 6 bucks at the swap meet, which is original equipment on this bike, i had to desecrate one of jim's sprocket adapters to fit my bendix hub (that was no fun, it slipped on the grinder and almost cut my thumb off at the wrist, and i had to superglue it back together.) found a rear fender that might work, and spent waaay too much time trying to use bernzomatic brazing rods with my handheld mapp torch, just like the website says, to make a motor mount. they lie. i almost melted the steel, and the rods didn't do a thing but burn the flux off. jerks.

tried to make an offset intake out of a stock one, but when the torch hit it, it melted like a marshmallow that fell of the stick into the fire. i dunno what those are made of, probably some godzilla crap. wait, he was japanese, right?

to sum up, i'm drunk and sleepy. the end.
 

K.i.p

New Member
Nov 8, 2009
339
1
0
CNY
Yep, made a post about that a couple weeks back....those manifolds melt in a heart beat. wrecked mine but built a better one anyhow. I was stunned how brittle the kit one was.
 

Attachments

BarelyAWake

New Member
Jul 21, 2009
7,194
21
0
Maine
silverbear - I'm prolly gonna go with the original steel rims for now, they seem rugged and best yet - they're not chrome lol I'm most likely not gonna lace them myself, they'll need custom length spokes and I've never done it. However the guy whom sold me the bike has two sons, both of which work as techs at a bike shop and I bet if I asked nice they'd show me how - and/or I'll just pay 'em to get it done. It's a valuable skill it's true - but I've a bit on my plate ATM heh

I really do think the blue is gonna look great on yer bike and I'm sure NAPA will order it for ya... it's about all they're good for these days, I kinda don't like NAPA anymore but it's prolly due to the local one being pretty useless yet still expensive. I don't mind payin' a lil more for good service but I sure as heck don't like paying more for nothing at all. They do however carry my wonderful Amsoil, although it's not out where you can just grab a bottle - it's hidden away in the storeroom... I have no idea why and neither do they o_O

Judging from what you've already accomplished on the fender - they're gonna look awesome man, a lil bit of wear & tear will only add to the vintage look. For that very reason I'm gonna leave the faint pitting and wear on some of my components like on the springer hardware, painted black it'll look kinda "forged" I think, whereas if I replaced some - it'd look obvious and out of place.

bairdco - yer hinting at a new tank idea - then ya leave us hangin' on what it might be o.o *shakes fist*

I know ya don't like the idea - but remember I'm bailing on the skiptooth for a coupla reasons, one of which is the shiftkit... so an oversized adapter from Jim isn't necessary. I've heard mixed reviews on the three speed hubs and the shiftkit combo, but it seems that the failures were all on old beaten hubs and/or tryin' to shift under load so we'll see. I tell ya what tho - you may not like the shiny new pedals on yer bike, but a new three piece crank is gonna look downright weird on my Rollfast... I'm gonna hafta figure something to do about that lol

Sounds like ya might hafta hit up a local welding shop for the motor mount & intake, sux but I dunno what else you can do 'cept pick up a lil MIG unit - which I'm assuming you would have already if ya wanted one. We've got a Lincoln 110v where I work and I've been after it for a while but that's on hold as I'm buyin' too many other toys ATM.

Glad you didn't cut yer thumb off man - yer gonna need it to hang on to that ride o'yers ;)
 

BarelyAWake

New Member
Jul 21, 2009
7,194
21
0
Maine
Yep, made a post about that a couple weeks back....those manifolds melt in a heart beat. wrecked mine but built a better one anyhow. I was stunned how brittle the kit one was.
Actually I remember that post of yers - and it saved me from destroying the one on my Schwinn just in the nick of time (it's cut, shortened, offset, and clamped w/a lil chunk of hose). I was gonna weld it - but now I'm glad I didn't try lol Thanks Mr. Lab Rat! :D

bairdco - Tho a properly made steel one is obviously better, I suppose you could try this for now;


(no, my carb isn't that crooked, I was... I need a new pic lol)

It wont look right - but I've almost 2000 miles on it now without problems *shrug* I did add a touch of sealant to prevent slippage and to fill w/e lil gap may have been present where the two halves meet.
 
Last edited:

silverbear

The Boy Who Never Grew Up
Jul 9, 2009
8,325
670
113
northeastern Minnesota
Bairdco,
Sounds like a rough day, especially where Christine got her blood sacrifice. Hope your thumb mends up well. It doesn't take but a nano-second to screw up, I know. (I have the scars to prove it. Cut my finger to the bone once with a sledge hammer. Still hurts just thinking about it. Among all the other scars and dents, that one is a stand out.)
Barely,
Ah well, I had hoped to learn something about lacing, but I guess I will some other way. I think the 24" wheels on that Hawthorne will be a good place to learn. Buying heavy duty rims with cheap chrome isn't necessarily the best way to go. It's fast and easy, but on an old bike with strong rims and a good hub it might be better with just new and thicker spokes. I've been putting it off, but I guess this winter is the time to go to spoke school. A spoke in time saves nine. Something like that. I'm going to a different Napa today and hope to pick up or at least order the dark blue Dupli -Color.
Yesterday was such a rare gift in fair weather (60 degrees) that I had to set projects aside and fire up the American Flyer for a day of riding narrow back roads here in the Cotactin Mountains of western Maryland. Twisting up down and around through old growth forest, in dappled sunlight the road passed small waterfalls and deep ravines, steep rocky inclines with stands of fern still green among brown fallen leaves. For forty miles the road unwound beneath me as I was twelve years old or sixty five or somewhere in between... timeless on my spinning mandala wheels and thinking of nothing much... just aware on high alert in the unfolding moment. I find riding a meditative experience which helps me level out and live in the present. I don't go to church; I go to nature to get in touch with The Great Mystery, Gitchee Maaniidoo (the Great Spirit), Creation and riding along on spinning prayer wheels is one way to do that. So, instead of working I went to church in my own way and slept tired and deeply through the night. Today is one for work. Coffee cup is empty and I'm off to Napa. Wishing everyone a very good day,
Silverbear
 

bairdco

a guy who makes cool bikes
Aug 18, 2009
6,537
264
63
living the dream in southern california
silverbear, here's a good place to start if you're thinking about building wheels. Building Bicycle Wheels by Sheldon Brown

drilling hubs and rims is common practice for larger spokes, as long as you've got enough material so you don't compromise it.

the first wheels i re-laced, i did it by removing and replacing one spoke at a time. i used the same size spokes, so it was easy. i did it back in my BMX days, back when they made spokes in all different colors, just because i wanted to change the way my bike looked.

sometimes you can get lucky with your hubs and rims, and they'll take the next size up spoke without having to drill.

as with everything, take your time and do a good job, with sharp drill bits, etc... wheels are something you don't want to mess up. they're the main thing keeping you in motion, and off the ground...

my thumbs all right, i was exaggerating a bit. just a nice 2" scratch.

sorry BA about leaving you hanging on the tank. i've got to mock it up first, or else you're gonna read a 10 paragraph explanation involving papertowel tubes, contact paper, masking tape, sharpies, and how many cigarettes it took for me to figure it out.

gotta go get some stuff, now that the stores are open...
 

BarelyAWake

New Member
Jul 21, 2009
7,194
21
0
Maine
o_O

Looks like everyone is buyin' stuff today lol, I just destroyed my wallet gettin' those hubs and the 'Deluxe HD Shiftkit' from Sick Bike Parts (even managed to remember the 1 to 3 piece adapters). I decided to go with the "deluxe" simply because it included some stuff I wanted anyway. I was surprised as heck to find the hubs on my local bike shop's webpage - which is awesome 'cause I trust 'em and if they give me reason to not - I know where they live MuhahaHA!!!

silverbear, yer ride sounds almost as beautiful as it musta been... tho it's raining here as usual so I'm tryin' to not envy you too much. It's familiar, the description of that other plane... I too do much the same. Boating, flying, biking - whatever it is that enables that transcendence and it's welcome to my mind... and I'm not known for my spirituality *shrug* Ride on man - ride on. :)

bairdco - it's cool lol, but if ya can, take a buncha pics as I suspect they'd be a great contribution to the forum. My tank plans may be on hold for a few, one of your other posts regarding your old (50s - 60s?) Rollfast got me to thinkin' that adding a few gussets prolly wouldn't hurt and that'll effect the tank's shape.

I did finally get the frame to my workplace, thought ya'll might get a giggle from how I did it (pic at my coffee pit stop);
 

Attachments

fasteddy

Well-Known Member
Feb 13, 2009
7,455
4,920
113
British Columbia Canada
BarelyAWake. do you take the money out and throw it by it's self or do you just throw the whole wallet at the problem?

Myself I prefer the whole wallet theory. They will get the whole contents so then the wallet is an empty annoying lump in your pants and serves no real purpose except to remind you that before you got involved in MB you used to have money.

Glad you found your parts. I do sure do admire the guys that can build thier way out of a problem. I have to buy my way out.

Steve.
 

bairdco

a guy who makes cool bikes
Aug 18, 2009
6,537
264
63
living the dream in southern california
my old rollfast was a 60's-ish middleweight. it had a cantilever frame, the reverse of the schwinn. it had two skinny top tubes, and one middle tube. the top tubes busted. you won't have that problem, though, your frame was built to last.

...might as well skip down to the pictures now, this might get kinda wordy...

after destroying that intake the other day, i was thinking up all kinds of crazy ways to build an offset one. i didn't want to go with the flexible route, or anything crappy, because i want this bike perfect. so i went to the hardware place, got 12 bucks worth of hardware to replace every bolt on the engine, and got some copper 1/2" plumbing 45's, some other junk, just searching for ideas.

i mess around with mounting the engine, trying to figure out a front mount, and decide to just use the extra mount that came with the kit and be done with it. i don't have the tools to make what i really want, but i can always change it in the future.

so, motor and exhaust are done, had to bend the cranks a tiny bit, then it back to staring at the stupid intake.

i've got another kit, so i'm sitting there with the carb in one hand, the intake on the other, and then it's so freaking obvious how to solve it. little mini intake. chopped it, grinded it to fit the carb, ported it as much as i could, made a gasket, and... check the pics. got about 2 millimeters of clearance, and the carb is perfectly level.

while i'm staring at it all smug and proud of myself, i see the CDI sitting there, and, well, check the pics again. from the pedal sprocket side, it's like, "what? CDI? where? i dunno what yer talkin' about..."

the kill switch is gonna get run up the seat tube for now to an external button under the seat.

everything's going my way, so i figure it's chain time. that probably took me a whole half hour, maybe 45 minutes. and would you look at the clearance?! there's like an inch between the chainstay and the chain! and i didn't have to do anything but put it on! and my pedal chain is the exact same tension! holy smokes!

then the clutch cable with a "brake noodle" i picked up awhile ago, and i installed the throttle, but the cable's gonna wait till tomorrow. i gotta shorten it, and i didn't feel like messing with it tonight.

so all i need to do is build the tank. i'm tempted to slap the peanut on there and see how the backasswards motor works, but i'm holding out for the real thing. plus, i'm gonna go opti2 at 50-1 for break-in, then 100-1 after that.

i even pedaled the bike around the block and it's so friggen cool feeling. except it's gonna be a shoe-melting, leg-burner with that exhaust.

but so what. it looks amazing. i'll get some overall pics tomorrow, when i can use the garage door. for now, you just gotta be satisfied with the detail shots...
 

Attachments

BarelyAWake

New Member
Jul 21, 2009
7,194
21
0
Maine
fasteddy - Yus - the "whole wallet" technique also has far better ballistics for the larger projects, a mere handful of money only tends to wound the problem. :p

Seriously tho, I know this bike is gonna tap my resources far more than my Schwinn ever did, not just cash - but my abilities and even involving other people in the build. From day one I thought of that mountain bike as a mere prototype, an experiment to see if these engine kits were even worth the bother. All in all I have about $500 tied up in that one, every penny and even the bike itself I considered disposable.

After months of entertainment, roughly 2000 miles and many lessons learned I've decided that these motorized bikes are both amusing and handy enough to be worth "taking it to the next level" so to speak and investing my hard-earned pennies in quality components and my time in fabricating what can't be purchased.

The expense... well I suppose it all depends on perspective. Everything I've invested in the Rollfast so far, the shiftkit, hubs, engine kit, and even the bike itself is still less than what I've got tied up in the computer system I'm staring at now, far far less than I've blown on other hobbies that were also less useful in my daily life.

I suppose I'm preaching to the choir lol but I'm still constantly surprised at how the low cost of these engine kits skews perspective, how many will resent the "high price" of say SBP's shift kit, which I suspect many of us have spent the same or more on a single night out on the town. I'm not gonna kid myself and claim it's an investment, but on the other hand the amusement it provides is priceless, at least to me.

I will say that the Schwinn saved me from buying yet another beater car, some POS that I'd hate, hemorrhaging cash with constant breakdowns and expensive parts, insurance and even fuel. I hope to build the Rollfast to be as rugged and reliable as possible with the weakest component being the Chinese engine itself - which is easily replaceable for less than a hundred bucks. Should it manage to get me through just one season, saving me the misery of dealing with everything that perpetuating a car entails - I figure it'll have paid for itself and that's not even factoring in the fun.

o_O

Wow... pray forgive my 4am rant lol, but hey - you said "I do sure do admire the guys that can build their way out of a problem. I have to buy my way out."... aren't you the one building a sidecar? Seems to me that's something not available at the local Walmart... or anywhere for that matter lol :D
 

BarelyAWake

New Member
Jul 21, 2009
7,194
21
0
Maine
bairdco - holy crap man, the carb mount worked out perfect! The shorty, straight-shot intake will prolly improve performance too, nothin' like getting an added bonus out of what was initially an act of desperation lol

I dunno... actually I know for a fact you're stronger than me - I could never resist slappin' the peanut tank on and takin' her out for a ride lol

I suppose it's just the pics, but that front mount seems... I unno, it worries me for some reason. Obviously you know what yer doin', but I'm assuming you've checked for lateral movement? You mentioned new hardware and clearly those aren't factory studs so I guess it's all in my head... I think it's mostly that I'm not particularly fond of just the clamp method for engine mounting what with only two points of contact and both being comparatively low in relation to the engine's center of mass. *shrug* No matter - you did say it's just temporary heh

I may steal your CDI mount idea, I'm gonna have a ton of room under my motor... who am I kidding? I've room all over this build heh, I'm gonna be hard pressed to fill the empty space in such a way to not have the engine look funny :p Again, I really do like the tighter builds like yours, they do end up lookin' factory and well worth the problems that crop up.

Yer gonna hafta get another old bike man, yer gonna be done so fast - the Rustoration Build Off wont be the same without ya ;)


edit: Hey - did you clean up the weld on the exhaust flange? Was there a problem w/it?
 
Last edited:

bairdco

a guy who makes cool bikes
Aug 18, 2009
6,537
264
63
living the dream in southern california
yeah, the motor mount looks kinda sketchy, but it's solid. i'm not too happy with it. gotta figure somethin' else out.

and no, that's what the exhaust looks like after you strip the 1/2" thick paint off. you should see where they welded the muffler to the pipe...
 

silverbear

The Boy Who Never Grew Up
Jul 9, 2009
8,325
670
113
northeastern Minnesota
You guys are moving right along, I see. Nothing much to report here. I did order a couple cans of the deep blue Dupli Color engine enamel from Napa, but forgot to pick up the darker primer, so will just go ahead and use the lighter gray to prime the frame, etc. The warm temps of Sunday have returned to the reality of around 30 this morning, too cold to paint anything since I work outside. Hopefully it will warm up some so that I can get the frame primed. The rear fender is slowly taking shape and the guards are coming around. As soon as things are as good as I can get them with the straightening and tapping out of dents I'll do the silver solder work repairs and follow with JB Weld to fill in lows. Then paint and assembly. I can hardly wait to start putting things together. Bairdco, your progress is impressive and moving right along. Thanks for the Sheldon Brown link. Looks kinda complicated, so it will take some study. I need to find something that deals with old steel rims and bigger spokes that is written for dummies. I'm thinking to maybe replace one spoke at a time, drilling bigger holes as I go. At least I can't get the pattern screwed up that way...
Barely, what's next, the tank?
Guess that's it for now.
SB
 

bairdco

a guy who makes cool bikes
Aug 18, 2009
6,537
264
63
living the dream in southern california
here's the standard "garage door" pics...

the front mount ain't gonna work for me. it's too tall to be supported by two 6mm studs. it already looks like they're bending. i've got another idea that should work, and clean up the lines better.

the tank is gonna take some doing. i set the peanut on there, and it actually didn't look too bad. not great, but not the worst thing in the world. i might have to put it on so i can ride it while i'm building the new one.

the clutch is weird. it's super smooth, and has a very short pull to engage, without dragging. i hope it works as well with the motor running.

the chain guard almost fits. i'd have to cut it a little. that's a tough decision. on one hand, it's 70 years old and the odds of me finding another one are slim (and if i found one, it'd probably cost as much as i paid for the whole bike,) but on the other hand, it's my bike. i can do what i want with it, as long as i'm happy. i really don't forsee myself taking the motor off and pedaling it, or, god forbid, selling it, so what's stopping me? the only reason i want it on there is for aesthetics anyway. the motor pretty much acts as a chainguard anyway...

decisions, decisions...

enjoy the pics.
 

Attachments

BarelyAWake

New Member
Jul 21, 2009
7,194
21
0
Maine
bairdco - Lookin' good man - I say cut the chain guard, on the one in a million chance it turns out ya want it back to original it'd be easy 'nuff to repair... and it is your bike after all ;) What sprocket did ya go with? It looks so itty-bitty heh

silverbear - Tho I'd love to start the tank, for that I'm dependent on someone else... it may be awhile... our business slows right down as soon as the first snow hits, so maybe next week or so we'll start on that? Watch it not snow this year simply because I wanna get the tank done lol I'll prolly start cleanin' and painting the rims tho as my hubs showed up today, with only like 23 hours between placing the order and opening the box :D (no, I didn't "overnight" it heh)

Oh right - I ordered them from Bikeman in case anyone is interested, they're not the cheapest but they have good customer service and a great selection. They're also just the next town over from me, so obv. that effects the delivery time lol, still - I'm happy my order didn't just sit there for a coupla days.