My first build: 1912 Indian

GoldenMotor.com

Bugthunder

New Member
Nov 6, 2011
54
0
0
Florida
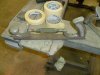
I now have the jackshaft chained to the motor. As you can see from the photo I tigged a couple of pieces of aluminum for the mount.

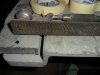
Next was the handlebars. I had to cut a section out of the middle to make them fit better.

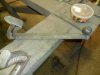
I put some of the accessories on the frame while it was jigged to see how they would be mounted. You can also see the old timey kick-stand I fabbed up for it.

More photos coming!

[/IMG]
 

Bugthunder

New Member
Nov 6, 2011
54
0
0
Florida
I finally finished fabbing the tank. Many thanks to Dan Orabona at Taylar Motorbikes for his tips on working the metal for the curved sides! If you haven't seen Dan's work, check it out at: wix.com/taylarmotorbikes/taylar#!

Nice work!

I sealed the inside of the tank yesterday with Por-15 and will do the final bodywork soon. I plan on using a metal based putty so I can powder coat it.

The front end sits high at the moment, as you can see from the pictures. It took some experimenting to get the fork-rockers to function properly. The finished rockers will drop the front wheel significantly and provide spring for hard hits.


thegnu

New Member
Sep 15, 2011
982
1
0
freedom pa
I. I plan on using a metal based putty so I can powder coat it.


]
NO metal base putty can be powdercoated it will bake right off of your tank . the only way I know to do any filling on anything to be powdercoated is to learn how to work lead ... a very old technique but incredibly effective an durable . I would hate to see you work that tank to perfection an find out that work is no good .
Gary
 

silverbear

The Boy Who Never Grew Up
Jul 9, 2009
8,325
670
113
northeastern Minnesota
Gary,
Interesting that you should mention lead work as Dan the Tinsmith and I were discussing the very thing in reference to gas tanks, not only smoothing out any irregularities but also sealing up possible pinholes in the welds. We're just at the mulling over stage, but are considering it on the tank I'm about to make which is bound to have pinhole leaks as I am new to welding. Many years ago Dan did some lead automotive body work and is trying to remember how he went about it. Any tips?

Also good to know about the powder coating as that was also something I've been wondering about regarding re working old fenders and using lead instead of epoxy as a filler in low spots.

I happen to have a good bit of lead scraps left over from when I used to make leaded windows, so have a good source. I guess lead has fallen out of favor to Bondo, but I remember from my youth staring at hot rod magazines and seeing articles on working lead, using a paddle as I recall. .I think I'll look in to it.
SB
 

thegnu

New Member
Sep 15, 2011
982
1
0
freedom pa
the lead you have will work get some purified bees wax or unpurified, when we do it in my shop the whole shop smells like honey ! rough up the tank with 36 grit grinding wheel , be sure to use an acid core solder rosin dosent work as well heat the steel spread the solder with a fine steel wool the solder is the bonding agent, be care ful not to overheat the steel an turn it blue , get your lead hot like warm butter an spread with a wodden paddle thats been dipped in the bees wax that keeps the lead from sticking to the paddle , almost forgot wash the tank between solder an lead with a good precleaner to remove any remaining acid an wash with the same cleaner after to remove any bees wax that may remain.
easy as pie ! an glad to know that somewhere out there people still do lead work , thought I was one of the last of them.
Gary
 

allen_okc

New Member
Aug 18, 2010
149
4
0
oklahoma city, oklahoma
This project has some very qualified skills of workmanship going on with it - its a pleasure to see this kind of quality happen...

This bike, is more than a bicycle - it is a refabrication of the early motorcycles, very classy and very clean - awesome job...
 

rustycase

Gutter Rider
May 26, 2011
2,746
5
0
Left coast
Wow!

That would really help me out, Bugthunder!

I don't really need front suspension on my motorized bicycle, because the roads are pretty smooth... it's the impact with curb & gutter aprons that really make me nervous! I'm afraid of crumpling the front wheel sometimes!!! lol

Running a rocker that way would resolve my problem!

Dan at Taylar does nice work.
Amazing what can be done with a chinagirl!

Best
rc
 

Bugthunder

New Member
Nov 6, 2011
54
0
0
Florida
Here are some pictures of the tank build.
I had taken more during the build but I can't find them or they were deleted.

I used 18 gage steel and formed the round sections by pressing them over a 5" PVC pipe using another (split down the middle) piece of 5" to sandwich the metal. I fine tuned the curves of the end sections using both a metal and rubber mallet on a wood table and a metal table.

As you can see from the last photo, I built a wooden jig to check the pieces as I cut and formed them. This made fitting a lot easier.

I did not use internal baffles as I had planned. The 18 gage steel ended up making for a heavy tank. If I went lighter gage, I would build in baffles for rigidity.
 

silverbear

The Boy Who Never Grew Up
Jul 9, 2009
8,325
670
113
northeastern Minnesota
Thanks for posting the pictures and commentary. It is a great looking tank. Did you tack the pieces together with the tank mounted as it is in the photos?
SB
 

silverbear

The Boy Who Never Grew Up
Jul 9, 2009
8,325
670
113
northeastern Minnesota
the lead you have will work get some purified bees wax or unpurified, when we do it in my shop the whole shop smells like honey ! rough up the tank with 36 grit grinding wheel , be sure to use an acid core solder rosin dosent work as well heat the steel spread the solder with a fine steel wool the solder is the bonding agent, be care ful not to overheat the steel an turn it blue , get your lead hot like warm butter an spread with a wodden paddle thats been dipped in the bees wax that keeps the lead from sticking to the paddle , almost forgot wash the tank between solder an lead with a good precleaner to remove any remaining acid an wash with the same cleaner after to remove any bees wax that may remain.
easy as pie ! an glad to know that somewhere out there people still do lead work , thought I was one of the last of them.
Gary
Thank you for the response, Gary. I'm guessing then that the lead can be sanded. I would guess that a face mask of some kind is a good idea due to the toxicity of lead. A lead coating on the outside of the tank at the welds should effectively seal it, wouldn't it?
SB
 

Bugthunder

New Member
Nov 6, 2011
54
0
0
Florida
Silverbear, I first tacked the threaded couplers that I used for tank mount points to the inside top and bottom of the tank where I drilled my holes. Then I adjusted the supporting rods accordingly before tacking them so that the distance would be correct.

I used parts of my wooden jig to check fit but this was more useful in the initial bending and shaping of the metal parts. I also continued to check fit with the frame after each part was tacked, however all tacks for the tank were done on a flat metal table where I clamped the bottom of the tank to make sure it stayed flat while attaching each piece.
 

Bugthunder

New Member
Nov 6, 2011
54
0
0
Florida
Here are some photos of the rockers I built. These are configured for the outside of the fork dropout on my forks.

There are many adjustments here to be considered such as length of pivot arm from dropout mount hole to wheel and also to spring linkage mount. Leverage makes a big difference in spring action. Also angle aspect; the original angle I chose allowed the spring to sag, taking away most of my suspension action. If you look at the last pictures with the tank on you will see how the pivots are set up. The angle from the spring linkage to the drop outs is higher than 90 degrees from horizontal, this gives me perfect stiff spring action for hard bumps, but the rocker design will be changed to keep this aspect but allow the forks to drop more over the wheel in the neutral position. I’ll post pictures when I fab these up.
 

thegnu

New Member
Sep 15, 2011
982
1
0
freedom pa
Thank you for the response, Gary. I'm guessing then that the lead can be sanded. I would guess that a face mask of some kind is a good idea due to the toxicity of lead. A lead coating on the outside of the tank at the welds should effectively seal it, wouldn't it?
SB
Yes an yes , Wear a good mask with CHARCOAL filters , an be carefull not to file off too much from the seams , heres a pic of the lead files I have . sometimes the lead will clog the file use a soft wire brush to clean it .
Gary
 

Attachments

silverbear

The Boy Who Never Grew Up
Jul 9, 2009
8,325
670
113
northeastern Minnesota
Silverbear, I first tacked the threaded couplers that I used for tank mount points to the inside top and bottom of the tank where I drilled my holes. Then I adjusted the supporting rods accordingly before tacking them so that the distance would be correct.

I used parts of my wooden jig to check fit but this was more useful in the initial bending and shaping of the metal parts. I also continued to check fit with the frame after each part was tacked, however all tacks for the tank were done on a flat metal table where I clamped the bottom of the tank to make sure it stayed flat while attaching each piece.
Thank you for the clarification.
So the threaded couplers ended up getting welded to the inside surface of the tank and then the mounting bolts from the outside thread into them, holding the tank to the frame. Is that right?
SB