You are using an out of date browser. It may not display this or other websites correctly.
You should upgrade or use an alternative browser.
You should upgrade or use an alternative browser.
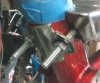
Micargi Puma with twin 97cc flat top lifan's
- Thread starter LabRat
- Start date
I think the small Comet is rated for up to 8hp You should be good to go...http://www.mfgsupply.com/gomini/gominiclutch/gominiclutchtorq/gominiclutchtorq30.html .... Curt
Last edited:
LabRat
New Member
I think the small Comet is rated for up to 8hp You should be good to go...http://www.mfgsupply.com/gomini/gominiclutch/gominiclutchtorq/gominiclutchtorq30.html .... Curt
Thanks for the heads up. I am building my own JS and I see these parts are available where I could use them in what I have envisioned. Of note I see they have this
30 Series Driven Unit, 5/8" Bore, 6" Dia
http://www.mfgsupply.com/gomini/gom...rq30/gominiclutchtorq30driven/219456a-w1.html
I have not purchased a clutch yet and need to consider this option. Final parts ordering will take place Aug 8th.
bigbutterbean
Active Member
You really should find a better way to secure that drum. Maybe weld a secondary bracket around the fork where the tab is welded for extra support and also to take some of the load off that one spot where the tab is welded. I'm concerned for your safety, and when the tab breaks off and your brake cable wraps around your hub, locking your wheel and throwing you from the bike at 50mph, I'm going to feel very bad for you. Ask bairdco what can happen when a homemade brake arm bracket fails.
16v4nrbrgr
Active Member
He's responsible for his own actions, and as long as its inspected every time and the bike isn't stoppied I think it will prolly be OK.
NEAT TIMES
New Member
LAB
Nice build. I have a cvt go kart drive, not installed yet. Think you need drive and driven parts as the belt is flat on one side.
You could use a go cart centrifugal clutch on your jackshaft, belt or chain model.
Will finish my stretch cruiser build when my Swing Blade Lumber Saw Mill is finished.
Ron
chainmaker
Well-Known Member
LAB
Nice build. I have a cvt go kart drive, not installed yet. Think you need drive and driven parts as the belt is flat on one side.
You could use a go cart centrifugal clutch on your jackshaft, belt or chain model.
Will finish my stretch cruiser build when my Swing Blade Lumber Saw Mill is finished.
Ron
Building a sawmill......that's awesome! Sorry to quick jack the thread LR
RicksRides
Member
LabRat,
Have you considered running 2 centrifical clutches ( one on each engine) with one modified for pedal start application.
Also when modifying forks like you did I would re inforce the inside of the tubing by sliding a piece of tubing in it , then weld it back together, basically doubling the thickness of the forks in that area.
With that said your machine is looking great!
Rick
LabRat
New Member
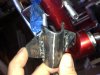
Nice point on the forks, but yes this is how it was done. The solid piece is set into the fork.
Starting the engines is simple start one the other starts.
Still undecided on the transmission. I have all the parts except a clutch and chain.
The on frame / welded into the frame gas tank is yet to be built but I have killed a few sheets of cardboard fiddling with the 'look'.
Starting the engines is simple start one the other starts.
Still undecided on the transmission. I have all the parts except a clutch and chain.
The on frame / welded into the frame gas tank is yet to be built but I have killed a few sheets of cardboard fiddling with the 'look'.
LabRat
New Member
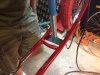
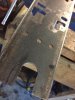
Sorting out the front bracket. Here I have taken a part of the puma's seat post down tube sliced it in half and then doubled it for thickness. Once fitted tabs were added. The tabs will be drilled to slide over the U-bolts that are welded in under and through the engine mount.
Attachments
Deiseldave
New Member
Looks great Lab
Deiseldave
New Member
Looking great as usual there Lab... you and the rat pack are great at what you do ,keep up the good work and lets hear them twins scream down the street !!!!
LabRat
New Member
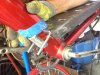
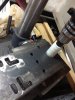
Modification to the rear of the engine plate. First a hole was drilled. Then a jig saw was used to open the hole into a slot.
Attachments
LabRat
New Member
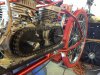
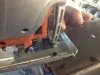
The engine plate in place now. Clicking through will show the angle of the support post is the same as the original seat post. This post blocked off and welded to a cross member plate. The bike will have a custom seat pan.