
You are using an out of date browser. It may not display this or other websites correctly.
You should upgrade or use an alternative browser.
You should upgrade or use an alternative browser.
Micargi Puma with twin 97cc flat top lifan's
- Thread starter LabRat
- Start date
LabRat
New Member
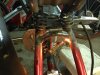
Thanks Power tool. Seeing how I do not like the plate on the mock up jack shaft I will be taking it apart and re assembling minus the large back plate. Still pushing the pencil about it. Ordering/Buying some steel I beam shorts and plate. Ill figure something out and the JS will not look the same.
Leaning toward the a tractor alternator on this build is part of the drive to redesign the jackshaft. Need a place for a pulley to power the lighting.
Leaning toward the a tractor alternator on this build is part of the drive to redesign the jackshaft. Need a place for a pulley to power the lighting.
16v4nrbrgr
Active Member
And how about a side view. The seating looks really nice; I will 'cover' more later
Looking sleek Labrat!
LabRat
New Member
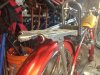
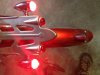
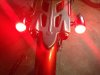
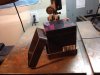
The nifty 12v LED tail lights from Amazon.com and the seller has them in amber as well. The cost was approximately $24 with freight. They do ship from China but arrived in less then two weeks. (More than I can say for the head light that was ordered from Japan 3 weeks ago as it remains at sea.) The rack is a re pop Columbia that was purchased on eBay over 2 years ago and it sure looks to like its found its place on the Puma Twin.
Attachments
LabRat
New Member
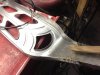
Should mention this too. In the market for some leather to use to cover the seat frame today I bounced into a 2nd hand clothing store. Looking specifically for dated styles that I understood would have low pricing. There were a multitude of things to look over. Men look in the ladies department too. Your not shopping for yourself your looking at the leather! Anyway I was able to find a Wilsons made dark maroon leather jacket looked like something MJ would have commissioned Members Only to make. Eww.... However the deep V stitching on the back will reveal well cobbled into the Puma Twin seat pan...
Cost was $24.
Cost was $24.
Intrepid Wheelwoman
New Member
I have only just found this thread, - how did I come to miss it!
What a magnificent motor bicycle this is going to be. I am deeply impressed.
And it's powered by two side valve engines! I love sideys. Back in my 20s I build up a full race 4 cylinder 100E (English) Ford engine. Fully ported, relieved block, highly modified oiling system. Everyone said i was nuts to mess around with a side valve engine and I thought they were nuts right back at them for not seeing a side valve engine's potential. Those old 100E engines had a forged crankshaft in them that was just about unbreakable.
Sorry to hi-jack the thread with my rememberings of past glories, but I can't help it I just love side valve engines.
LabRat
New Member
Chrome/Red LED Bullet Stop TURN SIGNAL LIGHT Motorcycle Cruiser Chopper Custom Harley Softail Dyna Sportster Honda Yamaha Suzuki Kawasaki Custom Chopper Metrics
by Tmsuschina
www.amazon.com
$26.99 + Free Shipping
In Stock. Sold by tmsuschina
by Tmsuschina
www.amazon.com
$26.99 + Free Shipping
In Stock. Sold by tmsuschina
LabRat
New Member
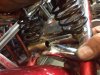
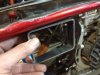
As previously stated the bookrack was not attached to the frame. Modifications were made as follows. First reshape the direction of the fitting that reaches toward the seat post. This was accomplished with tin snips and a bit of vice work and a hammer. Then weld & grind.
Attachments
LabRat
New Member
Next came making a support to hold the book rack. Adding cross sectional strength was not needed at this junction. I curved piece of arm rest from the wheel chair frame I have been hacking about was used in this course.
Attachments
Velodrome
Well-Known Member
HA! Found em !! Thanks! http://www.amazon.com/Motorcycle-Cr...words=Chrome/red+LED++bullet+stop+turn+signal
LabRat
New Member
These lights are solid and heavy steel. Liked them so much I ordered a pair of yellow ones for front blinkers last night.
tommyboy1442
Member
dude!!! just sick man!!!!! love it!!
LabRat
New Member
totaly amazing you one clever guy. Love what you are doing and the build. Back yard enginering at its best................Curt
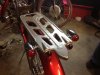
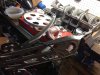
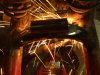
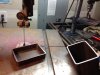
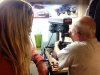
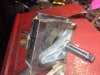
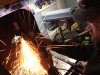
Ok I had to laugh at " Back yard engineering at its best " Here is why. The back story on the band saw. The part that adjust the tension in the top pulley made of cast pot metal shattered rendering the saw scrap metal. Sledge is seen at the drill press working on the part he re constructed in steel. Wizzkid is shown with the cut off tool making the round hole square to fit the new steel part. And there is the part. Sledge put a lot of time into this with basic tools. Credit where credit is due on this one. I just took the pictures these two guys are great!
This all had to take place before the parts for the battery tray could be cut . The band saw is awesome! What an addition to the Laboratory! Seriously going to save money on cut off disk. And all the sweeping that goes with it too.
Attachments
LabRat
New Member
Well as I posted I did order amber ones for the front the same day you posted this on the 19th today is the 21st and I just got a tracking number from china. Ordered on Friday after hours shipped Monday. Awesome seller fair price considering delivery by pidgin mail from Asia.