
You are using an out of date browser. It may not display this or other websites correctly.
You should upgrade or use an alternative browser.
You should upgrade or use an alternative browser.
bicycle engine clutch.
- Thread starter Norman
- Start date
user....
you DO NOT hammer anything to remove the clutch assembly!!!!
you DO NOT remove the small sproket or the large gear sproket!!!~
they provide a clutch PULLER tool in the kit.
after removing the star nut, the pressure plate and the main shaft nut (and the compression washer behind it) you use the clutch hub puller tool.
use the large end of the puller screwed into the center hub (just snug.... tightening this does not remove the hub. screw the small piece of the puller into the center of the puller and tighten it untill the complete hub slades out in one complete piece.
there a slot keyway pin you must watch for as the hub comes out. dont lose it (it is a very small steel half moon shape).
you should now have the hub in your hand, bearing races and 2mm balls should all still be intact.
there are 3 guide on pegs, hold the hub and see if it all turns freely with no chunckiung or grinding.
reassemble in reverse order..... you dont need the tool, use a socket to tighten. make sure the keyway is in the shaft slot FLAT SIDE DOWN. you may have to tip the pin down slightly to slide the hub over it.
good luck
stay dry
gubba
Last edited:
user....
you DO NOT hammer anything to remove the clutch assembly!!!!
you DO NOT remove the small sproket or the large gear sproket!!!~
they provide a clutch PULLER tool in the kit.
after removing the star nut, the pressure plate and the main shaft nut (and the compression washer behind it) you use the clutch hub puller tool.
use the large end of the puller screwed into the center hub (just snug.... tightening this does not remove the hub. screw the small piece of the puller into the center of the puller and tighten it untill the complete hub slades out in one complete piece.
there a slot keyway pin you must watch for as the hub comes out. dont lose it (it is a very small steel half moon shape).
you should now have the hub in your hand, bearing races and 2mm balls should all still be intact.
there are 3 guide on pegs, hold the hub and see if it all turns freely with no chunckiung or grinding.
reassemble in reverse order..... you dont need the tool, use a socket to tighten. make sure the keyway is in the shaft slot FLAT SIDE DOWN. you may have to tip the pin down slightly to slide the hub over it.
good luck
stay dry
gubba
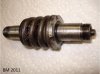
Thanks for the tips. But how does the clutch assembly come out without removing at least the small chain sprocket? Also how does the gear puller that is included in the kit actually remove the clutch assembly? Just for clarification, the attached picture is the part I am referring to. I guess it is called the clutch shaft, sorry if I confused you. My RAW 80cc kit only came with a gear puller, what does the clutch puller look like? Is it the same as the gear puller?
Attachments
GearNut
Active Member
What you have shown in your picture is not the clutch. It is the transmission shaft with the clutch pressure spring still attached to it.
The clutch assembly is the large round thing with gear teeth all around it that is attached to the end of the transmission shaft. The puller tool removes it from the end of the transmission shaft.
Now...... on to the transmission shaft:
The assembly is installed into the case with an interference fit. The holes in the case, called bearing bosses, are machined at the factory to be a few thousandths of an inch smaller than the diameter of the bearings. This gives the bearings a tight, non-slip fit into the cases.
To remove the shaft and bearings properly you need to heat the case either in an oven to approx. 180F/ 200F or if you have the experience, carefully heat the case around the bearing boss with a propane torch before pressing or driving the bearings and shaft out. Aluminum expands more than steel and the heating process causes the bearing bosses to loosen up their grip on the bearings a little bit.
NOTE: When working on the bearings while still attached to the shaft, never put any sort of pressure on the shaft or inner bearing race. Only apply pressure to the outer bearing race. Use a properly sized deep socket or short piece of pipe to accomplish this.
To re-install the bearings and shaft back into the cases do the heating process to the case again, only this time you also need to put the bearings and shaft assembly in a zip-lock bag and place it in your freezer it for an hour or two.
Freezing the shaft assembly causes it to contract or shrink, heating the cases causes the bearing bosses to expand. As quick as you can, re-install the shaft into the case The assembly should nearly push into the cases with your fingers. A little tapping might be necessary. It needs to be done quickly before the hot case warms the shaft bearings and the frozen bearings cool the case. If this happens the assembly will become much more difficult to work because the bearings will have warmed up and the bearing bosses have cooled. You will have lost all thermal advantage to properly re-installing the assembly.
Last edited:
What you have shown in your picture is not the clutch. It is the transmission shaft with the clutch pressure spring still attached to it.
The clutch assembly is the large round thing with gear teeth all around it that is attached to the end of the transmission shaft. The puller tool removes it from the end of the transmission shaft.
Now...... on to the transmission shaft:
The assembly is installed into the case with an interference fit. The holes in the case, called bearing bosses, are machined at the factory to be a few thousandths of an inch smaller than the diameter of the bearings. This gives the bearings a tight, non-slip fit into the cases.
To remove the shaft and bearings properly you need to heat the case either in an oven to approx. 180F/ 200F or if you have the experience, carefully heat the case around the bearing boss with a propane torch before pressing or driving the bearings and shaft out. Aluminum expands more than steel and the heating process causes the bearing bosses to loosen up their grip on the bearings a little bit.
NOTE: When working on the bearings while still attached to the shaft, never put any sort of pressure on the shaft or inner bearing race. Only apply pressure to the outer bearing race. Use a properly sized deep socket or short piece of pipe to accomplish this.
To re-install the bearings and shaft back into the cases do the heating process to the case again, only this time you also need to put the bearings and shaft assembly in a zip-lock bag and place it in your freezer it for an hour or two.
Freezing the shaft assembly causes it to contract or shrink, heating the cases causes the bearing bosses to expand. As quick as you can, re-install the shaft into the case The assembly should nearly push into the cases with your fingers. A little tapping might be necessary. It needs to be done quickly before the hot case warms the shaft bearings and the frozen bearings cool the case. If this happens the assembly will become much more difficult to work because the bearings will have warmed up and the bearing bosses have cooled. You will have lost all thermal advantage to properly re-installing the assembly.
Wow, thank you so much! I thought there was no easy way of just straight hammering the shaft out. Norman never mentioned in his posts on clutch shaft removal the use of heat to help expand the casing slightly. What you say makes sense. Would it also help to apply some penetrant before/after heating the casing to aid in removal? Or does it do nothing?
GearNut
Active Member
Applying grease to the bearings and case bosses before re-assembly will help, and don't worry, it won't make them slip loose years later either.
Keeping to the temperatures of 180- 200 F is important though. Any hotter and you risk cooking the grease inside the bearings, ruining it's ability to properly lubricate.
When bearing grease encounters thermal break down it will not always return to it's engineered lubricity state when cool. In street language: The special additives may become destroyed.
Using a penetrate lube before dis-assembly cannot hurt things, but I would not do it myself unless I am dealing with rusty, corroded parts.
Last edited:
Applying grease to the bearings and case bosses before re-assembly will help, and don't worry, it won't make them slip loose years later either.
Keeping to the temperatures of 180- 200 F is important though. Any hotter and you risk cooking the grease inside the bearings, ruining it's ability to properly lubricate.
When bearing grease encounters thermal break down it will not always return to it's engineered lubricity state when cool. In street language: The special additives may become destroyed.
Using a penetrate lube before dis-assembly cannot hurt things, but I would not do it myself unless I am dealing with rusty, corroded parts.
Could I use a butane torch? Don't have a propane one handy
Yes but it will take alot longer to heat up the case. You need to heat up both sides of the case evenly at the same time. A bit difficult with a small butane torch.
It's acutally a torch that uses the portable stove type butane cans (size of a standard spraypaint aerosol can). So the torch head size is equal to that of a propane torch, if not slightly larger. It's just butane fuel source vs propane.
Update: I heated the engine casing around the bearing for a good minute and tried to drive out the bearing, but am still having trouble removing it, even with a drilling hammer. How long am I suppose to heat it for to get the bearing to come out with less effort?
I eventually, after a long time of hammering, drove out the bearing from the clutch side. The bearing on the clutch side is slightly better, but outer bearing wall fell off, exposing the bearing inside to dust and grime. The bearing on the small chain sprocket side is completely destroyed. Both walls of the bearing are gone and some of the ball bearings came out, jamming the shaft and preventing it from freely spinning. Now, the outer race is stuck in the casing and I have no idea how to remove it. It is pretty flush with the casing from the inside and is hard to get a deep socket to fit it exactly. Can I dremel the stuck race out? Seems like that is my only option at this point.
Last edited:
GearNut
Active Member
I recommend trying to drive it out with a well fitting socket or piece of pipe. If you choose to dremel the outer race out try your best to avoid cutting into the case.
Typically if you cut nearly all the way through the race, at oposing sides of the race (for example: 12 o'clock and 6 o'clock positions) leaving only a hair thin section of race left where you did the cutting, you can crack through the remaining hair thin section with a few carefully placed chisel blows.
Typically if you cut nearly all the way through the race, at oposing sides of the race (for example: 12 o'clock and 6 o'clock positions) leaving only a hair thin section of race left where you did the cutting, you can crack through the remaining hair thin section with a few carefully placed chisel blows.
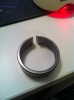
Here's the sonafabitach that was such a PITA to remove. I tried fitting a deep socket in the clutch shaft housing, but it got caught on a slight lip that was created from an errant bearing that got caught and scored the casing. I decided to just go straight through one section with carbide cutter dremel bit. And whacked it using the 4lb drilling hammer and flathead screwdriver as chisel from the opposite side. I watched extremely close up as I drilled through to see the change from the shiny bearing race metal, to the slightly duller casing metal. I did ground a little of the casing bearing seat ever so slightly, but nothing resembling a groove or thereof. I heated the casing during removal, but failed to notice any improvement in bearing removal. I am certain the area around the bearing seat was heated past 200F. Is it suppose to get hot to a point that touching the casing for a split second will cause blisters? How long am I suppose to be torching the area before bearing installation/removal is easier?
Attachments
GearNut
Active Member
180F to 200 is standard. You can go as hot as 350F but any more than that and you risk annealing the aluminum to a state that is softer than it all ready is.
Aluminum starts to anneal at 380F.
I use a non contact thermometer gun whenever heating parts for bearing removal/ installation.
Non-Contact Infrared Laser Thermometer
If it never got any easier for you after heating, that bearing must have been a really tight son of a bee fit from the factory. Quality control? What's that....
180F to 200 is standard. You can go as hot as 350F but any more than that and you risk annealing the aluminum to a state that is softer than it all ready is.
Aluminum starts to anneal at 380F.
I use a non contact thermometer gun whenever heating parts for bearing removal/ installation.
Non-Contact Infrared Laser Thermometer
If it never got any easier for you after heating, that bearing must have been a really tight son of a bee fit from the factory. Quality control? What's that....
yeah, it was one tight son of a bee fit, really really tight. Hopefully putting the new bearings in won't take Thor-like strength with my trusty Mjölnir.
Ayotaybrink
New Member
So im having a problem with my clutch Ive adjusted the flower nut so i can pedal when the clutch lever is pulled in (disengaged) and when i let go of the clutch lever the tire will not spin (engaged) however when i get the bike running and pull in the clutch lever the clutch does not disengage I picked up my back tire with the bike running and noticed it was spinning. Ive tighten the clutch arm and cable as much as i could I just dont understand whats keeping the clutch from disengaging when the engines running since its fine when the engines off. Any help would be great!
Bryan Smith
Member
Are the rubber pucks tight in the holes? I found that my clutch worked much better when I sanded the sides down to fit the holes better. They cram them in tight at the factory and go on to the next engine. Looser pucks engage and disengage easier.
BikeGuyver
Member
the clutch arm engages a small metal pin that is placed in front of a ball bearing. check to make sure the pin is long enough, if not, you can buy lengths of it and either cut them yourself or do it at the store. i noticed in my case this pin would be worn down over time.
flmotorbikes
New Member
It could have internal wear too. If you do alot of stop and go
flmotorbikes
New Member
I would just get a replacement their not that expensive so it might save some frustration