
You are using an out of date browser. It may not display this or other websites correctly.
You should upgrade or use an alternative browser.
You should upgrade or use an alternative browser.
Womens Issues
- Thread starter harry76
- Start date
Yes harry, I have 3 twins and 5 singles. The 1 cylinder motors are rated at 3/4 hp and were made up into the 40s and maybe 50s. The twins first came out in 1937 and are 5/8hp and are more rare because by then most people had electricity for their washing machines. I have thought about using one in a bicycle but they just don't have enough power for me. The singles are hit and miss governed and the twins are throttle governed. Neither have a way to control motor speed on the go unless you use different carbs. Anyway, I love those old motors and run them for quests often.
harry76
Well-Known Member
I think ive given you this link before, but its a maytag twin and it looks like it goes alright, not in the same league as your briggs bikes but it gets along, not to mention its just soooo cool .... Maytag Bicycle‏ - YouTube
MEASURE TWICE
Well-Known Member
I posted on another thread here in MB you may look at the GenSet that I saw in the back of a B24 part of Wings of Freedom Tour. Also my Briggs 5S. It was running and about a year ago I had the valves and seats cut for better compression so it will start easier and run more powerfully.
http://motorbicycling.com/f36/villiers-boardtrack-racer-30023-3.html
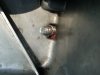
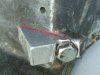
MarkSumpter or any others out there, I was wondering if you know why the two lower of the three threaded holes for the ¼ X 20 bolts for the Briggs Flywheel Cover on the engine crankcase casting are not solid?
I thought that maybe so the thickness in cooling after the molten metal is poured it does not crack.
Anyway one of the inside pictures of my Briggs’s crankcase has two dimples inset by the back bottom of the crankcase. The one on the right side is one that I had accidentally drilled into its hollowed out space.
** ref to page 7 post #70 on this thread **
Another oil breather you might say. This all happened when I was trying to drill out a rusted in place bolt on the other side of the crankcase that is for one of those ¼ X 20 bolts to attach the flywheel cover.
When I saw the daylight coming through when the drill went toward the crankcase and connected with the hollowed out space in the casting, I just decided to make the hole larger to the size for a tap for a Helicoil.
I made an angle wedge on the outside of the crankcase so that the bolt I coated with high temp red RTV, and a split lock washer could plug the extra oil breather I had created by accident.
The picture of the outside wedge attached and the close up of the inside thread.
Measure Twice
http://motorbicycling.com/f36/villiers-boardtrack-racer-30023-3.html
MarkSumpter or any others out there, I was wondering if you know why the two lower of the three threaded holes for the ¼ X 20 bolts for the Briggs Flywheel Cover on the engine crankcase casting are not solid?
I thought that maybe so the thickness in cooling after the molten metal is poured it does not crack.
Anyway one of the inside pictures of my Briggs’s crankcase has two dimples inset by the back bottom of the crankcase. The one on the right side is one that I had accidentally drilled into its hollowed out space.
** ref to page 7 post #70 on this thread **
Another oil breather you might say. This all happened when I was trying to drill out a rusted in place bolt on the other side of the crankcase that is for one of those ¼ X 20 bolts to attach the flywheel cover.
When I saw the daylight coming through when the drill went toward the crankcase and connected with the hollowed out space in the casting, I just decided to make the hole larger to the size for a tap for a Helicoil.
I made an angle wedge on the outside of the crankcase so that the bolt I coated with high temp red RTV, and a split lock washer could plug the extra oil breather I had created by accident.
The picture of the outside wedge attached and the close up of the inside thread.
Measure Twice
Attachments
Last edited:
MEASURE TWICE
Well-Known Member
I think ive given you this link before, but its a maytag twin and it looks like it goes alright, not in the same league as your briggs bikes but it gets along, not to mention its just soooo cool .... Maytag Bicycle‏ - YouTube
Thanks for the re-acquaintance of that link.
Do you have video up of your motor bike out on the road? Like to see it go!
The one in the video notice no magneto, battery not yet enclosed, but the points exposed, that takes the cake!
The friction drive I guess would not need the covering over the belt when the clutch is disengaged for the need to stop a rattling belt to catch and try to move the bike at a stop. The tightening of the belt happens simultaneously as the whatever it is rubs the wheel to transfer the power at the rear pulley.
Measure Twice
I think ive given you this link before, but its a maytag twin and it looks like it goes alright, not in the same league as your briggs bikes but it gets along, not to mention its just soooo cool .... Maytag Bicycle‏ - YouTube
Thanks harry. I've seen that video before and really like how he overcame the problems that enabled him to make it work on a bicycle. It's just a lot more than I would have thought of and probably the fact that it's been done already that keeps me from making one. Mine wouldn't be nearly as cool as his. I did make a Maytag scooter from plans from a 1934 Poipular Mechanics. Rode it around the block once and put it on the shelf.
Thanks Harry,
Didn't see this bike. Like Silverbear I was married 3 times and when I see something called Womens Issues I tend to duck down low and run like mad.
Missed this great build. Glad your young lady is interested in it and wants to help you design and build it.
One more to watch.
Steve.
Didn't see this bike. Like Silverbear I was married 3 times and when I see something called Womens Issues I tend to duck down low and run like mad.
Missed this great build. Glad your young lady is interested in it and wants to help you design and build it.
One more to watch.
Steve.
harry76
Well-Known Member
Hahaha im hearing you Fasteddy.
I just realised something..... me and my girl have the same birthday, different years. And my girl and her bikes engine were born in the same year..... just some random useless information/coinicidence, or destiny?...... you decide *music from the twilight zone playing*
I just realised something..... me and my girl have the same birthday, different years. And my girl and her bikes engine were born in the same year..... just some random useless information/coinicidence, or destiny?...... you decide *music from the twilight zone playing*
harry76
Well-Known Member
Today i did more staring then working.... but i did shorthen the seat stem and seat pole to make the seat a little lower for Kelly.
And i also cut up my shroud, thanks to msrfan for giving me the idea. I think its a big improvement in the looks department, looks more vintage, and id guess its better for blowing the air because its now guided rather then before hitting a corner section.
This is the thinnest steel ive tried welding with my welder, i didnt get it to where i was 100% happy because i blew a few holes in it. I just need to neaten it up a little but i had enough for today, so it can wait for now.

silverbear
The Boy Who Never Grew Up
Much improved. I like how the shroud now flows into the lines of the gas tank. How does Kelly like it?
SB
SB
Darn, SB said it first.
When I first saw the photos all I could think was very clever and how nicely it flowed into the gas tank.
I like the look a lot and maybe more people will leave them on when they see how you did yours.
I too, hope your young lady enjoys it and her friends want one so they can ride together.
Steve.
When I first saw the photos all I could think was very clever and how nicely it flowed into the gas tank.
I like the look a lot and maybe more people will leave them on when they see how you did yours.
I too, hope your young lady enjoys it and her friends want one so they can ride together.
Steve.
Very nice harry. Remember, on the square part of the starter ratchet, one corner out of the four is marked, That corner goes as straight up as possible when you slip the shroud back on. Otherwise it tries to catch one of the steel balls and spit the rope out. Also there's a small hole in the middle of the pressed in plug of the square part. A couple of drops of light oil in that hole lubes a little felt pad inside. If that goes dry the rope jumps out at you like a snake and makes a squealing noise. Really funny to see but not so efficient.
MEASURE TWICE
Well-Known Member
The flow visually does look nice on the outside and also as you said inside the air does not hit the corner.
Please don't rib me for sort of nit picking. I’m just making an observation.
Since the change of the flywheel cover/shrowd is not as the original, the governor would have the air- vane affected. The air-vane you can do away with just as I did along with the governor springs and linkages, because your girl friend will be in control of the idle.
***(yea I know working out the governor with the intake above a foot away, you might as well negate the governor)***
My intake on the Briggs makes a right hand turn and rotates to tilt forward the carb about 30 degrees to have the bowl level. I dispensed with the idea of some fangled way of still having a governor. I actually was contemplating an electronic/electro-mechanical way of making the linkages for a governor with this situation. It would have used two variable resistors with one at the air-vane and one at the butterfly throttle, along with two servo motors, and a circuit to board to make it work. Nuts, yea I’m that!
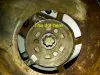
For what Msrfan said about the flywheel cover assembly, I was wondering if off clockwise from up at Noon to 2pm, the dot I think I can see in the pic I took of the Brigg’s Flywheel cover on my engine.
Note: The picture has up on the cover at a 45 degree angle to the left.
Note:
I did re-wrap the spring and was not observant of this. I hope that it is not that bad to cause any problem. I don’t think I’ve yet noticed anything. I did use plenty of lube on the spring and it works nice.
Though I did have a problem I had for a while was this. The mounts on the flywheel cover to the engine casting had to change, since I had to modify the way it was done when stuck/rotted out metal of the casting caused me to change it. It was the centering so that it would not scrape and shoot out sparks. Finally I got it centered OK.
Also as Msrfan mentioned lube at the other picture part on the flywheel end of the crank shaft. This is the part with the ball bearings inside, that helped immensely. I used 3 in 1 oil on it. This I think is a part with one of the shaved corners (picture pointer in blue)of the square, that should line up with the dot on the other part? It is not straight up, but at 2pm.
The spring I had too thick grease making recoil stubborn, so I cut its viscosity with some 3 in 1 oil and got the coil spring to act right.
From the nice looks on the cover welds Harry, I am thinking I may try to see with another extra cover I may Dremel away the recoil from the shroud and get the pull start where I want it welding it back 90 degrees clockwise. I’ll practice MIG for a while before I do this though. You were down at what the minimum your machine puts out?
Measure Twice
Please don't rib me for sort of nit picking. I’m just making an observation.
Since the change of the flywheel cover/shrowd is not as the original, the governor would have the air- vane affected. The air-vane you can do away with just as I did along with the governor springs and linkages, because your girl friend will be in control of the idle.
***(yea I know working out the governor with the intake above a foot away, you might as well negate the governor)***
My intake on the Briggs makes a right hand turn and rotates to tilt forward the carb about 30 degrees to have the bowl level. I dispensed with the idea of some fangled way of still having a governor. I actually was contemplating an electronic/electro-mechanical way of making the linkages for a governor with this situation. It would have used two variable resistors with one at the air-vane and one at the butterfly throttle, along with two servo motors, and a circuit to board to make it work. Nuts, yea I’m that!
For what Msrfan said about the flywheel cover assembly, I was wondering if off clockwise from up at Noon to 2pm, the dot I think I can see in the pic I took of the Brigg’s Flywheel cover on my engine.
Note: The picture has up on the cover at a 45 degree angle to the left.
Note:
I did re-wrap the spring and was not observant of this. I hope that it is not that bad to cause any problem. I don’t think I’ve yet noticed anything. I did use plenty of lube on the spring and it works nice.
Though I did have a problem I had for a while was this. The mounts on the flywheel cover to the engine casting had to change, since I had to modify the way it was done when stuck/rotted out metal of the casting caused me to change it. It was the centering so that it would not scrape and shoot out sparks. Finally I got it centered OK.
Also as Msrfan mentioned lube at the other picture part on the flywheel end of the crank shaft. This is the part with the ball bearings inside, that helped immensely. I used 3 in 1 oil on it. This I think is a part with one of the shaved corners (picture pointer in blue)of the square, that should line up with the dot on the other part? It is not straight up, but at 2pm.
The spring I had too thick grease making recoil stubborn, so I cut its viscosity with some 3 in 1 oil and got the coil spring to act right.
From the nice looks on the cover welds Harry, I am thinking I may try to see with another extra cover I may Dremel away the recoil from the shroud and get the pull start where I want it welding it back 90 degrees clockwise. I’ll practice MIG for a while before I do this though. You were down at what the minimum your machine puts out?
Measure Twice
Attachments

Last edited:
MEASURE TWICE
Well-Known Member
In regards to my last post and about the dot being up on the part of the recoil. I know what you mean Msrfan.
I have in the past unscrewed the parts and it's like a cradle that when spun at start cord pulled, the centrifugal force makes the ball bearing catch and you can pull start. Once the engine is going it has the opposite effect and releases so the recoil does get jammed and then crank shaft has to stop stalling the engine. Possibly trying to rip itself apart too
But what I was wondering is what I dumbly had not quite figured at first, is the tilting of the engine, right?
You mean this should be compensated when the engine is on a tilt.
Serendipity must have it, that with an approximate 30 degree tilt backward of my engine (the opposite direction tilts on Harry's Engine); I sort of come out even, so that the dot is probably near Noon position (up). This is being, because I have the dot at 2pm and that is 2/3 of 90 degree (3pm). That 60 degree forward and minus my 30 degree tilt back makes a resultant 30 degrees so it probably works ok like this.
If need be, I’ll put a long under my front tire to shim it out just right")
Does that sound right though?
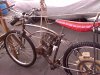
Jpeg of:
Measure Twice's Motor Bike JC Penny Foremost Frame 50 60's think early on with only welds for V-brakes Clutch gear opposite now outward too
Measure Twice
I have in the past unscrewed the parts and it's like a cradle that when spun at start cord pulled, the centrifugal force makes the ball bearing catch and you can pull start. Once the engine is going it has the opposite effect and releases so the recoil does get jammed and then crank shaft has to stop stalling the engine. Possibly trying to rip itself apart too
But what I was wondering is what I dumbly had not quite figured at first, is the tilting of the engine, right?
You mean this should be compensated when the engine is on a tilt.
Serendipity must have it, that with an approximate 30 degree tilt backward of my engine (the opposite direction tilts on Harry's Engine); I sort of come out even, so that the dot is probably near Noon position (up). This is being, because I have the dot at 2pm and that is 2/3 of 90 degree (3pm). That 60 degree forward and minus my 30 degree tilt back makes a resultant 30 degrees so it probably works ok like this.
If need be, I’ll put a long under my front tire to shim it out just right
Does that sound right though?
Jpeg of:
Measure Twice's Motor Bike JC Penny Foremost Frame 50 60's think early on with only welds for V-brakes Clutch gear opposite now outward too
Measure Twice
Attachments


harry76
Well-Known Member
Today i got a call from the bearing supply shop, he told me the 10 tooth, 5/8 sprocket i had on order was no longer available. D'OH!!!!!!!!!
They cant even get an 11 tooth. So im on the hunt for another supplier...... am i searching the right sort of shops or do i need to look elsewhere?
They cant even get an 11 tooth. So im on the hunt for another supplier...... am i searching the right sort of shops or do i need to look elsewhere?
Hey harry, you may have better luck at a lawnmower or landscape supply. I know Trimmer, Mclane, Trucut and others use those small sprockets, Those are American makers of reel mowers but you may have similar models. A lot of them don't use keys, just a set screw. I have some all the way down to 8 teeth for a 5/8'' shaft. Farm implements use a lot of sprockets also. Go kart and minibike suppliers can probably help too.