
You are using an out of date browser. It may not display this or other websites correctly.
You should upgrade or use an alternative browser.
You should upgrade or use an alternative browser.
what did you do to your motorized bicycle today?
- Thread starter Skarrd
- Start date
MEASURE TWICE
Well-Known Member
I tested out my bike after changing the crankcase oil breather that was shot. The spring stuck open wider than it ever was supposed to be and never shut.
The paper airfilter new replaced, the foam prefilter cleaned and replaced, and now it is not smokey. I got a new prefilter, but soap and water did a fine job cleaning it after it dried.
Putting back the chain on the two sprockets of the two jackshafts (upper and lower) has always been a pain. The bottom movable jackshaft left and right sides adjust separately while I set the chain tension. I think I may make a connection some how if I find a way and weld the left and right sides as one, this would negate so much effort and time getting it set right.
The problem is that I do not want the connection to get in the way of the chain, sprockets, or anything else I may not figure in just yet that may be needed.
In any case it worked just fine and the chain rides smooth.
I will be continuing on making bosses on the frame to hold the skeleton structure for the Art Fish Covering that will be used in parades.
MT
Last edited:
")
Cruise
New Member
Got excited about some sound deadening, so I cut a gumboot side out so it fit inside the clutch cover. For anyone unsure it's rubber sheet basically, about 1/16 thick. Stuck it in the cover with gasket goo. It's reduced clutch chatter noise quite well. Onto the other covers soon.
placidscene
New Member
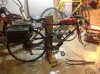
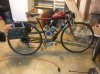
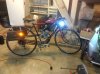
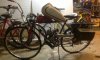
I have built a motorized Road bike. Yes, skinny tires and all.
I love it, but want to lower my center of gravity. Other than welding, I was trying to come up with other ideas.
I happened upon an extra fork I had laying around that was exactly, by accident the same size as my current one but with more of a forward rake.
After I put that on, the front of the bike sat almost an inch lower. Then I figured a way to lower the neck on my handle bars about 2 inches by modifying the neck mounted road bike shifter so that it would mount on the handle bars. This allowed me to move the fuel tank forward a little, which is good because the bike is VERY tail heavy. Then I cut on the seat tube part of the frame that was almost 2 inches taller than the top tube of the frame. I was able to lower the seat at leas another inch. This actually involved breaking a weld. The factory had welded the seat post clamp to the bike. (PITA!)
I rode it around a little, and it seems to have helped.
Next I am going to lower the Ammo Can panniers about 3 inches down from their current mounting position.
I would like to modify the frame, but have to take it to a welder to do that.
I added a heavy duty intertube to the front wheel. No more flats for me. (Already had on in the rear.)
I also took the head of the engine and shaved it down a little to increase the compression. It actually seamed to start a little easier? Thought that was odd.
It looked like the head gasket might have had a slight leak. That may have made it harder to start I guess.
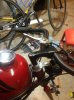
I bought a new fuel tank off ebay today. It is off of a 1973 Yamaha AT1 125 Enduro.
I finally can get rid of the peanut tank! Well, after I clean the new one up and paint it. It has a 1.8gallon capacity instead of the current .5 gallon. Looking forward to that.
I should be able to ride to work and back all week on 1 tank of fuel.
THAT IS AWESOME!
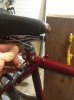
In the pictures, the front wheel is off now because I am taking it in for new bearings tomorrow. I can feel some grinding in there, and I don't want a wheel to lock up at high speeds.
I love it, but want to lower my center of gravity. Other than welding, I was trying to come up with other ideas.
I happened upon an extra fork I had laying around that was exactly, by accident the same size as my current one but with more of a forward rake.
After I put that on, the front of the bike sat almost an inch lower. Then I figured a way to lower the neck on my handle bars about 2 inches by modifying the neck mounted road bike shifter so that it would mount on the handle bars. This allowed me to move the fuel tank forward a little, which is good because the bike is VERY tail heavy. Then I cut on the seat tube part of the frame that was almost 2 inches taller than the top tube of the frame. I was able to lower the seat at leas another inch. This actually involved breaking a weld. The factory had welded the seat post clamp to the bike. (PITA!)
I rode it around a little, and it seems to have helped.
Next I am going to lower the Ammo Can panniers about 3 inches down from their current mounting position.
I would like to modify the frame, but have to take it to a welder to do that.
I added a heavy duty intertube to the front wheel. No more flats for me. (Already had on in the rear.)
I also took the head of the engine and shaved it down a little to increase the compression. It actually seamed to start a little easier? Thought that was odd.
It looked like the head gasket might have had a slight leak. That may have made it harder to start I guess.
I bought a new fuel tank off ebay today. It is off of a 1973 Yamaha AT1 125 Enduro.
I finally can get rid of the peanut tank! Well, after I clean the new one up and paint it. It has a 1.8gallon capacity instead of the current .5 gallon. Looking forward to that.
I should be able to ride to work and back all week on 1 tank of fuel.
THAT IS AWESOME!
In the pictures, the front wheel is off now because I am taking it in for new bearings tomorrow. I can feel some grinding in there, and I don't want a wheel to lock up at high speeds.
Attachments
maniac57
Old, Fat, and still faster than you

I tested out my bike after changing the crankcase oil breather that was shot. The spring stuck open wider than it ever was supposed to be and never shut.
The paper airfilter new replaced, the foam prefilter cleaned and replaced, and now it is not smokey. I got a new prefilter, but soap and water did a fine job cleaning it after it dried.
Putting back the chain on the two sprockets of the two jackshafts (upper and lower) has always been a pain. The bottom movable jackshaft left and right sides adjust separately while I set the chain tension. I think I may make a connection some how if I find a way and weld the left and right sides as one, this would negate so much effort and time getting it set right.
The problem is that I do not want the connection to get in the way of the chain, sprockets, or anything else I may not figure in just yet that may be needed.
In any case it worked just fine and the chain rides smooth.
I will be continuing on making bosses on the frame to hold the skeleton structure for the Art Fish Covering that will be used in parades.
MT
Regarding your chain adjustment issue: Can you mount the bearings on a single plate that would then bolt to the existing mount and adjust both sides as one?
Just a thought....
Intrepid Wheelwoman
New Member
Cool bike Placidscene. That's a much nicer looking fork and i think you'll find it will give you better steering as a bonus.
I'm building a new cargo tray for my Hercules tricycle at the moment as I'm tired of using half baked lash-ups when ever I want to carry anything bulky or heavy.
I'm building a new cargo tray for my Hercules tricycle at the moment as I'm tired of using half baked lash-ups when ever I want to carry anything bulky or heavy.
MEASURE TWICE
Well-Known Member
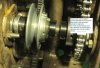
Maniac57 I looked at it and think in the I can make a U-shape bracket that will connect left to right pillow bearing mounts as one. I will as meaning to do, cut to length threads and have all bolt heads on the inside. The largest sprocket is in place in the photo so I see room. The belt on the left when tensioned is also out of the way.
I should have the engine off to weld with it bolted in place, I can maybe have less warping that way.
I'd be needing to take the engine off to weld other areas for mounting bosses for my skeleton frame. That is what a fish art cover will go over to make it a parade vehicle. Then it will have the big 28 tooth sprocket and the smallest 8 tooth sprocket for around 38:1 to have crawl speed. Then I can have the clutch locked up so not to heat real bad in the desert and be going 3.5mph.
MT
Attachments
placidscene
New Member
Today I am still working on lowering my center of gravity on the bike some more.
I was able to lower my Ammo Can panniers 3 inches. They have a battery in them for the lighting, so that should help some.
I also re soldiered the connections on the magnetic sensor for my speedometer that got cut when my first headlight that had a cheap plastic mount vibrated loose at about 25 miles per hour and went through the spokes and between the front fork. Don't know how I didn't get thrown off the bike when that happened!
So now that I think I finally have the bike tuned I can check actual speeds. Excited about that.
In case anyone is wondering, I got the lay back seat post from Sportsman Flyer Bikes. It is great.
What is next? New fuel tank. Should get it tomorrow or Monday.
Attachments
Intrepid Wheelwoman
New Member
Cool, roadies make good motorised bicycles. I like what you've done .
phatcruiser
New Member
Riding to work yesterday the motor died as I was pulling into work. Bummer. The bracket the carb bolts on to had come loose causing the engine to die....5 minutes later I had the bracket snug and she fired up!
I am going to buy a rear wheel with a velo coaster brake. The coaster brake on there now is A cheap Chinese pos and is almost worthless. Eventually I will swap out the seat and handle bars. But for now they work fine.
I am going to buy a rear wheel with a velo coaster brake. The coaster brake on there now is A cheap Chinese pos and is almost worthless. Eventually I will swap out the seat and handle bars. But for now they work fine.
placidscene
New Member
I got my new fuel tank today...
It is a little larger than I thought it looked in the picture on ebay! lol
I think I will pull my tank off tomorrow and do a test fit before I spend too much time cleaning it up.
What do ya'll think?
It is a little larger than I thought it looked in the picture on ebay! lol
I think I will pull my tank off tomorrow and do a test fit before I spend too much time cleaning it up.
What do ya'll think?
Attachments
Last edited:
Intrepid Wheelwoman
New Member
That Yamaha tank is going to look way better than the wart.
placidscene
New Member
Well I didn't have time to test fit the tank today, but I did have time for a short ride.
First time with the speedo working again. It said I got up to 37mph. (down hill)
Bike didn't seem to like me today though. It is moody.
I know it ran better, smoother, higher revs the last time I rode it. I will figure out why later.
It tried to kill me today though... Just after I slowed back down from 37 mph, I pulled over to the side of the road to admire a bi-plane flying by at low altitude and killed the engine so I could hear it. A Leander Police officer slowed down to check me out as he went by, then kept on going, which is great.
When I started her back up and went around the corner, I got this wierd feeling that something wasn't right. I pulled back over and looked down at my front fork. One of the wheel nuts was gone, and the other was loose! I mush have had an absent minded moment when I put the wheel back on Thursday night!
Could have been very bad at 37mph if the front wheel had gone off!
Oh well, all's well that ends wheel!
placidscene
New Member
I like the comment about "Intercontinental range" with the Yamaha Fuel Tank! lol
It should go a couple hundred miles anyway.
It should go a couple hundred miles anyway.