The Rustoration Build Off

GoldenMotor.com

bairdco

a guy who makes cool bikes
Aug 18, 2009
6,537
264
63
living the dream in southern california
from the pics of that fender strut, it doesn't look that bad. i've fixed worse. the method i explained 50 pages ago should work for you.

a quick re-cap, though; i'd bend it as straight as possible by hand, first. hopefully the metal is still malleable enough, and not brittle from age.

lay it on it's side and go to work on those bends, first. the "v" shape is stronger, and can take some pounding, so you can just tap it a few times, flip it, tap it, etc, till it's straight. it's probably gonna want to twist while you do it. i usually let it twist till i've got it mostly straight. then you can grab it with a crescent wrench and carefully twist it back.

once it's straight sideways, just a little bit of pressure can bring it back into shape lengthwise. sometimes using just your thumbs.

at this point, just keep flipping it and tapping it till it's straight. if the "v" starts to straighten out, turn it on it's side again and hit it with a few light angled blows, to bend it back into shape.

hope this makes sense...
 

silverbear

The Boy Who Never Grew Up
Jul 9, 2009
8,325
670
113
northeastern Minnesota
SB and BarleyAWake, any advice on making in frame tanks??
I think my bike needs one so i guess ill try :D (hope i'm not stealin your ideas!)
I would suggest creating a file and then going back into the threads posted here having to do with fabricating an in frame tank... lots of stuff here, plus follow Barely's progress and put it all in the file folder you created. Then study it all and decide for yourself if you're up for doing it. I personally have no experience with it so can't much help. Learning how to learn is a very valuable thing. Do some of your own research and then when you ask a question it is specific and shows you've done your homework and are serious. No, you're not stealing any ideas. If they are here in open posts, then they are for sharing with everyone. Although many of us would like an in frame tank, few have them for a reason. It's a whole lot simpler and cheaper to use the peanut tank supplied with the kits and although we complain about them, they really aren't all that bad and on some bikes look really good, Bairdco's for one. I wouldn't choose to do anything because others are doing it. Do it because it is something YOU want to do and then decide for yourself how badly you want it. Fabricating your own is no small thing. I'm not saying you can't, as only you know what you can do. But there is something to the old saying about not biting off more than you can chew... something I have to relearn every now and then myself. That said, good luck. How's the rest of the bike coming?
SB
 

silverbear

The Boy Who Never Grew Up
Jul 9, 2009
8,325
670
113
northeastern Minnesota
from the pics of that fender strut, it doesn't look that bad. i've fixed worse. the method i explained 50 pages ago should work for you.

a quick re-cap, though; i'd bend it as straight as possible by hand, first. hopefully the metal is still malleable enough, and not brittle from age.

lay it on it's side and go to work on those bends, first. the "v" shape is stronger, and can take some pounding, so you can just tap it a few times, flip it, tap it, etc, till it's straight. it's probably gonna want to twist while you do it. i usually let it twist till i've got it mostly straight. then you can grab it with a crescent wrench and carefully twist it back.

once it's straight sideways, just a little bit of pressure can bring it back into shape lengthwise. sometimes using just your thumbs.

at this point, just keep flipping it and tapping it till it's straight. if the "v" starts to straighten out, turn it on it's side again and hit it with a few light angled blows, to bend it back into shape.

hope this makes sense...
Thanks again. I'll give it a go, hopefully tomorrow. Can't end up any worse than it is now. Any new Colson adventures?
SB
 

weekend-fun

New Member
Jun 21, 2009
999
0
0
San Carlos CA
I would suggest creating a file and then going back into the threads posted here having to do with fabricating an in frame tank... lots of stuff here, plus follow Barely's progress and put it all in the file folder you created. Then study it all and decide for yourself if you're up for doing it. I personally have no experience with it so can't much help. Learning how to learn is a very valuable thing. Do some of your own research and then when you ask a question it is specific and shows you've done your homework and are serious. No, you're not stealing any ideas. If they are here in open posts, then they are for sharing with everyone. Although many of us would like an in frame tank, few have them for a reason. It's a whole lot simpler and cheaper to use the peanut tank supplied with the kits and although we complain about them, they really aren't all that bad and on some bikes look really good, Bairdco's for one. I wouldn't choose to do anything because others are doing it. Do it because it is something YOU want to do and then decide for yourself how badly you want it. Fabricating your own is no small thing. I'm not saying you can't, as only you know what you can do. But there is something to the old saying about not biting off more than you can chew... something I have to relearn every now and then myself. That said, good luck. How's the rest of the bike coming?
SB
Thank you and good idea!
I dont know if i am goign to follow through, but it wouldn't hurt to look :D

The bike is going great! i have some pics, but cant upload due to camera issues (which cord is it?rotfl)

thanks again
WF
 

BarelyAWake

New Member
Jul 21, 2009
7,194
21
0
Maine
Somethin' like fabin' a sheet metal tank is both much harder and far easier than you would think... if that sounds strange - just get some thick construction paper (think cereal box, corrugated cardboard won't work well) and make a simple box with some tape holdin' it together. While initially it's easy - any misalignment, dent, crinkle, or gap (particularly in the corners) will skew the whole thing. While the welder can make up for a poor fit somewhat by filling the gaps it'll show up like a sore thumb. Also, the longer you need spend "filling" with molten metal - the more heat is generated and so distortion is inevitable.

So it's all about how well you can get the pieces to fit in the first place - if ya get that down, the welding part is easy for anyone that knows their stuff.

With that in mind, it's best to get far more materials than what you'd think would be necessary. Although I'm just cuttin' two side panels at the moment - I got enough sheet steel to make five. Cutting out three to start with I choose the best of the two for the tank - the third I save for experimentation and the rest of the steel I save for when I mess up (notice "when" not "if" lol).

While some may make a mock-up of the tank first usin' the above method (construction paper) then use those cut outs as templates, there will always be some variance between the model and the real-life tank - mostly due to the difference in thickness between the cardboard and the sheet metal. With that in mind I'll be using the side plates to fit the top and bottom, mostly because of the curvature of this tank.

So - the first step is obviously to make a trace template like I did in a previous post, then simply tape the template to the steel and outline it usin' a Sharpie. If you put the bits o'tape only where there's a straight line - they're easy 'nuff to put in afterward with a ruler. Be very careful when making the marks tho as they'll be your only guide while yer cutting. Also don't ever use the panel you just cut to trace the next, always use the template - while you would think that would result in a near perfect copy of the first cut panel, in fact you'll just be amplifying the errors in the first one and adding more;


Ya prolly noticed I'm using a simple jigsaw with a "bi-metal" blade, essentially the same as a hacksaw blade. Inexpensive and easy to use - know that no tool (other than an industrial stamp machine) is going to be terribly accurate at this stage, so you'll want to cut on the outside of the line, never coming within 1/16" of your "final" edge. This will be your "buffer zone" of error and blade wander - something jigsaws are famed for. You'll also want to keep your cutting area as close to the table as possible - the vibration of the tool gets amplified by the sheet to the point where the blade will "springboard" out of the cut, best case scenario it's just annoying - far more likely what will happen is you'll dent/distort the panel and will hafta start over. While you could try and flatten it back out - it will never be the same so yer better off making another.


If you make the long cuts first then trim off the ends, you wont get that twisted off end that happens with a long cut... well, you will - but it wont be anywhere near where you care about so it doesn't matter heh, here's the panels all cut out - while I always stayed outside the line (actually I cut half the line off... but I've done stuff like this before) you can see the slight wavering and inaccuracies inherent in the tool... and me actually lol, so the next stage is to clamp the two best together and grind down to the inside of the line - this way they'll be smooth and almost perfectly flush with each other, as close to symmetrical as I'm gonna get;


That "X" denotes the one I didn't like as much and will serve as a backup/test piece. Again, it's best to not get too attached to any one bit as it's simple enough to make another that's better. That lil rule of thumb will save much frustration and will result in a far better end product than fussin' over some lil screw-up. They first attempt at something is always the sloppiest so why worry? Heck - I may well make a second entire tank if I don't like the first, if I get a better idea - or if I just don't like the welds lol

As silverbear so aptly put it - recognizing yer own limitations is a valuable skill, that way ya can always work around 'em FTW
 
Last edited:

BarelyAWake

New Member
Jul 21, 2009
7,194
21
0
Maine
Heavy
Snow
Hi 27 °F

Winter Storm Warning
Coastal Flood Watch
Hazardous Weather Outlook


There will be a slight delay in Rollfast progress as my home turns into an aquarium...


silverbear

The Boy Who Never Grew Up
Jul 9, 2009
8,325
670
113
northeastern Minnesota
No new snow, but single digit temp with howling winds in the night puts everything in survival mode. Dog's water dish froze (inside the trailer) and I spent the night as close to the wood stove as possible. No progress on the Elgin til things warm up a little. Stay warm, my friend.
SB
 

weekend-fun

New Member
Jun 21, 2009
999
0
0
San Carlos CA
Somethin' like fabin' a sheet metal tank is both much harder and far easier than you would think... if that sounds strange - just get some thick construction paper (think cereal box, corrugated cardboard won't work well) and make a simple box with some tape holdin' it together. While initially it's easy - any misalignment, dent, crinkle, or gap (particularly in the corners) will skew the whole thing. While the welder can make up for a poor fit somewhat by filling the gaps it'll show up like a sore thumb. Also, the longer you need spend "filling" with molten metal - the more heat is generated and so distortion is inevitable.

So it's all about how well you can get the pieces to fit in the first place - if ya get that down, the welding part is easy for anyone that knows their stuff.

With that in mind, it's best to get far more materials than what you'd think would be necessary. Although I'm just cuttin' two side panels at the moment - I got enough sheet steel to make five. Cutting out three to start with I choose the best of the two for the tank - the third I save for experimentation and the rest of the steel I save for when I mess up (notice "when" not "if" lol).

While some may make a mock-up of the tank first usin' the above method (construction paper) then use those cut outs as templates, there will always be some variance between the model and the real-life tank - mostly due to the difference in thickness between the cardboard and the sheet metal. With that in mind I'll be using the side plates to fit the top and bottom, mostly because of the curvature of this tank.

So - the first step is obviously to make a trace template like I did in a previous post, then simply tape the template to the steel and outline it usin' a Sharpie. If you put the bits o'tape only where there's a straight line - they're easy 'nuff to put in afterward with a ruler. Be very careful when making the marks tho as they'll be your only guide while yer cutting. Also don't ever use the panel you just cut to trace the next, always use the template - while you would think that would result in a near perfect copy of the first cut panel, in fact you'll just be amplifying the errors in the first one and adding more;

Ya prolly noticed I'm using a simple jigsaw with a "bi-metal" blade, essentially the same as a hacksaw blade. Inexpensive and easy to use - know that no tool (other than an industrial stamp machine) is going to be terribly accurate at this stage, so you'll want to cut on the outside of the line, never coming within 1/16" of your "final" edge. This will be your "buffer zone" of error and blade wander - something jigsaws are famed for. You'll also want to keep your cutting area as close to the table as possible - the vibration of the tool gets amplified by the sheet to the point where the blade will "springboard" out of the cut, best case scenario it's just annoying - far more likely what will happen is you'll dent/distort the panel and will hafta start over. While you could try and flatten it back out - it will never be the same so yer better off making another.


If you make the long cuts first then trim off the ends, you wont get that twisted off end that happens with a long cut... well, you will - but it wont be anywhere near where you care about so it doesn't matter heh, here's the panels all cut out - while I always stayed outside the line (actually I cut half the line off... but I've done stuff like this before) you can see the slight wavering and inaccuracies inherent in the tool... and me actually lol, so the next stage is to clamp the two best together and grind down to the inside of the line - this way they'll be smooth and almost perfectly flush with each other, as close to symmetrical as I'm gonna get;
]

That "X" denotes the one I didn't like as much and will serve as a backup/test piece. Again, it's best to not get too attached to any one bit as it's simple enough to make another that's better. That lil rule of thumb will save much frustration and will result in a far better end product than fussin' over some lil screw-up. They first attempt at something is always the sloppiest so why worry? Heck - I may well make a second entire tank if I don't like the first, if I get a better idea - or if I just don't like the welds lol

As silverbear so aptly put it - recognizing yer own limitations is a valuable skill, that way ya can always work around 'em FTW
You think I could use a angles grinder to cut out the big hunks around the tracing??? I dont know why I asked :) just thought it would be quicker and I wanna try out the grinder :D
 

fasteddy

Well-Known Member
Feb 13, 2009
7,454
4,920
113
British Columbia Canada
BarelyAWake, hope that water doesn't get any higher! Have you noticed the guy 3 doors down, building a large boat and gathering animals up from around the neighbourhood?

Silver Bear, I remember the winter I spent on the Eastern Shore of Maryland. They had to bring a small ice breaker in to clear the harbour so the watermen could get out to the oyster beds. Ice was up to a foot thick in places by the time they got to the harbour.

Sounds like my trailer in NH. Had the heater going full blast and the the cat was so cold he got under the covers and wouldn't come out and I only made the mistake of trying to get him out once. Amazing how much blood you can lose and you don't die.

Yes,fellas I know what I should/would have done to the cat but then the smarter of the two of us was in bed and warm.

Were you close enough to the fire so that you could toss more wood on as you got cold and never leave your bed or expose any more than your arm and one eye?
That brother, is darned cold.

Hope the weather breaks for you all.

Steve.
 

weekend-fun

New Member
Jun 21, 2009
999
0
0
San Carlos CA
BarelyAWake, hope that water doesn't get any higher! Have you noticed the guy 3 doors down, building a large boat and gathering animals up from around the neighbourhood?

Silver Bear, I remember the winter I spent on the Eastern Shore of Maryland. They had to bring a small ice breaker in to clear the harbour so the watermen could get out to the oyster beds. Ice was up to a foot thick in places by the time they got to the harbour.

Sounds like my trailer in NH. Had the heater going full blast and the the cat was so cold he got under the covers and wouldn't come out and I only made the mistake of trying to get him out once. Amazing how much blood you can lose and you don't die.

Yes,fellas I know what I should/would have done to the cat but then the smarter of the two of us was in bed and warm.

Were you close enough to the fire so that you could toss more wood on as you got cold and never leave your bed or expose any more than your arm and one eye?
That brother, is darned cold.

Hope the weather breaks for you all.

Steve.
LOL i have the same trobules here!
 

weekend-fun

New Member
Jun 21, 2009
999
0
0
San Carlos CA
Just saw SB's new Elgin, and it inspired me to try to get another vintage :D
Only problem is I am running on empty cash wise! I just spent like 125 bucks on stuff from hot topic (chain, 3 pairs of skinny jeans, jacket, pinkfloyd shirt)

I really need a job besides my allowance lol!!!

so i guess i go around shoveling snow if we get enough to stick for more than two hours!!
 

silverbear

The Boy Who Never Grew Up
Jul 9, 2009
8,325
670
113
northeastern Minnesota
Barely,
I wanted to thank you for the excellent how to series of photos and commentary on your in frame tank. Very nice!
Cold again tonight so another night on the couch by the wood stove, sharing space with Aaniimoosh The Wonder Dog, who helps keep my feet warm.
Yes, Steve, I am able to reach the stove door without getting up.
Bairdco, I hope you get heat rash or something.... (Not really...) 70 degrees! That's above zero, right? Man, would that be nice.
SB
 

BarelyAWake

New Member
Jul 21, 2009
7,194
21
0
Maine
Well... my home flooded to "only" about 3" of standing water... twice, at each high tide on Sat & Sun. It's messed up - I've lived here for a few years now and it's just this past winter that the floor has been anything other than a lil wet - usually during spring run-off. In my panic I misread the tide charts and as the water was streaming in around the sliding glass door - I thought high tide wasn't for another two hours... which by my hasty estimate would submerge my home with at least 3 or 4 feet of water so I packed up alla my tools and 'puter stuff and moved them to a safe(er) location. As my back was already screwed up from my lil mishap - this unnecessary precaution has left me cranky and self-obsessed.

No damage - but a nice holiday weekend wasted with nothing much accomplished. Fortunately my job is sittin' at a 'puter so I'm just goin' to bring in the heating pad and act the cranky ol' bastid I'm rapidly turning into o.o

weekend-fun said:
You think I could use a angles grinder to cut out the big hunks around the tracing??? I dont know why I asked just thought it would be quicker and I wanna try out the grinder...

For in-frame gas tanks, is there a "special" seal or somthing that goes inside them???
Actually you'd be surprised, the grinder/cut-off wheel will be not only far slower than a jigsaw - but incredibly sloppy as well. Given it's propensity for binding if yer not very careful it's also highly likely you'd distort the heck outa the sheet steel (20ga is what I'd reco BTW). Also I'm really not that fond of cut-off wheels, a necessary evil sometimes - they're VERY dangerous and prone to shattering when they bind and they're all the more likely to bind in sheet that say rod stock... so no, I don't advise it and never NEVER use it without it's guard in place ok? If yer just usin' a grinding wheel to cut... well yer turning up to 1/4" of steel into dust and slag and doin' not much else than generating a huge amount of heat and noise lol Unless ya've a plasma cutter around a jigsaw is prolly the best tool fer this particular job... actually given it's 20ga - the jigsaw is prolly better than the plasma anyway lol

As for the "seal" it all depends - if yer ossum you'd use stainless or aluminum to make the tank outa, but if yer lazy like me and usin' mild steel then yes - you prolly should line the tank with something like 'Kreem Fuel Tank Liner' (bout $20 a pint). While you can get away without it (the kit tanks are unlined steel) as the fuel itself will help prevent rust - there's nothing stopping corrosion above the fuel line except residual fuel/oil from the last time it was splashed. This is all fine and good if you ride everyday - but sooner or later you may want to store it and that's when the pitting starts. Any partially filled container is prone to condensation build up due to temperature changes - not only does this cause the dreaded water in the fuel scenario, but is the number one cause of pinholes in older cars' fuel tanks. They'll develop a "rust ring" right around w/e level the fuel was at when it was parked for a while - I've seen it a bunch on even transmission pans too.

While the lil tank on a mere MB may not seem worth the trouble, it is after all something yer crafting yerself so why not spend the lil extra effort and do it up right? Who knows - yer build may just outlast you and someday some kid could find it while pokin' around in a barn and be stoked at the quality of yer work lol


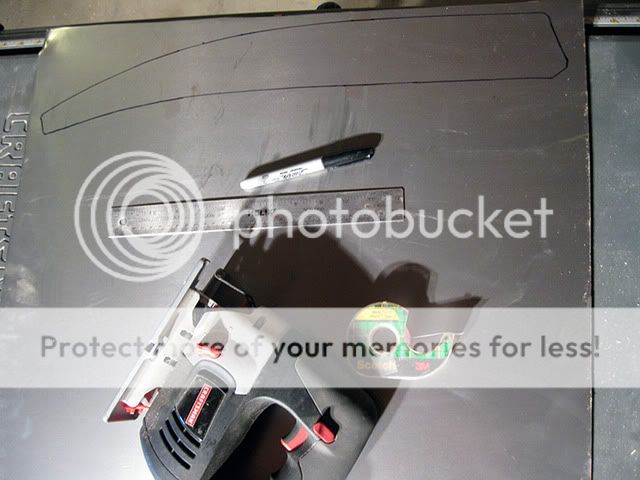
I did manage to get a lil done in between lapping tidal waters, clamping the two side panels together using popsicle sticks to pad the C-clamps and making sure to not crank 'em down too tight (metal distortion);


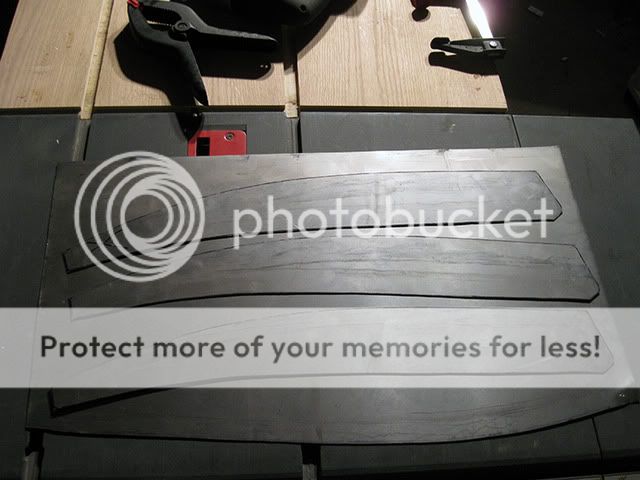
I started bringing down the steel till the two pieces were flush and to the indicator line. I started with a Dremel of course, but this leaves a wavering finish with low and high spots no matter how careful you might be, but if ya always make long, sweeping passes it'll reduce the amount of "dig-out" and result in smoother lines. For the outside curve and flats - I used a large, flat file much like you would a planer. Slow and somewhat tedious, it's really the best method for getting a nice, smooth, regular surface - particularly on an outside curve. Inside curves are the same deal - ya just need a 1/2 round file (bigger = better) and remember - long passes result in less irregularities and "even out" high and low spots.


The two panels now about as identical as humanly possible and this is where I call it quits for now. Although it's tempting to round the corners to what it's "supposed" to be - it's far, far better to make the top and bottom panels and bend those first, then grind the rounds on the sides to fit. While I know what shape/angle I want the bends to be - no amount of planning can account for the real world and I'm sure the rounded bends wont be quite exactly as I thought they would be. I'd rather wait to grind and test fit then guess and hafta try and put metal back lol Also... the math gets tricky with mutable bends & curves... and math was never my strong suit heh


Most of this back & forth, test fitting & shaving a bit more off is simply due to the fact it's a "one-off" - the first attempt at a product you've not made before. Should you ever wish to make another - it'd be far easier as you'd already know what shapes you'd need and if'n yer clever - you'd have used the original bits to make "finished" templates before ya weld them together. Even tho I don't think it likely I'll ever run into another, identical Rollfast that needs a real fuel tank - I'll be makin' 1/8" thick, epoxy-coated plywood trace templates for each piece... *shrug* Ya never know - I might dent this one and want another, maybe - just maybe someone else will have a Rollfast and those bdanged templates are where all the effort is ;)
 

weekend-fun

New Member
Jun 21, 2009
999
0
0
San Carlos CA
As my back was already screwed up from my lil mishap - this unnecessary precaution has left me cranky and self-obsessed.
LOL my mom is having the same troubles. Hope you start feeling beeter soon!

4 feet... again "What has this world come to!!"

Today I smoothed out the top t ube paint job, so its dryin'. Later I plan on installing the kit.
I am just going to use the peanut tank, and maybe I'll make a in-frame tan some time yonder ;)

Tomorrow I go back to school so :-||:-||. I'd rather spend the whole day on my bike!!!
 

fasteddy

Well-Known Member
Feb 13, 2009
7,454
4,920
113
British Columbia Canada
BarelyAWake, that's a new meaning to water front property. Sure glad it wasn't any worse.

I hope your feeling better soon. Not much worse than a bad back in my books.

That tank is coming together like a work of art. Listening to what you are saying about filing the metal and I hear my old shop teachers from 50 years ago. The only thing that is missing is the "no,no thats not the way I showed you how to do it". LOL

Learned a lesson about exploding grinding wheels. Nothing like standing on the ground looking up at a metal shed roof 15 feet above you and seeing day light through the metal. A lot of day light.

The guy using the grinder was ok but did need the rest of the day off.
The grinder didn't have a guard on it. They all did after that and any one taking them off was fired on the spot.

Steve.
 

mekano

Member
Nov 4, 2008
219
13
16
Stockholm, Sweden
Is it to late to sign up for the rustoration build off...?
I have had my old 30's Tellus (Swedish bike) standing here in my livingroom for awhile.
I had my own thread even when my drinking prob was killing me. Now, finally, I have this engine at hand and after clearance problems I have found the hockey puck solution! I am raising my motor a bit above the cranks, it looks cool anyway. Here is a pic from the guy who sold it:
 

Attachments

Last edited:

silverbear

The Boy Who Never Grew Up
Jul 9, 2009
8,325
670
113
northeastern Minnesota
Is it to late to sign up for the rustoration build off...?
I have had my old 30's Tellus (Swedish bike) standing here in my livingroom for awhile.
I had my own thread even when my drinking prob was killing me. Now, finally, I have this engine at hand and after clearance problems I have found the hockey puck solution! I am raising my motor a bit above the cranks, it looks cool anyway. Here is a pic from the guy who sold it:
So far as I know there isn't any deadline although the way I'm going it will be sometime around the 12th of never when I finish mine. Just kidding, by spring it will be all done or at least I'll be all done with it. Barely will need to weigh in on this one. I sure like your bike. You've got all the room in the world there for an in frame mounting, even for a 4 stroke. What engine are you using?
I was just picturing a cylindrical tank hanging off the crossbar... it would look cool, I think. What size are the tires? Looks like a strong frame. It's gonna make a cool motorbicycle for sure.
SB