
You are using an out of date browser. It may not display this or other websites correctly.
You should upgrade or use an alternative browser.
You should upgrade or use an alternative browser.
The Rustoration Build Off
- Thread starter BarelyAWake
- Start date
bairdco
a guy who makes cool bikes
nice work, silverbear! those are really starting to look like fenders again. i don't think i've ever worked on a pair as bad as yours. but i know the effort it takes to get those dings out. the rubberized undercoating trick would work good on the undersides of those, and maybe on the inside of the coatguards, too. it'll help protect them on those snowy rides, and quiet down the noise. just make sure you mask them off good. once that stuff dries, it's a pain to remove.
the heatshield stuff i got was just sitting in a pile at the metal place i go to. it's like 1/16" thick diamond plate, but with mini diamonds. i bought a 2' x 1' piece for a couple bucks. it still heats up, but not enough to melt my shoe on contact.
the heat is kinda nice in this weather. you can drop your hand next to it and warm it up...
BarelyAWake
New Member

I can't believe how nice yer fenders are turnin' out silverbear!!! Simply amazing and that's no exaggeration! What's interesting is this is gonna be one of those deals where yer gonna work so hard on somethin' and that because ya did such a good job - no one will ever notice...
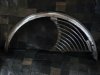
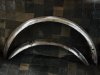
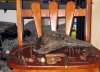
For anyone that mighta missed some earlier pics - I just hadta reup this example of silverbear's patience and attention to detail, check these before and after shots of his fenders OMG;
Attachments
-
 16383d1258983481-rustoration-build-off-dsc02533.jpg233.1 KB · Views: 299
 -
 16382d1258983441-rustoration-build-off-dsc02532.jpg231.1 KB · Views: 304
 -
 16533d1259261588-rustoration-build-off-dsc02594.jpg272 KB · Views: 315
 -
 17358d1260723243-rustoration-build-off-dsc02634.jpg227.5 KB · Views: 306
 -
 17357d1260723200-rustoration-build-off-dsc02632.jpg228.7 KB · Views: 307
BarelyAWake
New Member
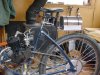
Well... I spent most of yesterday waitin' on paint to dry lol, got the springer and seat base coated, I'll be top coating and detailing once the motor mounts are welded to the frame and it's painted too. There's some detail I didn't bother with (like the spring being black not gray etc.) as it'll just get messed up when I take it all back apart about a million more times *sigh*
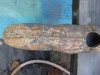
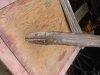
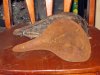
Ran into a problem when I started to clean up the original neck, turns out there's quite the hefty crack in it, two actually - one on each side. So far it's the only really damaged part, I suppose I could grind it down a bit and weld... I could also hunt around for another from my friend but just for now I snagged one off a dead Huffy. Sacrilege I know and it looks really out of place, mebbe no one else would notice - but it's screamingly obvious to me and it's annoying to say the least.
The busticated original (right next to the expansion cut);


Still, with the seat panted and back together again and the handlebars on it - it's starting to look like a bike again and not just a pile of crusty. I've not made the leather cover for the seat yet as I wanna get a gel insert for it and I'm downright terrified... I just can't summon the courage to go anywhere near the mall this time of year. Heck, I may even starve as I forgot to stockpile foodstuffs to tide me over till the public regains some semblance of sanity. The pizza guys will be hearing from me often methinks.
Not yer grandpa's Rollfast anymore (and yus - I did sit on the bike and make vrooming noises to myself... come to think on it, I think I'll do it again right now lolz) ;
;

Ran into a problem when I started to clean up the original neck, turns out there's quite the hefty crack in it, two actually - one on each side. So far it's the only really damaged part, I suppose I could grind it down a bit and weld... I could also hunt around for another from my friend but just for now I snagged one off a dead Huffy. Sacrilege I know and it looks really out of place, mebbe no one else would notice - but it's screamingly obvious to me and it's annoying to say the least.
The busticated original (right next to the expansion cut);

Still, with the seat panted and back together again and the handlebars on it - it's starting to look like a bike again and not just a pile of crusty. I've not made the leather cover for the seat yet as I wanna get a gel insert for it and I'm downright terrified... I just can't summon the courage to go anywhere near the mall this time of year. Heck, I may even starve as I forgot to stockpile foodstuffs to tide me over till the public regains some semblance of sanity. The pizza guys will be hearing from me often methinks.
Not yer grandpa's Rollfast anymore (and yus - I did sit on the bike and make vrooming noises to myself... come to think on it, I think I'll do it again right now lolz)
;
Attachments
Last edited:
silverbear
The Boy Who Never Grew Up
Thanks for the encouragement regarding the fenders and skirt guards. Looking at them through your eyes helps me appreciate how far they have come thus far and encourages me to keep on keepin' on. I tend to see mostly what's still wrong with them... the silver solder repair work yet to be done, the places where a bit more straightening is needed and then all the JB Weld filling and sanding to come. They do look better in the pictures than they would in paint at they are. I'll do some more work on them and then say 'good enough' as I have with every other imperfect thing on this bike. You have to know when to say enough and move on. Overall it is looking much better than I had originally imagined it might. I think this is going to be my favorite ride.
Steve, I'm glad to hear you've got the mahogany laid down on the sidecar... can't wait to see it. I'm still thinking in terms of adapting a kiddie trailer into a sidecar, which shows the great discrepancy in our respective woodworking skills. I'll be very interested in how yours will attach to the bike.
Bairdco, I failed to thank you for the fender and fender stay tips. I have yet to address that bent up stay. Whatever I do it can't turn out worse than it is now.
Barely, your bike is really coming along. Very dramatic picture, that! No, it sure isn't grandpa's Rollfast anymore. Where do you get gell seat insert material? I need something for mine as the padding I used when I rebuilt that seat had a kind of waffle design in it which telegraphs right through the elk hide... so it needs something else to both look and feel better. I suspect I'll be riding this bike a lot, so a comfy seat is high priority. I'm also thinking about adapting gel grips and then covering them in leather. I have nerve damage in my hands, so they are very prone to tingling a lot after long rides. I'm thinking gel might be a good way to go. Any experience with gel grips? Are they flexible enough for one to fit over the throttle barrel? I hope so.
Yesterday I soldered up a new V8 gas tank and made a new and improved cradle for it with wider angle and a solid aluminum plate underneath to sandwich the rack. The cradle will stay unpainted aluminum and I'll take more care in painting the tank. You know, I don't mind that the tank looks like what it is, a lowly juice can made into a gas tank. So what if it works and looks good? I don't feel much need to disguise it. So long as I like the way it looks, then good enough. That's part of the great satisfaction in building these old bikes out of rusted and neglected frames and parts. As we breathe life into them they start to take on our character and reflect our tastes, color preferences, values. In that sense they truly become extensions of who we are and give real meaning to 'my bike'. Gettin' kind of philosophical there... hoping for another shake-down ride today as it appears to be the only break in weather for some time.
SB
BarelyAWake
New Member
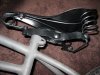
Gel seat insert material? I was just planning to gut a gel saddle cover TBH... If it fits well enough I may cheat and stitch the leather to the cover itself to save some effort (shh, I r cheater). I dunno about the gel grips - but I successfully used the stock Schwinn grip over the HT throttle so I'd imagine a gel one would only be easier. I hope so anyway as I'm doin' that too lol.
I just chucked the stripped down throttle (stock grip still on it) and the Schwinn one in a coffee can filled with soapy water so hot it was almost simmering. After a smoke break, the HT grip came off w/o too much trouble - the new one did require a bit of convincing, but every time it got annoying I'd just bloop 'em back in the grip soup and take another break till they got hot again. Sliding the throttle onto a handlebar end kept me from crushing it while I worked.
Obviously I really liked the Schwinn grips lol
I really don't think the can for a tank is as incongruous as you may think - I've seen ribbed cans like that used for many other applications on old stuff... oil reservoirs, air filters, vacuum canisters on some older cars, that sorta thing *shrug* besides - black w/brass is just awesome lookin' no matter what it is heh, leather would put it over the top fosho!
Last edited:
Venice Motor Bikes
Custom Builder / Dealer/Los Angeles
Ran into a problem when I started to clean up the original neck, turns out there's quite the hefty crack in it, two actually - one on each side. So far it's the only really damaged part, I suppose I could grind it down a bit and weld... I could also hunt around for another from my friend but just for now I snagged one off a dead Huffy. Sacrilege I know and it looks really out of place, mebbe no one else would notice - but it's screamingly obvious to me and it's annoying to say the least.
Don't use that stem!! Don't even try to fix it... Throw it away!
That's the last thing you want to break @ 30MPH!
BarelyAWake
New Member
O.O
/flees in terrors
Yer absolutely right Venice and I would never advise someone to attempt a repair on something like that... still, we do have a TIG and I am considering cutting off the tube itself and replacing it entirely, cutting new expansion slots - provided I can't get another.
I think it'll be OK as it's a hefty, solid lump of real metal unlike the cheesy Huffy one I've on there for now or the alloy one on my Schwinn. If '43 Rollfast parts were commonplace it'd be a different story lol
Thanks fer lookin' out fer me tho") at least I aint tryin' ta JBweld the thing lolz
at least I aint tryin' ta JBweld the thing lolz
/flees in terrors
Yer absolutely right Venice and I would never advise someone to attempt a repair on something like that... still, we do have a TIG and I am considering cutting off the tube itself and replacing it entirely, cutting new expansion slots - provided I can't get another.
I think it'll be OK as it's a hefty, solid lump of real metal unlike the cheesy Huffy one I've on there for now or the alloy one on my Schwinn. If '43 Rollfast parts were commonplace it'd be a different story lol
Thanks fer lookin' out fer me tho
at least I aint tryin' ta JBweld the thing lolz
Last edited:
BarelyAWake, thanks for putting Silver Bears fenders on again. I had forgotten how far past bad they really were.
Don't talk about JB Weld like that. Bad things happened to the last guy I knew that mocked the power of JB weld.LOL
I share your love of mall is the joyus holiday season. The only place worse you could be is the returns desk at Wal Mart on the 26 of Dec.
If Grandad saw that Roll Fast you would never see it again unless Grandad was on it.
Steve.
Silver Bear, started my favorite part of the job, sanding. The mahogany being so thin and dry it cupped when the glue dried and now the game is to sand them flat with out sanding the edges of the boards away.
My big mistake was I didn't listen to myself again and built the thing to wide. It should have been 18" wide and not 24". My brother keeps calling it the guppy.
He stopped when I slapped him along side the head with the canoe paddle. One could say he saw it in a different light.
I'll try and mess with Picasa again. Like the way they keep asking if the directions helped. I'd tell them my opinion but whoever read it would need asbestos eyeballs.
I've put kids toys together that had better directions.
I know it's frustrating to everyone to hear me talk about it but you can't see it. I want to share it and get opinions.
Still not sure how I'm going to hook it to the bike. Got a rough idea but that seems to take different paths as I go along.
Right now I want to get the side car body done and then on to the not so fun parts for me ,metal work.
The really annoying part is Barely AWake can do both metal and wood and make it look effortless.
Steve.
BarelyAWake
New Member
"Got a rough idea but that seems to take different paths as I go along."
That about sums up every project I ever tried lol Well said Steve, well said
/chases gramps
That about sums up every project I ever tried lol Well said Steve, well said
/chases gramps
silverbear
The Boy Who Never Grew Up
Silver Bear, started my favorite part of the job, sanding. The mahogany being so thin and dry it cupped when the glue dried and now the game is to sand them flat with out sanding the edges of the boards away.
My big mistake was I didn't listen to myself again and built the thing to wide. It should have been 18" wide and not 24". My brother keeps calling it the guppy.
He stopped when I slapped him along side the head with the canoe paddle. One could say he saw it in a different light.
I'll try and mess with Picasa again. Like the way they keep asking if the directions helped. I'd tell them my opinion but whoever read it would need asbestos eyeballs.
I've put kids toys together that had better directions.
I know it's frustrating to everyone to hear me talk about it but you can't see it. I want to share it and get opinions.
Still not sure how I'm going to hook it to the bike. Got a rough idea but that seems to take different paths as I go along.
Right now I want to get the side car body done and then on to the not so fun parts for me ,metal work.
The really annoying part is Barely AWake can do both metal and wood and make it look effortless.
Steve.
Hey Steve,
I did create the picasa tutorial which is a pictorial click here and now click here how to. However, I don't quite know how to post it. PM me your email addy and I can send you the word attachment. Barely, I have sent you a PM regarding the same... as an all knowing moderator I figure you will know how to post it. I can send you the tutorial as an attachment and being a computer whiz maybe you can take it from there if that's OK.
Made another V8 tank today with more care in the soldering. I also made the better version of the cradle it will sit in. I like this version and will use it in future builds. Can't beat the price, that's for sure. About a dollar eighty for the juice & can, a few inches of 1/4" copper tubing worth maybe a quarter, copper threaded 3/4" plumbing fitting for a couple bucks and a brass cap for the same. Less than ten dollars for sure. The cradle would be a few more dollars for the aluminum angle, the aluminum bottom plate and four bolts with lock nuts. So 10 or 12 dollars for the whole thing and it holds about a third of a gallon of gas. No leaks. Since I do mostly step through bikes the gas tank is an additional expense beyond the cost of a kit. Thanks again for the Apple Juice gas tank, Sir Rockenstein!
SB
BarelyAWake
New Member
I KNOW NUFHINK!!1! 
Sure np silver")
Sure np silver
weekend-fun
New Member
weekend-fun - depends on what ya wanna do with the bike, I'd repaint it to prolong it's life - but that's just me, it is a bit of a pain. I used a high-speed wire brush in a 4 1/2" side handle grinder to clean up the Rollfast, it goes quick that way... but better count yer fingers lol
 Barley
I am goign to repaint it, but keep it looking like it did way back when, not black with purple fireballs and a picture of Miley Ciris (I hate thar girl but I have nt had me coffe yet and its the only 21st century thing we all have heard of)
BUT I STILL! CAN'T FIND A WRENCH TO FIT THE SPROCKET AND REMOVE IT TO REPLACE TEH BEARINGS AND REPAINT IT!! *breathes deeeply*


silverbear
The Boy Who Never Grew Up
Removing the crank assembly can be a real pain on older bikes, especially rusty ones. I'm assuming what you're talking about is removing the pedal so that you can get everything apart. The pedal is the hard part. I would suggest keeping it soaked in a good penetrating oil, something like PB blaster which I have heard good things about. The pedal wrench should be 9/16 in size. A bicycle shop will sell the appropriate wrench if you don't have one. Remember that it turns the opposite way so that it will seem like you are tightening it when actually it is loosening. Check how it is on one of your good bikes so you know which way to turn the wrench. If nothing works at getting the pedal off I suppose you could cut it off with a torch or hacksaw and then replace the crank arm. That's a case of last resort, however. Someone else may have a better approach. Good luck.
I am goign to repaint it, but keep it looking like it did way back when, not black with purple fireballs and a picture of Miley Ciris (I hate thar girl but I have nt had me coffe yet and its the only 21st century thing we all have heard of)
BUT I STILL! CAN'T FIND A WRENCH TO FIT THE SPROCKET AND REMOVE IT TO REPLACE TEH BEARINGS AND REPAINT IT!! *breathes deeeply*
SB
silverbear
The Boy Who Never Grew Up
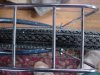
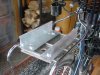
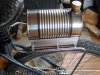
I made a new V8 gas tank, paying more attention to clean soldering this time. I also revised the cradle setup to affix the tank to the rear rack. I used wider aluminum angle for the sides and a solid aluminum plate to go under the rack The cross pieces of the rack each have 1/4' fuel line (slit down one side) covering them as do the tops of the two side pieces of angle. The fuel line acts as a cushion so that the can does not touch metal anywhere and the cradle doesn't either, so it is both solid and also should transmit no vibration/noise. Two zip ties pass around the tank and through holes in the bottom plate. I like this one and expect I will use some variation of it on future rear tank builds. I also like the tank in plain metal, but suppose it will rust if not clear coated. The other tank which was painted black is going to get covered in leather one of these days pretty soon, so we'll see what that looks like. Chain guard and little in frame tank are just about ready to paint... then back to the fenders and skirts again.
I'm gettin' there, slow but sure. Unfortunately I have work to do for my employer installing a wall furnace in a yurt. Not nearly so much fun as playing with me bike.
SB
I'm gettin' there, slow but sure. Unfortunately I have work to do for my employer installing a wall furnace in a yurt. Not nearly so much fun as playing with me bike.
SB
silverbear
The Boy Who Never Grew Up
I made a new V8 gas tank, paying more attention to clean soldering this time. I also revised the cradle setup to affix the tank to the rear rack. I used wider aluminum angle for the sides and a solid aluminum plate to go under the rack The cross pieces of the rack each have 1/4' fuel line (slit down one side) covering them as do the tops of the two side pieces of angle. The fuel line acts as a cushion so that the can does not touch metal anywhere and the cradle doesn't either, so it is both solid and also should transmit no vibration/noise. Two zip ties pass around the tank and through holes in the bottom plate. I like this one and expect I will use some variation of it on future rear tank builds. I also like the tank in plain metal, but suppose it will rust if not clear coated. The other tank which was painted black is going to get covered in leather one of these days pretty soon, so we'll see what that looks like. Chain guard and little in frame tank are just about ready to paint... then back to the fenders and skirts again.
I'm gettin' there, slow but sure. Unfortunately I have work to do for my employer installing a wall furnace in a yurt. Not nearly so much fun as playing with me bike.
SB
I'll try again on the pictures... don't know why they didn't come through on the previous post...
Attachments

bairdco
a guy who makes cool bikes
BUT I STILL! CAN'T FIND A WRENCH TO FIT THE SPROCKET AND REMOVE IT TO REPLACE TEH BEARINGS AND REPAINT IT!! *breathes deeeply*
do you mean a big wrench for the bottom bracket?
if you have a vice, once the bike's stripped down to the frame and the cranks, pick it up and put that big nut in the vice, and use the cranks as leverage to loosen it. remember it's left handed thread, so it goes righty loosey...
Venice Motor Bikes
Custom Builder / Dealer/Los Angeles
Silver Bear,that tank mount is industrial strength. Perfect!
Steve.
Except for the zip ties... 'industrial strength' could be achieved by using large hose clamps!