"kindalikeawhizzer"

Thanks, Rick. Since I have the clutch then that's how I'll go. I have a jack shaft in 5/8" which is probably too short at 6", but I can figure that when I get further along.

Knowing nothing about sheaves, giant pulleys and such I have no idea what size sprocket and pulley I will need on the jack shaft. The clutch has a ten tooth sprocket, so that is fixed. The sheave measures 14" in diameter and that is fixed. The sprocket I have for the jack shaft has 17 teeth and can be changed for something else. I don't have a pulley yet and will buy whatever is appropriate. Can anyone guess what size sprocket and pulley I need on the jack shaft? If I'm in the ball park I can always tweak things later. This is the time to be gathering together the bits and pieces needed.

I was just looking at pillow blocks for the jack shaft. I see there is a wide range in prices with some being "light duty" others "heavy duty" and others yet for royalty. I'm guessing that the stress on these is not super great, so is something like this adequate...

http://www.ebay.com/itm/2-Qty-5-8-P...=BI_Heavy_Equipment_Parts&hash=item35c5bc7d94

Thank you to anyone venturing an opinion on any of this stuff. I tried calling Jay Leno, but the line is busy.
SB
 
That looks cool silverbear. Enjoyed your story a lot. The motor should pull an overall ratio in the range of 8:1 or so. You can vary by changing the jack shaft pulley and/or sprocket. keep in mind that pulleys are usually cheaper than sprockets, but chains are much easier to change length. If you mount your jack shaft with plenty of adjustment, you can change pulley sizes and keep the same belt. Obviously the rear wheel adjusts a little, so mounting the engine and jack shaft on sliding brackets will make experimenting a lot easier. A 3'' jack shaft pulley would put you in a good range. If you have a lot of hills, a 2 1/2'' or 2 3/4'' pulley would be better. Hope this info helps.
 
Today I modified the mounting hardware from another style Schwinn chain guard, removed the guard itself and did the switch. It lowers the guard quite a bit and with a smaller sprocket will be fine. It has allowed the engine to settle lower and now there is a plenty of room for spark plug and an air filter of one kind or another. Will still probably fabricate it since the Walbro carb is squarish at the base instead of round. It will get something to protect the engine.

Being able to move the clutch in closer to the engine allowing me to cut off as much as an 1 1/4" of engine shaft also makes a big difference. I can offset the engine a little to center the overall width. The pedal will need to be changed to an extra wide one and even then may need to be bent some. Will cross that bridge when I come to it. Stuck the exhaust manifold on to start thinking about how to run the exhaust pipe to the Harley muffler.

Thanks for the guidance you guys! Who needs Jay Leno when I have you all?
SB
 

Attachments

  • DSC05976.JPG
    DSC05976.JPG
    243.5 KB · Views: 176
  • DSC05977.JPG
    DSC05977.JPG
    252.5 KB · Views: 179
  • DSC05978.JPG
    DSC05978.JPG
    246.1 KB · Views: 177
  • DSC05979.JPG
    DSC05979.JPG
    273.2 KB · Views: 156
  • DSC05980.JPG
    DSC05980.JPG
    238.4 KB · Views: 166
To clarify: Ray, I'm still using the Schwinn feather chain guard... just has different mounting hardware. So glad that worked!

As I stare at the second photo above I am thinking to pull the upper part of the engine a few inches toward the seat post. The factory engine mount position will be good for making up a mount off of the front down tube. Will also try to figure out a secondary mount at the top rear two head bolts... with a support bracket going to the seat post. That should keep the engine secure. Another reason I want to move the engine aft a little is so that I can either find (or remake) a copper gas filter I came up with a few years ago. That would be under the gas tank at the front end of the tank. The filter has fittings at each end for the gas lines and is soldered closed with the filtering part being stainless steel wool inside. I never really used the one I made, but Russel liked it and made one for one of his bikes and I guess it runs fine, so it must work. A little more copper is always good, eh?

No doubt there will be snags further along, but right now I'm feeling really good about this build. Woohoo!
SB
 
Last edited:
Atom,
Thanks for looking . As it happens that is the same one I had settled on. Will wait til the end of the month to see how finances are before ordering, however.
SB
 
I have moved the engine toward the back a few inches and will stare at it that way for awhile. I think it looks pretty good. Now I'm wondering again what it would look like with the plug facing the seat the way I had it originally. Now that the engine is lower it may look better that way. That's what mock-ups are for... to help you visualize and avoid problems later on.

I ordered a 2 3/4' pulley (actually, 2.80"). I also installed the sheave using the conduit clips and put the belt in place. I'm still not sure if the belt will clear the frame or if I'll need to dimple the frame where it passes close by or rubs against.

The jack shaft bracket clamps should come in a few days so that I can start making that up. Then I imagine things will slow down until next month when I'll buy the pillow blocks & bearings for the jack shaft. After that the engine mounts. Order an extra wide one piece pedal crank. Rebuild the carburetor. shim the Herculese fork. Handlebars, controls. Make grips. Lots of stuff between now and spring when everything will come apart for cleaning things up, primer and paint.
SB
 
Forgot the photos. First of the engine further back and second showing how the sheave is designed so that the belt rides in it's own groove to the outside edge of the sheave. Nice.
SB
 

Attachments

  • DSC05981.JPG
    DSC05981.JPG
    255.7 KB · Views: 180
  • DSC05983.JPG
    DSC05983.JPG
    254.1 KB · Views: 163
I'm still trying to figure the best position for the engine. First photo shows it in the forward position, but pulled back some and more upright. Second shows it more forward and third has it reversed with the spark plug facing back. Position in third photo could be lowered a little with the base pitched forward more.

What do you think? How would you position it?

The 2.80" pulley arrived today as did the mirror clamp which will be used to hold the jack shaft in place.
SB
 
Oops...Let me try again,
SB
 

Attachments

  • DSC05976.JPG
    DSC05976.JPG
    243.5 KB · Views: 152
  • DSC05981.JPG
    DSC05981.JPG
    255.7 KB · Views: 146
  • DSC05984.JPG
    DSC05984.JPG
    272.6 KB · Views: 148
I think the strieghtest up and down you can get it would be the best especialy if you are going to run without the flywheel cover. Thats going to be superduper build...........Curt
 
Intrepid & Curt,
Thanks for giving it a "creative stare". Here's yet another variation. I have the engine pretty well centered in the frame opening and as low as I can get the base of the engine. With it mounted off center to the engine mountings, but centered up as far as pull start and clutch width it allows for the carburetor to hang below the front down tube. What do you think? Or was it better before?
SB
 

Attachments

  • DSC05990.JPG
    DSC05990.JPG
    261.5 KB · Views: 154
  • DSC05991.JPG
    DSC05991.JPG
    269.4 KB · Views: 154
  • DSC05992.JPG
    DSC05992.JPG
    247.1 KB · Views: 151
  • DSC05994.JPG
    DSC05994.JPG
    263.2 KB · Views: 145
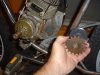
Hi SilverBear, long time, no talk! When I was first prototyping the Silent power drive, I could not easily get a small piece of 5/8 keyed shaft, and I spun the set screws on the flats i had ground into the shaft. My solution then was to use a Dremel with the new style quick-release stones, the type with the fiber-glass grid on it so it doesn't explode so easily.

I cut a key-way into the shaft, problem solved!

(Later i did get shafting, but learned a valuable lesson about being more inventive)


Mike
 
Back
Top