You are using an out of date browser. It may not display this or other websites correctly.
You should upgrade or use an alternative browser.
You should upgrade or use an alternative browser.
Excelsior V Twin build
- Thread starter DareDevil
- Start date
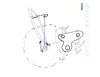
Hi .... The forks needed the inner tubes trimmed so the rods that actuate the suspension have clearance inside the forks and wheels..so I have trimmed 1/3 off the fork tube and reinforced it with 1/8" flat...shaped it around to fit the profile of the inner forks and welded it in...I have a clearance of 6-1/2" inside the forks...this will make the fork very rigid....I will clean them up to morrow....I will go to see the spring maker tomorrow and get him to make the spring...it will be 2" wide and should have 3 leaves.......probally take a week before I get it...DD
Time to sound like a newbie
")
Once the spring is mounted and inplace, where in the pivot point so the suspension will work?
Or are you using the forks themselves so they flex
If this is the case how have you worked out the deflection and breaking point of the material you used?
Not being negitive, just want to know.
DareDevil
Member
Hi .. Have cleaned up the inside of the forks and have cut some tube finger nail ends for the forks.. ed them in and cleaned up with a flapper disk.....DD
ed them in and cleaned up with a flapper disk.....DDAttachments

DareDevil
Member
Hi ... Have done a little on the left tank.....this is where I will be hiding all of the electrical components...the front part is reserved for the battery..will probally use a lithium type which should be a sealed type battery...the second compartment is where the starter solenoid..alt regulator and behind it is the C.D.I for the iginition..this will all attached on the bottom of the tank and will be removable to access these parts..... a 15 amp relay for the on-off switch...I also need a button switch for the starter...The ign coils are mounted in the rear section and the bottom will be left open and will allow for cool air to circulate around the inside of the tank....I dont want any electrics on the handle bars except a cut off switch...DD
Attachments
Last edited:
DareDevil
Member
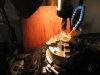
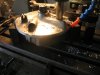
Hi ...Spent some time in the workshop today....made up a brass bung for the right gas tank petcock mounting..the bung is a piece of 3/4" round brass stock ..has a step machined half way so I can braze it into the bottom of the tank....drilled a hole through and tapped with a 1/8" NP to suit the petcock...another job done...amazing the the amount of small parts that have to be made to build one of these bikes...would hate to be paying someone to make all these small parts $$$$$$$.....no wonder thy want $125.000- for the replica B.T.R 1919 Excelsior's....DD
Attachments

DareDevil
Member
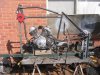
Hi....Have tacked the frame into place...every thing has lined up good...have machined the center tube bracket for a pedal set up..just waiting for some bearings so I can assemble it up before I finish welding the frame ...I might have to do some more machining on this part to fit the bearings.... so its easy to just grind of the tack welds off the frame to remove it if required.....Made a lumber jig to fit where the engine fits and made the front engine mounts....the front wheel doesn't sit where it shows in the photo...it sits on a rocker set up for the suspension, about 2 1/2" back from where it is...Have received new alloy 21" rims and new spokes to re lace to the two hubs I am going to use...rear hub is a Honda XL125 and the front is a CL 125....Still waiting for the front leaf spring, prob ally another week or so for it.....not the spring makers priority when he's doing thousand dollars jobs all the time!!!!......DD
Attachments
DareDevil
Member
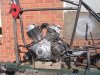
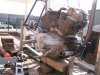
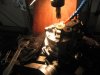
Hi.... Have tack welded the engine mounts into the frame..has 4 1/2" clearance under the crankcase...I will make a bolt on skid plate for the under neath of the frame to protect the crank case....The engine is offset 1" to the right so the chain is in alignment with the rear sprocket....DD
Attachments
DareDevil
Member
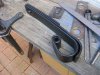
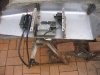
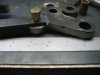
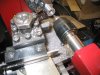
Hi ...Have done some work on the front axle suspension rockers ..they needed to be machined where the rod connects up to the the leaf spring...I have to machine some clevis couplings to fit on the ends of where the rods connect to leaf spring..the couplings will be made out off some 3/4" solid square stock.... the pivot points are all bushed.....DD
Attachments
chainmaker
Well-Known Member
Impressive build !! Really like whats happening with this build, as been said before it is unfortunate that you guys in OZ arent able to be legal with most of these builds. I have also been looking at the 250 for a possible next build.
DareDevil
Member
Hi Chainmaker.....There is also several other size engines available in the Yamaha range...they start from a 125cc v twin to about 1400cc....the next size up from mine is 550cc .....it probally would be around the same money to buy....just make sure you get every thing attached to make the engine run....Eg; Carby.... CDI.. coils.. Alt regulator ...starter solenoid...starter motor..cables.....these engine dont have a kick start....I brought mine and heard it running but he had already sold the starter...so I had to buy a starter got it straight from Hong Kong.....$55 to buy it here was over $200...so if you do buy a japan engine to power you bike have a good look through Ebay for your parts.....I paid $450 for my engine with all the bits....just about costs that to get a China Girl up to running with some power parts........DD
chainmaker
Well-Known Member
Thanks for the advice, Ive also been looking at a 250 single lung Triumph mostly original that is in super nice condition running and all, Id have to sell my Panther to come up with the coin, but it would be a great donor for somthing like this one posted earlier http://www.livetoride.com.au/sites/d...s/_LMR0858.jpg or make a sweet bobber...decisions..decisions.
Last edited:
DareDevil
Member
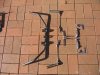
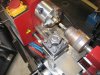
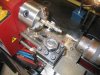
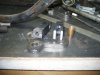
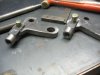
Hi... Spent some time making the clevis fittings for the suspension rockers...these are made out of 3/4" solid square stock.....takes a bit of time milling a slot for the rocker to pivot on ...there are three different holes...clevis pin hole , slot for rocker ,threaded hole for rod that is attached to leaf spring....finish them off tomorrow....DD
Attachments

DareDevil
Member
DareDevil
Member
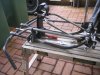
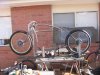
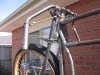
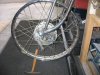
Hi ... Have mounted up the dummy front wheel..I will only be using this for setup as I have new 1.5 X 21" alloy rims and spokes for the front and rear wheels......had to make the correct width spacers for the axle so the suspension rockers where sitting correct and in alignment with the wheel and fork ends....had to machine the brake backing plate so it would sit in the pivot point bolt which will hold it in place and stop it from spinning with the wheel.....cant do much more with this until I get the leaf spring as the control rods from the rockers to the spring holds it all in place and alignment....DD
Attachments
DareDevil
Member
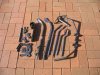
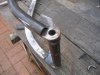
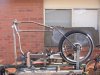
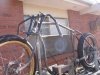
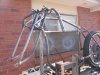
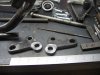
Hi .. Have finally got the leaf spring from the spring maker....have set it up and drilled the holes in the main hoop where the spring is mounted...it come with a nylon bush so I have drilled it out and replaced with a bronze 1/2" bush..have made the spring clamp and it is secured by four 1/4" HT bolts...the lever rods from the suspension rocker is solid 5/8" bar...it is machined at the pivot end to 1/2' NF that screws into the clevis pivots on the axle rockers..I have it all set up to make sure every thing moves without binding ...all looking good so far....the next move is to braze weld it all to gether...these forks have been a challenge to build...not easy..I can understand why the few people that produce them charge $2000 for them...they have to be engineered properly..they are nothing like bicycle spring forks.....I have layed out all the parts I have made for the forks...there are more photos in my albums