You are using an out of date browser. It may not display this or other websites correctly.
You should upgrade or use an alternative browser.
You should upgrade or use an alternative browser.
Excelsior V Twin build
- Thread starter DareDevil
- Start date
harry76
Well-Known Member
Hi... I would like to hear a few comments about painting the rims .....or leave polished alloy....I like the look of Lurkers polished rims....but something tells me I should paint them ????????....DD
Personally i much prefer the color coded rim look.
Can you even powder coat alloy rims like Trukd suggested? I know from my days MX riding that we used to anodise rims rather then powder coating them, i could be wrong but i always thought that the powder coated part had to be magnetic???
Id imagine that you would only powdercoat the rims if you were powdercoating the rest of the bike to match colors coreectly, and id imagine that Daredevi will be painting the bike himself as hes done EVERYTHING else himself. Why not paint it himself????
Another issue is changing tyres and scratching the paint, obviously podercoating would be better in that respect. I recall Lurker saying he wished he painted his rims but was worried about scratching the paint. I wonder how paint will hold up?
I guess it also depends how easy it is to change a tyre..... I recall how painful it was to change 21" MX tyres but i recently fitted my 23" tyre and it was surprisingly easy
truckd
Well-Known Member
Powder coating the rims and or the whole bike whatever,powder coating is a harder paint,it's not like spray paint and even with today's technologies, paints are way better then they used to be, I'm pretty sure DD will do 99.99.99.99.99.9 percent of the work himself, DAMNNN!! That guy is TALENTED!!! no matter what he decides we'll all be looking at the pic's with our jaws dropped, now here is a thought, DD could add an eliment of design and yet keep the wheels period and that is to leave a 1/2" strip of the chrome finish on the outer part of the rim where tire mounts and paint the inner portion of the rim the same color as the bike using a pin stripe to seperate the paint and chrome surface's, or how about painting the spokes and hub the same color as the bike with a brass nipples and chrome rims the possibilities are endless.
57ChevyWagonMan
Member
Anything that can stand 400 degrees Fahrenheit and is made of metal can be powder coated. Their are even special body-fillers that can stand the heat as well. I have a home type powder coating rig at school. I have helped students powder coat alloy wheels and cranks. It works well. Powder coat is nice but not indestructible as some would have you believe. I think it will hold up better than even the best base coat clear coat paints. Likely tougher than even Imron. But if you do chip it, it can be tough to match for touch up.
DareDevil
Member
Hi Guys....Thanks for the great input....I was fairly resolved about painting the rims as it would make it easy to touch up in case of scratching or chips....they will defiantly be pin stripped....I like power coating but as 57ChevyWagonMan said ..hard to touch up...I used to power coat my race car suspension and chassis parts...but is a real pain to remove to do any repairs such as welding......as truckd said there is a lot of combinations to mix-n-match....I will be doing my own painting....I'll stick to 1900's enamel finish..there is good quality fast drying gloss available these days....I should be able to mount the tyres up by hand...I think there are tyre levers available that dont scratch the rim when removing some sort of slippery coating on the shafts ....DD l
DareDevil
Member
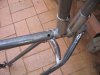
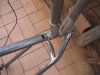
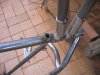
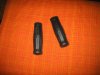
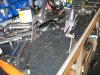
Hi...Have to think about where the electrical loom was going to run down from the left tank to the engine....because the engine "Yamaha xv250" has electric start...alternator...crank sensor for C.D.I.....and a few other electrics....probally about 8 wires.....would have looked ugly with the loom zip tied to the seat stem tube... so I have drilled a couple holes at the top and bottom of the seat tube....and elongated them and welded a piece of pipe 3/4"x1/8" long and squashed it in the vice so it become oval...It will be plenty big enough to feed the loom down with a sheath to cover the loom
....Used the dremel tool to smooth the inside so the wires wouldn't chafe and get cut..will use the dremel to smooth off the welds.....DD
....Used the dremel tool to smooth the inside so the wires wouldn't chafe and get cut..will use the dremel to smooth off the welds.....DD
Attachments
DareDevil
Member
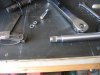
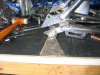
Hi ... Have been setting up the crank set....Have machined the pedal crank shaft out of 3/4" shafting steel..its 12" long to get clearance at the back of the engine....had to machine the ends to suit the cranks to 5/8" and mill a slot for the cotter pin....I might have to bend the pedal cranks to a 1" offset...I wont know till I set it up in the frame with the engine fitted...I have made the shaft so it is adjustable ( sliding sideways ) to any position it may need to be...still have a about a days work on it ...I've made split, shaft clamps to hold the ball races in place in the lower bracket...I will have to mill a keyway slot in the shaft once I have got every thing in place to hold the chain wheel and a cam to operate the rear brake....DD
Attachments
sportscarpat
Bonneville Bomber the Salt Flat record breaker
Very cool build, DareDevil. I really like the handlebar control linkages your building. Nice work.
Pat
Pat
57ChevyWagonMan
Member
DD,
Nice work! Where did you get your crank arms? Likely I will be building a similar set up for my Wisconsin powered bike.
Nice work! Where did you get your crank arms? Likely I will be building a similar set up for my Wisconsin powered bike.
DareDevil
Member
Hi 57ChevyWagonMan...I got them at my local bike shop $20.00 with cotter pins....they have a cheap and nasty chrome finish..they would be on Ebay as well...the right crank did have have a chain wheel ...so I have drilled it through the pressing and it dropped off..once I have worked out if I need to give them any offset I will probally have them nickle plated...I looking at nickle plating the throttle and magneto linkage's on the handlebars..there is a kit available to do this at home these days ..all done in a 4 gallon bucket....DD
DareDevil
Member
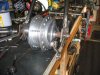
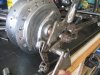
Hi.... Spent some time today finishing off mounting the rear hub ....made the brake rod and a mounting sleeve for the brake plate to anchor it to the frame.....machined the axle to the right width and cut a new 9/16 NF thread on it....need a couple of H/T washers before I can tighten it up and I can then drill the hole for the split pin to stop the axle nut from coming loose...once this is all in place I can lace up the the hub to the new 21'" alloy rim....I still need to paint them...they are in etch primer ready to be painted...its been a bit to wet and the air is to moist for enamel to dry...
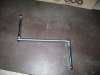
The next job is to make up a ratchet mechanism for the rear brake... this will be mounted on the right side of the pedal spindle...need to be able to rotate the pedals forward and apply the rear brake when I reverse pedal...have got the bearings for the center spindle and made the spindal clamping sleeves..just a little more machine work where the brake lever ratchet will attach this will look like a 15/16 nut when finished.. braze welded to the pedal spindal....a flange on the clamping sleeves will carry the bike chainwheel...dont think I will ever use it but it will look as if it should be there....I also have to make a gear change mechanism on the left side..this will need to be in a position so the gears can be changed with the pedal in the forward position....another job to sort out down the track....DD
To see more photos of the build... click on my user name and open the albums on that page........
Attachments
Last edited:
DareDevil
Member
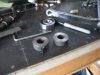
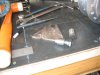
Hi.....Have machined up the pivots for the rear stand..its getting near when I will need the stand and better getting the parts ready now...the pivots will be brazed welded to the lower part of the rear fork ...the pivot has a step on it to locate it in the fork for welding...the bolts also have a step..I didnt have to make these as they are seat belt mounting bolts...have a bucket full of them....good size 7/16"NF thread and a 1/2" step ..the bolt head is 3/4"..Profiled out the triangles that it will sit in and just have to weld up a triangle frame for each side...have to go and buy some steel to make them...DD
Attachments
DareDevil
Member
Hi ... Have braze welded the pivots in place...need to use a rotary burr to clean them up..The triangle plates are where the stand sit in ...should be able to roll bike forward to ride off.....to remount the bike should be reverse.......DD
Attachments
DareDevil
Member
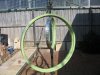
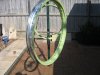
Hi .... Has turned a real nice day...had to do some chores around the house but this afternoon has allowed me to apply some paint on the rims...I dont know about this green but I suppose it will grow on me after a while...I would have prefered a dark royal blue..but that color was on on early 15-16 machines...DD