You are using an out of date browser. It may not display this or other websites correctly.
You should upgrade or use an alternative browser.
You should upgrade or use an alternative browser.
Excelsior V Twin build
- Thread starter DareDevil
- Start date
rustycase
Gutter Rider
Chainmaker...
"Id have to sell my Panther"
You have a Panther?
A real one???
Wow!
That's a REAL motorcycle!
40 cu in, isn't it?
a thumper?
Bud, these homebuilts are really fun, and all that... and not to put too fine a point on it, but it gives all sorts of creative fellows awesome things to build, but they will never, ever, build Panther motorcycles again and golly-gee-whiz, they are a darn special motorcycle!
Gosh, is yours in tip-top running condition?
Do you ride it often?
How does the torque of a thumpre that size feel?
lol
I really wanna know!")
Best
rc
sry to thread hi-jack and all that stuff...
Panther is Special!
"Id have to sell my Panther"
You have a Panther?
A real one???
Wow!
That's a REAL motorcycle!
40 cu in, isn't it?
a thumper?
Bud, these homebuilts are really fun, and all that... and not to put too fine a point on it, but it gives all sorts of creative fellows awesome things to build, but they will never, ever, build Panther motorcycles again and golly-gee-whiz, they are a darn special motorcycle!
Gosh, is yours in tip-top running condition?
Do you ride it often?
How does the torque of a thumpre that size feel?
lol
I really wanna know!
Best
rc
sry to thread hi-jack and all that stuff...
Panther is Special!
harry76
Well-Known Member
Hi....The pedals arrived to day..its taken ages to find old school type with solid rubber and no reflectors....DD
Very cool, i looked a while ago but couldnt find any reasonably priced ones.
Where are these from and how much?
DareDevil
Member
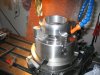
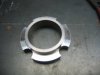
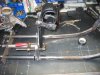
Hi...The rear sprocket I was going to use would have been to high in gearing with a 28" O/D tyre diameter .....the Yamaha XV 250 can turn 8000 rpm easy and this was over 100 mph..with the 16 X 42T....so I have gone with a 14 X 50 T on rear hub.. the 14 on the gear box should drop it down to 85 -90 MPH....the other thing about these smaller capacity *** engines is that the crankshaft output is not 1 to 1 to the gear box...I think the XV250 is around 3.5 reduction before the gearbox input...I had to make another sprocket hub adpator..the bolt holes were the same but the inside diameter was was from 58mm to 65mm...this was the difference... all the Honda hubs up to 175 were the same..the 200 cc was the same hub but a different size flange for the sprocket to sit on..they only made them for a couple of years.... also the chain size was increased to a 520 pitch...that is the same size as the output of the V250....fits in the frame OK ..still have plenty of clearance for the chain...
If any of you are going to use a motor bigger than 125cc I would recomend to only use moped or motorcycle hubs...these will probally wont fit in a bicycle frame as the smallest width hub would be 5 1/2" and you would have to be carefull how it was set up as the sprocket would chop into the frame...my frame width is 5 7/8" for the HONDA hub to fit in and I have also machined the sprocket flange 1 1/4" towards the center of the hub to get clearance from the frame and alignment for the sprocket on the engine in the frame 1 1/2" to the right ...you really need the engine when you start options of alignment can be worked out...it might mean a wider width when building the rear triangle of the fame...DD
If any of you are going to use a motor bigger than 125cc I would recomend to only use moped or motorcycle hubs...these will probally wont fit in a bicycle frame as the smallest width hub would be 5 1/2" and you would have to be carefull how it was set up as the sprocket would chop into the frame...my frame width is 5 7/8" for the HONDA hub to fit in and I have also machined the sprocket flange 1 1/4" towards the center of the hub to get clearance from the frame and alignment for the sprocket on the engine in the frame 1 1/2" to the right ...you really need the engine when you start options of alignment can be worked out...it might mean a wider width when building the rear triangle of the fame...DD
Attachments
DareDevil
Member
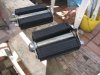
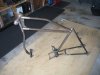
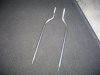
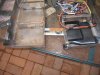
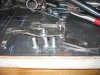
Hi .... These are the rods that are attached to the suspension rocker up to the leaf spring .. they are 5/8" solid rod with the ends machined down to 1/2" with a NF 1/2" thread that screws into the rocker pivots...I was going to use pipe here but the cost of 5/8" seamless alkaline pipe was ridiculous at $42 a meter...its very strong and has a 5/32" wall....the solid rod worked out OK....the spring hangers are welded to the rod and shaped appropriately to suit the spring...the bolts have castle nuts and I will drill the bolts for the split pins when all assembled together....one photo shows the spring hangers before they are welded to the rods and shaped...DD
Attachments
DareDevil
Member
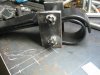
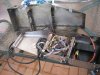
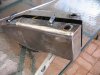
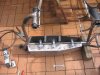
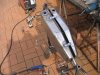
Hi ... Been playing with the tanks...gettin the mounting points silver soldered into place so I can finish off the mounting dimples on the frame..they need to be in place when I'm braze welding the frame in the near future....all the electrics are in the left tank which was on the original bike an oil tank for engine lubrication..the bottom of the left tank is removable with all the electrics attached to service if need be...you will see the thumb screws that hold it in place..the fuel tank is welded up without the side welded in ...I will tip some fuel in the open tank to make sure the welds Ive done are secure and can silvers solder along the seams if its weeping anywhere...a lot of work involved in making tanks.....DD
Attachments
cobrafreak
New Member
Tanks...I have just made my 2nd one. What a lot of work to get it right. Looks good!

cobrafreak
New Member
Especially when you are performing the one of many "leak tests", filling it up to your finish point with water and waiting for any sign of the blasted drip. Think of the most dramatic tension movie scene ever, where you know something bad is going to happen because the music is telling you that it is. That is what tank building is all about Shoot, when I was doing the bodywork on my tank after it was finished, but before paint, I filled the tank with water just in case I sanded through a seam and started a leak again. As it turned out, I did one time start a leak from sanding too much, but I fixed it with the torch in a couple of minutes. But, tanks to me are easily 50% of the hard work on the whole bike.
Shoot, when I was doing the bodywork on my tank after it was finished, but before paint, I filled the tank with water just in case I sanded through a seam and started a leak again. As it turned out, I did one time start a leak from sanding too much, but I fixed it with the torch in a couple of minutes. But, tanks to me are easily 50% of the hard work on the whole bike.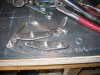
DareDevil
Member
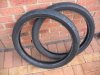
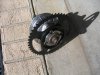
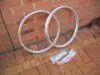
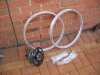
Hi...Have to plan ahead with the painting....I dont know weather to paint the new alloy rims or polish them....the bikes rims of that era are all painted and Im sort of leaning that way...I been down to the paint supplier to day and have ordered the "puke green"...it does grow on yer after a while...I'll do the dark green band striping around the tank and probally some fine stripping on the frame and forks ....the 21" alloy rims and spokes have arrived..I have to polish the outside of the hubs and brake plates on both hubs and I have some excellent chrome paint the middle of the hubs..this part of the hub is more trouble than its worth to try and polish......DD
Attachments
Last edited: