BGF Hongdu/Solex

GoldenMotor.com

Otero

Member
Feb 1, 2010
782
17
18
wa
I was afraid of that. Oh, well. Another trick I've used On my other bikes
is to cut a short piece of 3/4" conduit. After sanding the tip of the stand
& the inside on the conduit, I epoxy both & clamp the side of the tube
snug onto the curved foot of the stand. This gives it a bit more length,
a.bit wider stance, and a larger foot. If you go with a two footed stand,
get a good one. The inherent problem with these is that they have to be on
level ground. I suppose it would not be all that difficult to add an inch
to the Greenfield as well.
 
Last edited:

Intrepid Wheelwoman

New Member
Oct 29, 2011
2,830
62
0
Hauraki District, New Zealand
I've always thought that the side stand on my Wu Yang was a little too short and now with the extra weight of the engine the situation hasn't got any better.
Thanks for the suggestions guys, I will most probably fit a centre stand for now, but I think the real solution is to have some kind of stand arrangement on the front wheel itself.

I thought a little research might be in order so I checked out what the French did when it came to their front friction drive setups and soon discovered that mostly they seemed to lean their cyclemoteurs against a handy wall. Those that did use a stand seemed to chose a centre stand so I guess I will too and see how it goes.
 

Attachments

Otero

Member
Feb 1, 2010
782
17
18
wa
I was about to say, before I read alll the way thru your reply,
.... You can always lean it against a tree.
Me, I'm a master of the jury-rig. I'll always find a way to make
it work with whatever's on hand. This frequently involves
duct tape, zip ties, or baling wire. My bikes, eh.... not so
pretty as yours. Then again it's a $15 bike.
 

Attachments

Intrepid Wheelwoman

New Member
Oct 29, 2011
2,830
62
0
Hauraki District, New Zealand
Don't worry I've had my share of patched up cheapies too Otero :)

As I had a good 28inch single speed rear wheel to hand I decided to make it my new front wheel. A little adjustment and fettling was needed, but the final result is all good. Forty spokes, a stronger axle and hub and better bearings make a lot of sense when installing a front mount friction driver kit, with the bonus that I was able to fit a 90mm band brake as well.
There's an upgraded version of this particular brake that has internal expanding shoes. I have two on order at the moment and I'll most probably change the brake over when they arrive
Setting the 90mm brake drum on the hub took some messing about to get right. Fortunately I have a box of fixed sprockets for track bikes on the shelf in the garage and I raided some of the spacers and a sprocket locknut so I could position the brake drum correctly. Almost made a pratt of myself by mounting the wheel the wrong way around in the forks, but saw my mistake in time.

While the wheel was out I trimmed back the front mudguard in readiness for installing the engine and that was pretty much the close of play for tonight.
A small bit of fun though, - I raided my bicycle licence plate collection for a Chinese plate and fitted it to the back of the carrier.
 

Attachments

Otero

Member
Feb 1, 2010
782
17
18
wa
No worries,
I prefer rescuing old bikes from the boneyard. It seems this site
won't let me show my current bike as it as appeared in another thread
already,(ANNOYING). The one I'm currently riding is a mystery bike
that had 3 different coats of paint, Philco brakes from the '30s,and
a hodge-podge of German,Chinese,Japanese, and English parts. It's
a truly international bike of unknown pedigree. From the state it was in,
this bike has some serious miles on it. It took a lot of parts & labor
to put it in good order, but I love the way it rides now. If it could
speak, I sure the tale would be remarkable. The frame is similar to
a number of early mtn. bikes of various makes.
I must see your finished product, It sounds to be a classic. I've
been looking for a solex type kit to little avail. A new Solex is still
available from the Netherlands, but not with my budget. Just a
pipe dream I guess.
 
Last edited:

silverbear

The Boy Who Never Grew Up
Jul 9, 2009
8,325
670
113
northeastern Minnesota
Otero,
A bit off subject, but I noticed your comment about not being able to use a photo twice. That is really frustrating, I know. A way around that is to do a "screen capture" which essentially is like taking a picture of whatever is on your computer screen. Toward the upper right of your keyboard is a key marked Print Screen. That's the key you click when you want to do a capture. First you need to have the appropriate software in your computer. I use a simple freeware program called "Gadwin Printscreen" There are fancy versions of it that you pay for, so wander around a bit until you find the free version

So let us say that you have a photo from one of your builds and you've already used it in the build thread, but you want to make reference to it in another thread. When you try to use it a second time the forum software says you can't. So you click on print screen and a little menu comes up from Gadwin asking if you want to cancel, contine and where you want the image stored. It will take a "picture of everything on the screen, so you may want to crop it down to just the image. The forum software will take this as being a different picture and allow you to use it. I do this all the time and use Picassa as my photo management software which is also free and simple to use. I'm an old guy who came late to computers, so if I can do this it has to be easy.
SB
 

Intrepid Wheelwoman

New Member
Oct 29, 2011
2,830
62
0
Hauraki District, New Zealand
Ordered a proper leather saddle from China. It's an 'OK' brand saddle with the same three point springing as the plastic non-fantastic Wu Yang original, only I'm hoping that it's going to be a lot more comfortable.

With pictures that have been used before you can also right click on them, choose 'copy image location' from the menu and then post them using the
code instructions. :D
 

Attachments

Intrepid Wheelwoman

New Member
Oct 29, 2011
2,830
62
0
Hauraki District, New Zealand
The weather here has been really hot and muggy which is why I leave it until the evenings to work on my bike. My doctor told me to only work for an hour on my bikes each day so I don't exhaust myself, but tonight that went out the window because it was just so nice working in the cool night air.

I was determined that I was going to get the Solex engine properly mounted on the Wu Yang, only when I came to look over the collection of nuts, bolts and washers in the kit as well as the various brackets I could see it wasn't going to be easy. Now with the engine firmly mounted on the forks I'm still not sure what some of that stuff is for. :confused:

Fitting the lower brackets first seemed to work out best and since the brackets were a little oversize for the taper on the Wu Yang forks I bound the fork legs with an inch wide strip of leather. With everything clamped up fine it was the top mountings turn.
For a start I had to saw a slice off the large heavy brackets to get them to fit under the fork crown. Then I had to do some reshaping so they would fit the oval shape of the fork legs. I was given a Meccano set when I was a kiddie and it seemed like I was needing those skills again to get the brackets to fit properly. None of the bolts in the kit were long enough, but fortunately I've got plenty of long Allen head 6mm bolts so I was able to overcome that problem.
I found I had to nut and bolt the larger brackets to the engine mounting plate and then fit the clamp piece in behind so it locked down on the nut so everything was firmly held. There was some other trickery involved as well, but at least the engine is in place and when I tried heaving it about nothing shifted or moved.

I'll take some photos tomorrow.
 

Attachments

Last edited:

Otero

Member
Feb 1, 2010
782
17
18
wa
Bear,
I'll give it a go, But I'm still using a coal burning PC. That
saddle looks as if it'll do. Always important to have a
comfortable place to settle.
 

Intrepid Wheelwoman

New Member
Oct 29, 2011
2,830
62
0
Hauraki District, New Zealand
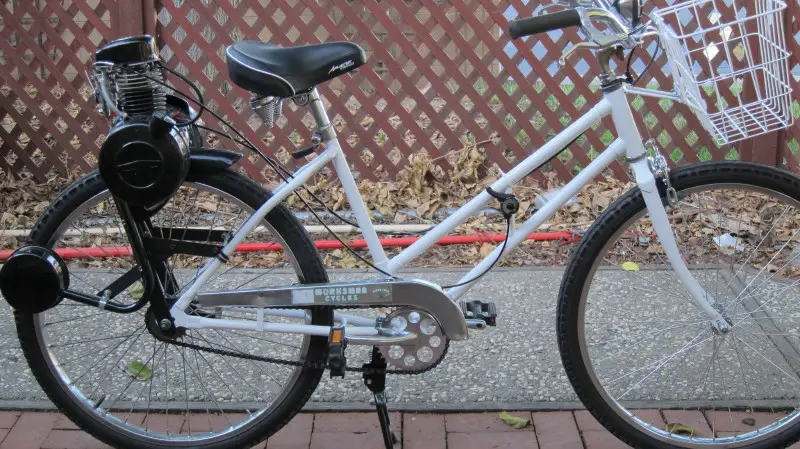
Well it's together, but I haven't tried taking it out for a ride yet.

Sorting out the decompressor cable and the throttle cable took time. For a start I didn't want to use the modern levers in the kit and after hunting around among my old bike parts I found a matching pair of really nice old school levers. The decompressor valve on my engine was screwed tightly closed so I had to do some messing around to get it adjusted properly. Along the way I discovered that the airholes in the air cleaner/airbox were around a third closed off with casting flash.
Just as well I've got a considerable amount of bicycle bits because I spent more time hunting out obscure cable hardware than actually working on the bike at times. In the end I got the decompressor working sweetly and after that setting up the throttle cable was a walk in the park.


Mounting up the exhaust pipe was relatively straight forward. The way the flexible connection to the exhaust pipe works is really clever. I found a steel support stay from a damaged lightweight 10 speed luggage rack was just the right length to support the muffler.
Quite a bit of messing about was involved in getting the mudguard to fit how I wanted and now it's in place it looks Ok. I wanted the tongue of the mudguard to match up to the engine, only there were all these nuts and bolts in the way. Time spent with a pair of Gilbrow tinsnips solved the problem and considering the amount of cutting and edge folding that had to be done it even manages to look relatively neat and tidy.

The front brake was more trouble than it's worth to setup. I couldn't use the original Wu Yang rod brake lever and links (no room); - so remembering that I had a NOS English heavyweight bicycle cable conversion kit to mount an additional rear brake I decided to use the lever and cable parts to connect up the front band brake.
It was a bit of a struggle to get the cable to run in a nice straight line because I didn't have much in the way of options to anchor the cable end. After some thinking and staring I mounted the adjustable cable anchor on the engine frame plates and ran a long bare length of cable down to the brake arm.
Squeezing the brake lever seems promising in terms of firmness of pull, but down at the brake not much actually happens. I suppose you could call it, - 'a gentle retardation', - which basically means don't stake your life on it.

By Sod's Law I received a note from the Post Office this morning to say that they have a package for me. The package contains the improved version of this brake with internal expanding brake shoes which I'm hoping will be better, but it would have been awfully nice if the package had arrived yesterday so I wouldn't have to take the brakes apart again!

Small things still to do such as mounting a tailight and a rear reflector. The extra length of the top engine mountings will stay like that until I'm 100% sure that they aren't needed for anything and that I can safely cut them back.
 

Attachments

Intrepid Wheelwoman

New Member
Oct 29, 2011
2,830
62
0
Hauraki District, New Zealand
More pictures.

I forgot to mention that I'm going to have to lengthen the hook that holds the drive roller clear of the tyre. Surprisingly this hook piece didn't fit the Wu Yang's steering stem and I had to work away it with my Dremel and open it out about 1/16th of an inch. Then of course I was so pleased that it finally fitted at last I didn't check to see if it was long enough and put everything back together again. For the moment I've got a couple of links of chain in place as a temporary fix, but as soon as I find a nice piece of stainless steel I'll do the job properly.
 

Attachments

Mike B

New Member
Mar 23, 2011
2,256
7
0
Central CA
Ah, you're gonna love it ya know, it just goes so wonderfully slow and makes nary a peep. I love mine. Every so often it compells me to to just pump the tyres and let it roll down the driveway and begin popping along.


Left it sitting for a year and it just popped off a couple of weeks ago. Marvelous thing for a nice slow ride - :)
 

Otero

Member
Feb 1, 2010
782
17
18
wa
Just the thing for a leisurely of Indonesia...or merely
the rest of the north island. I'm so jealous. It's
freezing here & my little engine has mutinied for a
warmer clime. I think a bunch of condensation got into
my gas, so now it splutters and makes rude noises.
I'm seriously considering tossing it in, and just touring
under pedal power.
 
Last edited:

cannonball2

Well-Known Member
Oct 28, 2010
3,682
224
63
Colonial Coast USA.
More pictures.

I forgot to mention that I'm going to have to lengthen the hook that holds the drive roller clear of the tyre. Surprisingly this hook piece didn't fit the Wu Yang's steering stem and I had to work away it with my Dremel and open it out about 1/16th of an inch. Then of course I was so pleased that it finally fitted at last I didn't check to see if it was long enough and put everything back together again. For the moment I've got a couple of links of chain in place as a temporary fix, but as soon as I find a nice piece of stainless steel I'll do the job properly.
Here is what I did with mine. Its adjustable to get the engine just where I wanted it. http://motorbicycling.com/showpost.php?p=258103&postcount=49
 

Intrepid Wheelwoman

New Member
Oct 29, 2011
2,830
62
0
Hauraki District, New Zealand
I'm certainly hoping to be able to enjoy that nice slow ride experience Mike. For most of my short local trips I ride my 1950 Hercules simply because I enjoy the unhurried experience of riding a heavyweight 28inch wheeled bicycle. Now that I have the Wu Yang/Solex build completed I'm looking forward to taking that quality of unhurriedness further afield.

Thanks Cannonball for the tip regarding lengthening the hook. It seems to take a good heave to lift the engine back though which makes me think the lever itself could do with being lengthened as well.

Has your engine got that bad Otero? - are you really going to remove it from your bike? Perhaps all that is needed is to empty out the petrol tank and flush the fuel lines through with fresh fuel.


http://www.youtube.com/watch?v=27338-TJpD4
 
Last edited:

Otero

Member
Feb 1, 2010
782
17
18
wa
Thx Wheela,
I'm pretty sure all that's need is a fresh fuel filter &
spark plug. I don't need much of an excuse to grouse
about something; have to maintain the grumpy old man
image. It's just that I've built up my legs lately, and
am actually fond of pedaling. Fresh gas is a good idea too.
 

Otero

Member
Feb 1, 2010
782
17
18
wa
Just timed out to look at the solex collection, Pardon me
while I wipe the drool from my chin. That's a really great toy
box. Do you have problem with the solex slipping in the wet?
Here in western Washington we've a rain forest clime most of
the year. In spite of numerous modifications, I still haven't come
up with a friction drive that serves well if it's really wet.
Fortunately this year is sizing up to be cold & dry, so I may
get some winter miles.
 

Otero

Member
Feb 1, 2010
782
17
18
wa
Silverbear,
Thanks for nothing. I took your Gadwin printscreen suggestion,
which when loaded flooded my PC with market tracking cookies
& stole my home page