You are using an out of date browser. It may not display this or other websites correctly.
You should upgrade or use an alternative browser.
You should upgrade or use an alternative browser.
Villiers beach cruiser
- Thread starter harry76
- Start date
MEASURE TWICE
Well-Known Member
Cool axle adjusters Harry. I added those to a couple of my bikes and love them. I've dealt with those link belts on machinery before and it may not be a good choice unless you have huge adjustment as they stretch a lot and do better with a spring loaded idler.
Having the welder as Harry has and all he has done with this superb looking bike; maybe that spring loaded idler is the trick. It's been so long ago that I had a few builds that had v-belts, that it is hard to exactly remember how much adjustment I had to tighten the belt. I think though about 3 inches. As far as the amount of tension on the spring for this, I can recall getting a foot and a half long adjustable crescent wrench that I used to not put on a bolt head, but a surface of the mounting for and idler on my pickup trucks serpentine belt. Weighing in at about 135lbs, I had my feet almost off the ground while changing the belt! No need for belt dressing to stop squeaks. I just wonder is it that belt dressing would help get the drive for more friction, since I think that it is loose belts that squeak? Maybe this can be tried if it turns out to be that way.
I did this time get the Accu-Link link belt to be able to take out a link when necessary on my current build.
Also, I am not sure exactly where I saw a quite professional looking bike with the handle for a clutch that did as Harry has done, but had maybe 8 notches to where you could engage it. I believe that the sketchs Harry made showed two varieties and one of them was like this. This maybe another option if there is need.
In motor cycles I have seen belts, not v-belts, but toothed belts. I don’t think they would have gone into mass production if they stretched that much. I wonder what the differences are in the material used in the different types of belts if any.
Measure Twice
Last edited:
harry76
Well-Known Member
I think, at least for now, i will just try and get my bike working with the current setup and a quality primary v-belt.
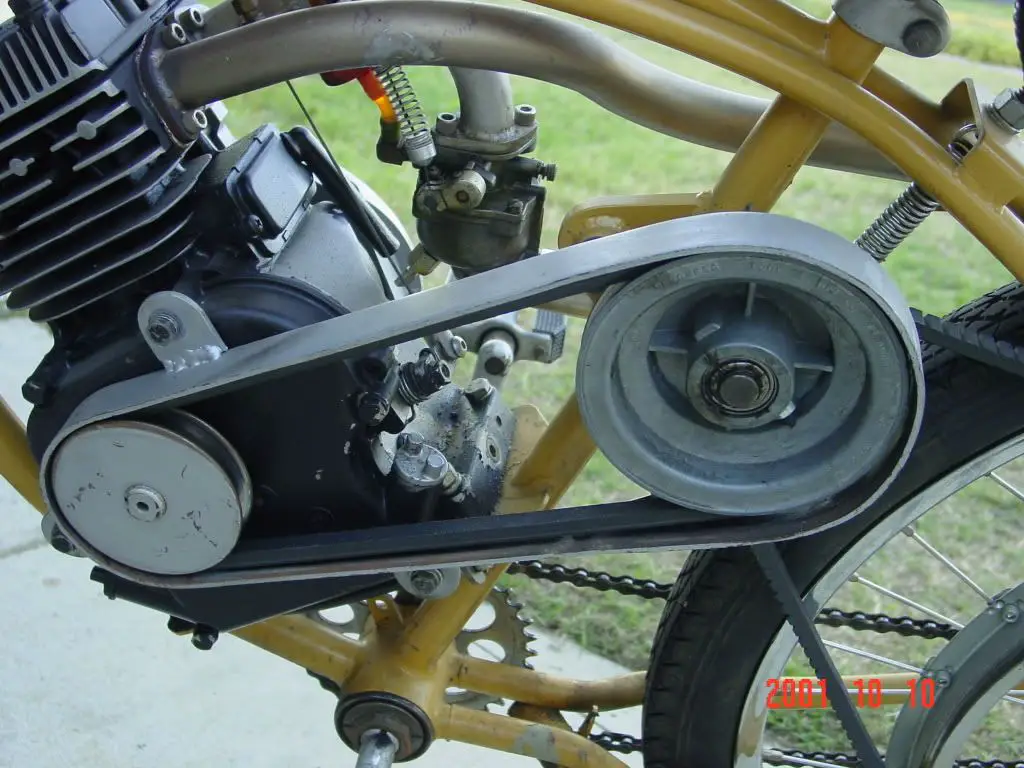
Having my clutcharm where it currently is means i dont have a great deal of adjustment, as i have only the distance between the engines pulley and my cranks......I could relocate my tensioner/clutcharm to above the primary belt and pushing down rather then up to tension the belt, but to do this i would need to move maybe my carby, and i dont think it would look as good. I really like how my clutcharm fills the empty space below my engine making it appear larger then it is.
Having my clutcharm where it currently is means i dont have a great deal of adjustment, as i have only the distance between the engines pulley and my cranks......I could relocate my tensioner/clutcharm to above the primary belt and pushing down rather then up to tension the belt, but to do this i would need to move maybe my carby, and i dont think it would look as good. I really like how my clutcharm fills the empty space below my engine making it appear larger then it is.
MEASURE TWICE
Well-Known Member
Did you investagate if the link belt can be attained where you are for not a lot of shipping cost, or do they have them in the stores there?
It started raining so all I did today way glue some stuff on my patio over hang. I could use a garage, oh well.
Measure Twice
It started raining so all I did today way glue some stuff on my patio over hang. I could use a garage, oh well.
Measure Twice
harry76
Well-Known Member
Ive been busy so havent yet found a source for those belts...... but as i said i think i will just stick with the V-belt for now. Plus im not sure if those belts are meant for "A" section pulleys.
I need a proper work area also...... i do use my garage but always need to pack everything away to put my car back..... definitely a pain. But if LURKER can build his beautiful BTR bike in his kitchen im sure we have no excuses....lol
I need a proper work area also...... i do use my garage but always need to pack everything away to put my car back..... definitely a pain. But if LURKER can build his beautiful BTR bike in his kitchen im sure we have no excuses....lol
MEASURE TWICE
Well-Known Member
I bought my Accu-Link at Harbor Freight Store near me and it is called A-LINK-5, A Section 5ft. My cost was $19.99 after the $5.00 coupon. Of course close to 10% tax, which I did not order, but oh well $22.00 out the door catch 22.
A is 1/2" top width, 5/16" height, I was checking and the pics I posted worked with my setup washing machine pulley show it works for me. The sheave or pulley, I'm not sure why different words, but this says A and is for V-belts.
pdf file:
http://www.jasonindustrial.com/pdfs/catalogs/catalog_1.pdf
Vibration Free Link Belt
ACCU-Link Vibration Free (Size A) 1/2" V belt $6 Foot | eBay
Damn though Ebay to Australia $28.75 and that’s about the same as the item you might buy, $6.00 a foot times 5ft $30.00.
Measure Twice
harry76
Well-Known Member
I havent done much this week. I did order my new high quality primary belt but havent received it yet. I did make a new shifter as i made the other one a little skinny in working it out. I got my gate mounts welded to the tank. I welded in a petcock mount. And i have a day off tommorrow so i plan to do my tank liner.


MEASURE TWICE
Well-Known Member
I was more closely looking at the shape of the modified rear fork lower and upper as most I could see that you did on your build. The triangle bends as you call them on just the side that the sheave is attached.
I had thought to rethink of how my rear pulley drive would work on my build. I remember my previous post about your (triangle bend welds) to get more space for the sheave on your rear wheel.
I thought with my wood clamping the spokes and attached to washing machine pulley was going to have enough space. It actually had just barely made enough space when I had partially tightened down the screws on it. That is how I came to think it would work. I was not yet going to run it with the engine at that time, so I did not find out till later it would not work fully tightened down. Then it became more like a pretzel when fully tightened.
I thought I would shim it. The shim idea would work to solve the tightening down issue with a distorted washing machine pulley, but it left no room to fit the rear fork. How do you like that!
Serendipity has it that even though it is too wide, I may bend the tabs on the washing machine pulley to get it right up against the spokes and not need the triangle bends if I can do it. The shimming will be taken care instead with the angle of the tab bends on the pulley. The best part is I now have more connection with the spokes with the parts that were to facilitate shimming, which I have to abort doing, unless I get a welder for triangle bends.
For a cheap one, I saw at Harbor Freight Chicago Electric 90 Amp Flux Wire Welder on sale for $119.99 and know that it is not real high quality, but they say they have a 90 day return policy. I don’t know how they can say that, but they do. Then additional warranty you can and I see as a must have is the extended 1 or 2 year after the 90 days ends which I think I heard on the phone with them $20.00 and $30.00 respectively.
I may just be getting this tomorrow and an auto shade helmet and some gloves.
Even if I don’t use it for the triangle bend welds if my work around bending the tabs on the pulley works, (I have an extra pulley just in case), I do have use for this welder for other work on this build.
Measure Twice
Attachments
harry76
Well-Known Member
I finally found some 1/2" pedals that i liked and is a big improvement over the plastic pedals. As these pedal were new i just ran them over the wire wheel to make them look a little beat up.

Today im lining my tank. Then wait a few days to dry, and by then my primary belt should be here and i can try to get it running again. And in the meantime i can get all the finishing touches (that seem to take way longer then ever expected lol) done.
I may also get a smaller front pulley and have a thread turned into it, and a primary belt to suit just to try a lower gearing. And as i have another Villiers motor the same it wont go to waste.


harry76
Well-Known Member
Hopefully i will be on the road soon.
After i welded up my stand yesterday i pedal started it on the stand quite easily. I havent yet got my new primary belt but it seems i cant get the primary belt to slip when the engine is running. So as soon as i lifted it off the stand and onto the ground it would die. The belt has stretched a lot so hopefully the new belt will slip. I may need to make a guard/guide above the top of the belt to hold it down and allow slippage.
Im also thinking its geared a little high, so i may buy a 3" front pulley and have a thread put in it to suit the motor and get a belt to suit.
Do you think that a 3" or smaller front pulley would slip easier then the current 4" pulley because there would be less belt/pulley surface area in contact?
MEASURE TWICE
Well-Known Member
I would not think the surface area would make that much difference, but I have not built that type of engage / disengage drive pulley by this method. Hope there are other people to respond with specific experience!
I did just do two days of work and got the stuff I wanted to do without a welder. I am putting it off getting a Hobart capable of 1/4 inch till I have more of a need for it and get it as MIG ready with all except the cylinder when I do. I've seen them on Amazon for about $375.00
With the pulleys that I used with the belt I have, I felt I had to make the belt tension tight enough that I could hold one pulley still in one hand and try to turn the other. I was not able to turn the other and did not have any slippage, it was that tight.
I added one link in this belt and had is slip just with enough pressure that it would not hurt my hand, but it did slip. It seemed to be about ½ inch longer with the one link added.
I took the link in the belt back out as I felt necessary to have it be sure I could climb hills. The thing that had me initially wanting to make the belt looser was that the Rear wheel would turn freely on the bearings with the belt off, but not with the belt on. I must have forgotten that that is the way belts on pulleys are supposed to be. The two bearings on my jack shaft freely roll the shaft, but not so easy when the belt is on the pulley.
Thinking of your situation I would think you need to have the belt that tight too. The amount of tightness that you can then loosen too, maybe the range is not good enough.
If that is the case you may see if you can get more movement to get a greater range. Possibly too, you may add some way of getting mechanical advantage, where you move the clutch handle and it is like geared up to move twice or more the distance at the pulley.
Now that I think of it, the hinge point on what you have does the opposite where it is like gear down. The fulcrum is down below with the longer portion going toward the handle.
One other thing, I am not sure I have ever heard of, but the way the pulley type centrifugal clutch I have for v-belt (which is not in my current build design), gains traction with the belt by squeezing from the sides. The sides then being at an angle then naturally have the belt pushed away the center of the pulley and essentially create a larger effective pulley. If this is something that is a possible method to have the belt tighten with a lever, maybe some scheme of that has already been in use, and you may do that if necessary.
I would think what you have as it is should work as I have heard others doing the same. Do some searches on this MB site to see if they had any issues that you have with this system.
I am soon to get the tank with gas on the frame and give it a test. I have not made a motor bike using both chain and belt with jack shaft, so I'm hoping it goes well.
This guard / guide that you may make for the situation you found, how does this exactly work? Is there some place that I can see pictures of how it looks?
Thanks
Measure Twice
Attachments

Last edited:
harry76
Well-Known Member
The problem with my primary belt NOT slipping when i wanted it to had nothing to do with a lack of my shifter/idler pulley movement. I can get enough movement to engage the clutch and enough to sufficiently move it out of the way and still have adjustment if needed.
The problem is the belt has streched. And when the shifter is disengaged the belt gets a lot of slack causing the belts to actually grab the pulleys. I saw somewhere MSRFAN mention it and he had the solution (if i recall corectly) a flat piece of steel over the top part of the belt with an inch or so gap. This causes the ends of the belt to slip on the puleys rather then grabbing onto it. This should work because when i pushed down on the top part of the primary belt it would slip. I will see how my new primary belt performs and make one if needed.
The problem is the belt has streched. And when the shifter is disengaged the belt gets a lot of slack causing the belts to actually grab the pulleys. I saw somewhere MSRFAN mention it and he had the solution (if i recall corectly) a flat piece of steel over the top part of the belt with an inch or so gap. This causes the ends of the belt to slip on the puleys rather then grabbing onto it. This should work because when i pushed down on the top part of the primary belt it would slip. I will see how my new primary belt performs and make one if needed.
MEASURE TWICE
Well-Known Member
The problem with my primary belt NOT slipping when i wanted it to had nothing to do with a lack of my shifter/idler pulley movement. I can get enough movement to engage the clutch and enough to sufficiently move it out of the way and still have adjustment if needed.
The problem is the belt has streched. And when the shifter is disengaged the belt gets a lot of slack causing the belts to actually grab the pulleys. I saw somewhere MSRFAN mention it and he had the solution (if i recall corectly) a flat piece of steel over the top part of the belt with an inch or so gap. This causes the ends of the belt to slip on the puleys rather then grabbing onto it. This should work because when i pushed down on the top part of the primary belt it would slip. I will see how my new primary belt performs and make one if needed.
I have to say I did not understand at all till now you explained what was happening. Maybe I should be like Steve Martin and say Excuse Me!
So back to it, then it seems that just the right amount of looseness is necessary, otherwise it catches friction un-evenly. This probably would wear out the belt if left to be doing that, but the engine stalls anyway. The fix you explained seems to make sense then.
Measure Twice
MEASURE TWICE
Well-Known Member
Your bike is looking good Measuretwice. How far off are you from getting it going?
I seem to remember thinking that I would gas it up about a year ago and try it, till the problem with the wobble in both axis’s of the rear drive pulley. Now that that is fixed, I have to look all around in boxes of stuff where all the parts are.
It does seem quite exciting to be back at once what was square 1, 10? again.
I have not actually used the carb that uses gravity feed. It is over a year old and I never tried it yet. I also had so many things to get the bowel level with the engine tilted back. The picture is not with both wheels on and on the ground. It is about 15 degree back tilt. I made manifold mods and also one part is the primer that some strange way needed to connect to a tiny hole on the side of the flange going to the air filter. My motor didn't have an air filter with a primer bulb attached, so I am using another defunct carb just for the working primer bulb and routing the pressure to the new gravity bowl carb.
All the workings of the throttle connection work, but are precariously left unprotected. I need to make a strong cover to protect the moving parts.
Ah, there also is a corrugated hose to go to a funnel intake with oven-range/stove filter up high on the bar next to where the gas tank mounts. I have to make brackets for that. I can run it without to test it though. The foam air filter is going to be attached; it is just for the ATV stuff in the dusty conditions I want to eventually have it.
So all in all, I am needing to do what I think are finishing touches!
I have the pull start on this Briggs with the pull very close to where the Throttle Cable goes. I was wondering if anyone has tried moving the pull cord routing with small pulley to have at different angle. I know they have the pull cord on some lawn mowers routed up the handle high, that I think is a bit ridiculous since you cannot have your foot on the engine and use your whole body weight to give a tug to start. But I suppose I may do this. The other much more intensive thing I would like to really do is rotate the top of the pull start recoil to be 90 degrees clockwise. Then it would be out of the way and in a free area just forward.
I do not have the welding stuff at hand and would rather wait an buy that later than use a shop that cost too much for limitations on space for me to work. Anyway I can make a work around, but I do not want the possibility of the pull cord smacking something when recoil, or if not in tune can snap back on startup. I'll figure something!
Measure Twice.
Last edited:
HI Harry. Yes, you need a guide no matter what size pulley you use. I make a "U" shape out of 1/8'' X 1'' steel strap and mount it close to the pulley without rubbing. The belt just needs to come off the front pulley a small fraction of an inch to disengage. once you get it adjusted, it works very well. And the smaller pulley would slip a little easier and of course the lower gearing would move the bike with less sffort.
harry76
Well-Known Member
Thanks MSRFAN, do you have a picture of this setup? Or could you direct me to the thread if you have a pic in it.
I had an idea in my mind of how to do it but that sounds a little different. I was going to just use stainless steel (i can get it for free from work and i thought it would be a suitable material for the belt to slide against) and bend up a guide with just a flat section above the belt. I guess your way guides the belt so is better.
Thanks again