Zoom's 1912 Indian Board Track Replica

GoldenMotor.com

What id the best way to stretch the frame?

  • Cut tubes in the middle, add sections of 1" tube with sleeves inside.

    Votes: 8 80.0%
  • Replace the tubes entirely.

    Votes: 2 20.0%

  • Total voters
    10

Zoom XF

New Member
Aug 6, 2017
9
8
3
60
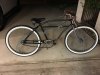
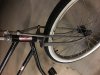
I have been planning a build for about a month with the goal of doing it on a budget. I found a donor bike today at the Pomona Swap Meet ($140). It is a Worksman bike, which should facilitate a good foundation for the build. I want it to have some patina, with probably more rust than paint. Here is a picture of what I want it to basically replicate and a picture of the donor bike. I plan on stretching the frame, so the length of the tank is about 30" with the bike wheel base at about 54".
Real 1912 Indian.jpg
IMG_2393.JPG
 
  • Like
Reactions: Hud and fasteddy

indian22

Well-Known Member
Dec 31, 2014
4,722
7,697
113
Oklahoma
Welcome to the forum Zoom. You bought a nice bike & have a nice design in mind, though motor and drive train now the basic question is: Do You use the frame you purchased & cut the frame for a stretch or do you build a frame to the desired dimensions mostly or entirely from scratch? I've built bikes doing it both ways and have been entirely pleased with the results. You actually have the only vote that counts....have fun and I'll look forward to seeing the fabrication process during and to completion. Have fun! Rick C.
 
  • Like
Reactions: Mark O Reilly

curtisfox

Well-Known Member
Dec 29, 2008
6,046
3,949
113
minesota
Welcome to the forum Zoom. You bought a nice bike & have a nice design in mind, though motor and drive train now the basic question is: Do You use the frame you purchased & cut the frame for a stretch or do you build a frame to the desired dimensions mostly or entirely from scratch? I've built bikes doing it both ways and have been entirely pleased with the results. You actually have the only vote that counts....have fun and I'll look forward to seeing the fabrication process during and to completion. Have fun! Rick C.
DIDO! Nice bike to start with...........................Curt
 

wret

Active Member
Feb 24, 2014
355
65
28
Maryland
Hello Zoom. Your project could be similar to mine. I started with a Worksman frame as well. Here is a pic I based a lot of my dimensional decisions on. As I recall I stayed pretty faithful to the original dimensions, scaled back about an inch due to the my intended wheel size.
indian grid.png
 
  • Like
Reactions: Franz123

Zoom XF

New Member
Aug 6, 2017
9
8
3
60
Hello Zoom. Your project could be similar to mine. I started with a Worksman frame as well. Here is a pic I based a lot of my dimensional decisions on. As I recall I stayed pretty faithful to the original dimensions, scaled back about an inch due to the my intended wheel size. View attachment 95524
Thanks Wret! I haven't measured an original Indian tank, but saw some dimensions on a Cyclone showing the tank to be 30" from the farthest tip on the front to the back. That would mean I would have to lengthen the frame 9". The height of the tank looked to be about 4", but if I don't move the heights of the two top bars, I only have a 3 1/2" space between the bars. How do these dimensions compare to your bike?
 

Gbrebes

Well-Known Member
Jul 16, 2010
656
260
63
Los angeles
Hi Zoom,

I did a frame stretch similar to this, but I used a vintage women's bike frame instead. My build thread is here. For the top bar, bottom loop, and crossbar (under fuel tank) I used 1 1/8" tubing. This allowed me to cut the frame, but I left 3" stubs on the head tube and seat post. I then fit these stubs with an inner sleeve and the 1 1/8" tube slid over the 1" stub. I brazed all the joints. For the bottom bracket I had to drill a new hole at the bottom of the shell in order to get a drop loop bottom. This new hole received a 1" stub with an inner sleeve and the bottom loop slid over this stub. I also recommend gussets at the head tube especially, but also at the bottom bracket joints.

I see that you purchased your frame in Pomona, so I am guessing you live in SoCal. I live in Hollywood if you want to get in touch and mull over the different options.

Good Luck,

Gilbert
 
Last edited:
  • Like
Reactions: indian22

Mr.B.

Well-Known Member
Oct 21, 2008
1,329
559
113
Upper Mississippi River valley
Welcome to the Forum!

If i was going to build a replica Indian racing frame from a Worksman i would probably approach something like this...

Indian frame .JPG


And if i lived anywhere close to Gilbert, i’d take him up on his offer to touch base!
 

wret

Active Member
Feb 24, 2014
355
65
28
Maryland
Thanks Wret! I haven't measured an original Indian tank, but saw some dimensions on a Cyclone showing the tank to be 30" from the farthest tip on the front to the back. That would mean I would have to lengthen the frame 9". The height of the tank looked to be about 4", but if I don't move the heights of the two top bars, I only have a 3 1/2" space between the bars. How do these dimensions compare to your bike?
My tank is about 29" inches but more blunt on the front than a standard Indian tank, and doesn't quite go all the way to the head tube. Mine is 4" high. Since I started with a women's frame I deleted and replaced all the horizontal tubes. Maybe easier in the long run than trying to extend tubes that are almost in the right place.
 
Last edited:

Mr.B.

Well-Known Member
Oct 21, 2008
1,329
559
113
Upper Mississippi River valley
Actually after a little more thought (dangerous thing) i’d probably do the bottom bracket area more like this.

Indian frame reviso .jpg


More like the original Indian and then you wouldn’t have to cut the rear wheel stays.

-Mr. B.
 

Zoom XF

New Member
Aug 6, 2017
9
8
3
60
Hi Zoom,

I did a frame stretch similar to this, but I used a vintage women's bike frame instead. My build thread is here. For the top bar, bottom loop, and crossbar (under fuel tank) I used 1 1/8" tubing. This allowed me to cut the frame, but I left 3" stubs on the head tube and seat post. I then fit these stubs with an inner sleeve and the 1 1/8" tube slid over the 1" stub. I brazed all the joints. For the bottom bracket I had to drill a new hole at the bottom of the shell in order to get a drop loop bottom. This new hole received a 1" stub with an inner sleeve and the bottom loop slid over this stub. I also recommend gussets at the head tube especially, but also at the bottom bracket joints.

I see that you purchased your frame in Pomona, so I am guessing you live in SoCal. I live in Hollywood if you want to get in touch and mull over the different options.

Good Luck,

Gilbert
Gilbert,

Thanks for the info and I looked through your build too. Awesome bike! I loved all the pics you posted and like the bare steel look. Yes, I am about an hour away from you, in Rancho Cucamonga. I would love to see your bike. Not sure how to exchange info without making it public on this site.

Mike
 

Zoom XF

New Member
Aug 6, 2017
9
8
3
60
Actually after a little more thought (dangerous thing) i’d probably do the bottom bracket area more like this.

View attachment 95538

More like the original Indian and then you wouldn’t have to cut the rear wheel stays.

-Mr. B.

Mr. B,

Thank you for the drawings. The first one is what I was thinking I would do. Once I start cutting and fabricating, I think I will consider drawing #2. I got the basket, fenders and front fork off last night. I should have my new reproduction Indian fork and 80cc Chinese engine kit in soon. I am going to test fit the engine, before I decide how big to make the bottom drop tube loop. I am planning on making some kind of fake oil pump to be mounted under the engine, to fill some of the space, as the Chinese engines look too small and out of place by themselves.

I really appreciate the help from everyone on the forum. Hopefully everyone will enjoy my build and I can help others too. More pics soon.

Mike
 

Zoom XF

New Member
Aug 6, 2017
9
8
3
60
My tank is about 29" inches but more blunt on the front than a standard Indian tank, and doesn't quite go all the way to the head tube. Mine is 4" high. Since I started with a women's frame I deleted and replaced all the horizontal tubes. Maybe easier in the long run than trying to extend tube that are almost in the right place.
Wret,

I was actually looking for a women's bike, thinking the same thing on the top two tubes as you, when I found the Worksman. I figured with the basic tube layout already there, it would be easier to just extend it and I really liked the wheels and spokes on the Worksman when I saw it in person. Thank you for the tank info and I printed a couple copies of the grid pattern you provided, so I could double check some of the dimensions.

Mike
 

fasteddy

Well-Known Member
Feb 13, 2009
7,445
4,888
113
British Columbia Canada
Zoom,

To send a private message go to the top of the page where your name appears. Put your cursor on the envelope and a small menu will appear. Click on, Start a new message, that is at the bottom of the menu and this will take you to a page where you type in the person's screen name you want to reach and then you add your message and send it.

Steve.
 
  • Like
Reactions: Hud and Zoom XF

Gbrebes

Well-Known Member
Jul 16, 2010
656
260
63
Los angeles
[QUOTE="Mr.B., post: 660164, member: 2541"

And if i lived anywhere close to Gilbert, i’d take him up on his offer to touch base![/QUOTE]

Hey Mr. B, if I lived anywhere close to you, I would definitely want to pick your mind on motorized bicycle building. You da man! I love your Excelsior bike, your YouTube videos, your new build, and basically your whole aesthetic relating to bike building.

Gilbert
 
  • Like
Reactions: Mr.B.

Zoom XF

New Member
Aug 6, 2017
9
8
3
60
I stripped off the fenders, chain guard and sold the basket on Offer Up for $15. Got a new board track replica fork on ebay and the quality is real good. I did have to order a new lower head bearing race to press onto the new fork and went ahead and ordered some new bearings from Worksman too. I used a piece of 1 1/4" schedule 40 PVC pipe to slip over the threads to press it on without damaging the race. Just a couple hits on the end of the PVC pipe, got it to seat nicely. I went ahead and test fit ted everything to see how it looked, (see pics). It's starting to look a little like a board track racer now. May test fit the engine this weekend, just to see how much room I will have, as I am planning on lengthening the frame about 8" like Mr B's drawings above. I would like to hear opinions on if I should build a frame jig, to really keep everything straight or if I can clamp some boards to the pipes to square everything back up.
 

Attachments

curtisfox

Well-Known Member
Dec 29, 2008
6,046
3,949
113
minesota
Looking good! Ya do like Mr.B did with the wood and and cables, till you get it welded. Study his Excalibur 09 build, you can see..........Curt
 

Zoom XF

New Member
Aug 6, 2017
9
8
3
60
Curt, Thanks. I did get to visit Gilbert and check out his bike a few weeks ago. Got some great ideas. Gilbert did some great engineering on his bike. Not too much new on my build. Have been buying parts and some tubing to lengthen the frame. Hoping to start the cutting and welding of the frame in a week or so. Planning on going out to the race at Grange Motor Circuit in Apple Valley, CA in a few weeks to check out some other builds. Here are some pics of painting the front wheel rim. I didn't want to strip the chrome, so I wet sanded it with 320, then primer, then paint, then semi-flat clear.
IMG_2570.JPG
IMG_2568.JPG IMG_2535.JPG IMG_2567.JPG IMG_2568.JPG IMG_2570.JPG
 

Zoom XF

New Member
Aug 6, 2017
9
8
3
60
Project coming along. I cut up a couple old small block chevy timing covers, to make a faux oil pump, to fill in the hoop space. I have also been doing some pipe bending for the handlebars and frame. A friend had a pipe bender and a pipe roller I could borrow. I made some board track style handle bars, that I am going to build an internal throttle and clutch release for. Looking at some original measurements, I am going to stretch the frame about 8 inches, so I made a cardboard template to lay it out. The bottom hoop was the biggest challenge, as the pipe wanted to twist on me. I am happy with the result. Cutting and welding next.
 

Attachments