Thank you guys for the kind words, yes it was a process of constant thinking, tinkering and trial and error with numerous materials and methods of applying them... a
long lasting loving process...
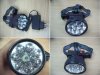
So, the LED lights (see attached photos):
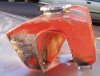
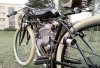
FRONT LIGHT:
1. Got an 1922 Cicca bicycle carbide lamp from a flea market in surprisingly good condition with all the details intact.
2. Disassembled the whole lamp to pieces and submerged them in a solution of 1/2 water and 1/2 ammonia for 2 hours, dried and rubbed every part with alcohol-free glass cleaner 'till shiny.
3. Now the hard part: spent 1 week looking for an appropriate LED light. After checking numerous online shops without luck, went to the local China Mart, especially to a shop that sells household appliances from obscure sources (I mean don't try to buy a toaster there -- they sell stuff made for chinese inland market, therefore the quality is awful...

) Found a shop has tremendous amount of flashlights, and -- with a measure tape -- checked every item that might fit into the carabide lamp's head (I was more than suspicious for the shop owner now
")
4. Luckily found a head lamp that slips comfortably into the lamp's head - bought 3 of them for $6 (business of the century
D, the shop owner thought that I'd might be an official from the Consumer Protection Authority Board, their worst nightmare...)
5. Took the glass out from the lamp head, and separated the LED lamp's reflector from the battery pack. Disassembled the reflector (consists of: plastic bowl, plexiglass, chromed plastic LED holder, wires) and glued the reflector's back bowl into the lamp's burner chamber with silicone based adhesive you normally use in sealing bathroom fittings. I used this kind of glue because it can be removed from metal surfaces without traces -- this is important if you'd like to convert the carbide lamp back to original condition. Note that this glue doesn't hold the lamp - it is just for securing it in place and to fill out empty space inside the lamp's burner chamber!
6. Rewired the LED light (still in parts!), closed the carbide lamp head rim and carefully screwed the LED lamps' LED holder and end rim on the LED reflector. Finally secured the reflector inside the lamp's burner chamber with small instrument screws through the carbide lamp's went holes.
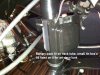
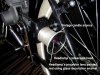
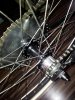
7. Attached the separated battery pack to the bike's neck tube and fixed the newly installed wires in it.
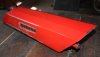
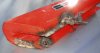
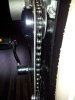
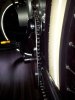
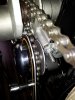
REAR LIGHT:
1. Got a power LED telescopic headlamp from the China Mart described earlier, took it apart.
2. Replaced the 5W white LED with a Cree 5W red power led bought from a microelectronic shop.
3. Bought an antique nickel plated candle sconce from a flea market, cut out the bottom plate of the sconce to make a cone shape, painted the inner surface to glossy black.
4. Fixed the preparated cone on the headlamp's telescopic tube with Loctite SuperGel (high-performance power adhesive, water and heatproof).
5. Drilled 2 small holes on the side of the batter pack for mounting screws, painted the whole battery pack to glossy red. Applied small scrathes in the paint for vintage look
6. Attached to the bike's factory dynamo post with small screws and spacers.

")
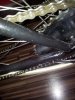
") they are decals made from MacTac special calendered vinyl films that guaranteed to last 5 years without fading and color loss. It's a special film engineered to car marking (since my gas tank's paint is a glossy car polish made by a car body shop).
they are decals made from MacTac special calendered vinyl films that guaranteed to last 5 years without fading and color loss. It's a special film engineered to car marking (since my gas tank's paint is a glossy car polish made by a car body shop).