Tube frame Ebike build

GoldenMotor.com

Tony01

Well-Known Member
Nov 28, 2012
1,729
1,721
113
sf bay area
IMG_6588.jpeg


IMG_6633.jpeg


IMG_6632.jpeg


Specs
Wheelbase: 55”
Weight: 170lbs
Battery: LiNMC 22s1p 80v 48ah Tony battery 150amp continuous, 3900wh. LVC: 66v, HVC: 92.4v
Motor: QS205 3.5t 14.4kv
Controller: Nucular 24F, uLight module
Charger: Modded Huawei R4875G 93v50a 110/220vac
Frame: custom tube. Mostly .065” wall mild steel
Forks: Suzuki K10
Rear shock: DNM 190mm with chain travel limiters
Wheels: 17x1.4 36h, 70/90fr 80/90rr Michelin
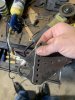
Brakes: Yamaha 120mm fr drum, 203mm rear disc, variable regen direct drive rear hub.
Charge plugs: J1772 adapter, AVC2.r com module, 110v female plug for sharing J1772 or charging 110v with double male cord.
Controls: Right: Throttle, front brake, rear disc brake foot pedal. Left: variable regen throttle, horn, turn signals/hazards

Speeds
Top speed: 86mph (MAX) 76mph (limited)
Speed on empty @77v: 70mph
Voltage range: 75-90v, 3.4-4.1v per cell
Battery amps: 285a peak
Motor amps: 480a peak
Charging 110v: 2000w, 2.5-4 hours full
Charging 220v: 4500w peak, 45 minutes full
Range: 35 miles at under 65mph


Previous build Worlds fastest schwinn cruiser
Next build 1973 Honda CB500f

*********************************
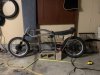
Been working on this thing a couple years now.

I first drew it up, then built it, then sold the two halves of the battery. I had planned on running a 20s2p of 48ah cells which would give me 72v96ah. But I ended up selling a bunch of those cells as 20s1p or 72v48ah. Great cells. One customer ran out of money and told me to keep the pack. I sat on it for months thinking what I would do.

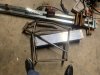
I planned to run a huge battery then got some other cells with super ratings. But I could not fit them in this frame. I gave up on the frame pretty much. But one day I was rummaging in the metal scrap pile and came upon this 5x5 aluminum box tube. I found if I squared up the battery, it would barely fit. And the box tube barely fit in the frame I built. Well it looks like it worked out.

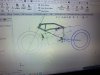
The 3D pic is after many reworks. I drew the frame completely then started over again many times. But this one is very close to actual. The built frame “tank” area is within 1/8” of the solid.

I had the computer out near my fab area and used angles and lengths to set my tools. This thing was a big job and I even screwed it up when I did that batt box the second time. But I’m going to run it. Done with it, just want to get it on the road.

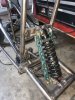
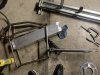
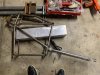
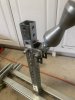
Built the swingarm the other day. I didn’t draw it cause I didn’t need to. I used the same tube as headtube for the pivot. It is 1.5” OD and 1-9/32 ID or standard schwinn numbers. 1.281” ID. Found bearings that fit without machining. Used a 1.5” hole saw to make the washer ends and stuck them on.

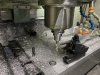
I originally planned to use an aluminum swingarm. I machined a mild steel pivot mount for it with a 12mm ID. Mounted the swingarm in the mill on an aluminium surface plate. Cut the dropouts straight. But then I realized I made a mistake with the dropouts and wouldn’t be able to make it work. Then I decided I would go half inch for the pivot. Luckily I could thread the 12mm for a 1/2-20 and run grade 8 bolts in half inch bearings. So that’s what I did. So if I need to, later I can run the alu swingarm. Just need to ream with a 12mm because the crappy tap I used probably formed the threads a bit. I drilled and tapped some 10-32 set screw holes just in case.

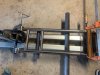
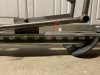
The last couple days I fabbed up plates for my swingarm pivot. I need to slim the mount down 3/8” per side before mounting the plates for the pivot mount tube. Got most of the stuff cut out. After this is done I will have to decide how the shock will mount up. There isn’t much space because of the way the batt box is oriented. The shock can be in the swingarm as pictured, or it can be parallel to batt box with an A-frame on swingarm for the lower mount.

Definitely my most difficult build. And my first and last trellis tube frame. This is hard! Getting so sick of building my own stuff. I could draw stuff in 3D, and pay somebody with better tools to make it.
 

Attachments

Last edited:

Greg58

Well-Known Member
May 1, 2011
5,353
2,575
113
65
Newnan,Georgia
Tony once you finish and take a little time off you'll get the "iche" again, it happened to me. Once I finished restoring my 50 I was burnt out, I spent so much time in the shop it was refreshing to cut grass. Then a couple of years later I find myself looking for another project, I've done cars and trucks, built trailers and so on. I found a small Jayco travel trailer that needed a lot of work, I took everything out and replaced the floor, then with my wife's help made a nice two person camper. Once you have the "build disease" it never goes away, it just goes dormant or hibernates for a while.
 

Tony01

Well-Known Member
Nov 28, 2012
1,729
1,721
113
sf bay area
Maybe so. I was already burned out when I started this project. But I really want to finish it so I can clean this mess of parts that are supposed to be a bike. It’s kind of amazing how much hardware it takes for one of these.

Today I made these plates for mounting the swingarm. I have to slim up the inside of the frame 3/8” per side. I’ll do it by stacking these pieces I made from 3/16” plate. Going to plug weld. I think I have to stack them, stick them together then drill plug weld holes thru and countersink them. Then put it all on my jig with the swingarm I made to be sure the front and back line up. Still haven’t figured what I’ll do about the shock. I can have it in that position or I can have it parallel to batt box above the pivot. Either way the swingarm will get the triangulation either above or below.
 

Attachments

fasteddy

Well-Known Member
Feb 13, 2009
7,440
4,877
113
British Columbia Canada
Your posts just showed up. I saw the frame a while ago when you posted it and all I was admiring it and thinking I wish I had the skills to do that. I agree with you when you said, it would be easier to design it and have someone else build it.

Steve.
 
  • Like
Reactions: Tony01

Tony01

Well-Known Member
Nov 28, 2012
1,729
1,721
113
sf bay area
Thanks guys. Well I pushed through. It could be a roller tonight. But I’m getting tired. Nah maybe tomorrow.

I finished up those swingarm pivot mounts yesterday. Drill holes and plug welded them together. Drilled some lightening holes too. Ha to slim up that area .750” total.

5AE85903-3962-4E47-8352-25C5C3DC7049.jpeg
827BB33C-6CF8-4DA7-996A-7D998730D364.jpeg
883D02EB-BE84-46F4-8D05-706BF5D86D8D.jpeg

Well today my 1” holesaw took a dump finally. It’s been on it’s last legs for months. I’m on my last everything. Last roll of wire. Last grinder cutoff wheel. Quarter can of that green paint I used before (but I have a lot of black). Low on map gas. Buddy will bring me the right torch head to do the alumaweld on the box the right way. Need a pencil torch flame as the aluminum just absorbs way too much heat and dissipates too fast even using two torches with the general copper soldering head.

Fortunately my old frame has a lot of pieces with 1” lightening holes that I was able to cut out and figure my shock lower and upper mounts. Cause most of the frame and swingarm is 1” so that hole saw crapping out really got me nervous. I’m done spending money on this build!

15541BED-128F-4473-A911-9AEEF95170D1.jpeg
F7DED3D2-EDD8-4DAD-9586-538BA820ED04.jpeg

My hole saw’s last cut. Took like 10 minutes to get thru .188”

1BE17DD7-CCF4-44B7-9BCD-94CDEA302A02.jpeg


Also cut a piece of box tube from my old swingarm as the upper shock frame mount. And did the front batt box corner mounts that can be seen in the distance.

EA037230-CB65-4167-8BB2-A9220FE0C333.jpeg
 
Last edited:

Tony01

Well-Known Member
Nov 28, 2012
1,729
1,721
113
sf bay area
Your posts just showed up. I saw the frame a while ago when you posted it and all I was admiring it and thinking I wish I had the skills to do that. I agree with you when you said, it would be easier to design it and have someone else build it.

Steve.
You could do it too. I did it cause I wanted to... but now I just want to ride again. I already have all the parts just need to put a whole lot of elbow grease. Having a machinist background helped. I love that stuff but it doesn’t pay so much anymore. Everything is going toward automation; a single programmer for a shop full of machines and robots and maybe a few setup guys. In China they use operators because the labor is so cheap, each worth 1/6 that of an American.

I didn’t get to the rolling chassis today. Cleaned the work area and rearranged tools to have the jig under the one LED bar light in the garage. Setup the jig for the most part. Got tired, will double check everything tomorrow.

Ran into a hiccup. My swingarm did actually pull pretty good in welding. Shrunk to 5.800” from 6.000” on the dropout. I was pretty sure the way I did it would pull it in the opposite direction. Anyway I used a portable car jack to open it up. I opened to 6.350 then used two map torches at the same spot both sides, heated till the outside of the swingarm tubes glowed orange. Then took heat off, waited for the outsides to cool to the touch and removed the jack. But the crossbar was still hot, cooled it with water. Checked spacing and I was at 6.002”. One shot and two thousandths out.

Sometimes I amaze even myself.

0E42B21D-17C4-475D-9031-5FB5211D9A51.jpeg

74D536D6-8016-4216-9FDE-F008D4822C23.jpeg


Last pic here is my jig as it sits now. Actually I got it closer than that, already put pivot bolts and got everything lined up and square. Pretty close. Used the computer to get angles for how it should sit at rest. Checked with protractor. Arrow showing light gap used to check accuracy to tube.

DB023AE5-8293-4215-B451-32AECA6E91FD.jpeg
 

Attachments

Tony01

Well-Known Member
Nov 28, 2012
1,729
1,721
113
sf bay area
Yeah I should have got all these bits laser cut or done it all outside. When I cleaned yesterday there was so much dust the floor was a different color. I probably saved about $150 but it took me hours. Explains why I’ve been so congested the last few days.
 

wrench

Well-Known Member
Aug 20, 2019
749
1,005
93
So Cal
Yeah I should have got all these bits laser cut or done it all outside. When I cleaned yesterday there was so much dust the floor was a different color. I probably saved about $150 but it took me hours. Explains why I’ve been so congested the last few days.
Use Covid face mask or a M-95, It'll eliminate all that dust your breathing in
 

Tony01

Well-Known Member
Nov 28, 2012
1,729
1,721
113
sf bay area
I really like the jig and it's definitely a hill climber with that swingarm
The jig was its own little build. I didn’t want to shell out for a real jig and pieced this together with strut channel, perforated square tube and 3/4” rod from Home Depot, and got the headtube cones from a place that sells jigs kits. $125 total. It’s not super rigid but it does the job for alignment. I wish I’d done it earlier cause all my bikes rode funny with the wheels not in the same plane. But this one is dead nuts looks like. I used some laser cut pieces in 1/4 and 5mm thick to space the headtube. The long nut for the 3/4 rod wasn’t a standard size and luckily I had 5mm thick parts that made up the difference. This is the 3rd project I’m doing with this jig so it definitely paid off!
 

Attachments

Mossy

Well-Known Member
May 20, 2022
1,128
818
113
I've been looking at this setup... Steel or stainless options ... I've got a few frames (as patterns) but will build everything from chromolly tubes I'll actually ride... $800 to get everything minus the square stock... I like the rotisserie option... But I'm still a ways away from finishing up my place... Got to live before I can play ;)
 

Attachments

  • Like
Reactions: fasteddy

Mossy

Well-Known Member
May 20, 2022
1,128
818
113
Yeah I should have got all these bits laser cut or done it all outside. When I cleaned yesterday there was so much dust the floor was a different color. I probably saved about $150 but it took me hours. Explains why I’ve been so congested the last few days.
I've done welding and grinding and cleaning to then paint and it's just so much work so I'm going to have a painting shed something I can stand up in and never get too dirty or spray wd40 or silicone anyway near it so I'm not creating fish eyes or having to sand out dust chasing it around... Or maybe an inflatable paint room I can pack away but keeping the various messes away from each other... I have a slab I can put a fence around for the welding... And an outlet on the meter box because by code I can't string power in the shed but I can plug in next to it and everything is good
 

Attachments

Last edited:
  • Like
Reactions: fasteddy

Tony01

Well-Known Member
Nov 28, 2012
1,729
1,721
113
sf bay area
Was busy this weekend, didn’t get much work done. Really wanted to finish it and ride it. Did my steering stop and shock mount. Mounted swingarm. Lots of little difficulties. Start with the steering stop.

Found a large washer the ID of my headtube, cut and bent the ends but it was too wide and not enough travel. Cut the bent ends off and welded an old MT clutch shoe to the plate. Perfect size.

Mounting the swing arm required fabbing bushings between frame mount and inside bearing race that the bolts tighten on. Unfortunately I screwed up earlier and couldn’t press the bearings further than flush with the outside. I was going to pack em with grease and put a cover. But I’ll just have to run em open now and hope for the best.

Made the lower shock mount, rails with multiple holes. Welded in then realized my shock was way too long for the work. It’s $60 for the shorter version, but still the same garbage shock. I ended up limiting the shock travel using chains. Took a lot of trial and error. Made a separate lower chain mount so I could use a single shouldered grade 8 bolt all the way through like on the top.
 

Attachments

  • Like
Reactions: fasteddy

Tony01

Well-Known Member
Nov 28, 2012
1,729
1,721
113
sf bay area
I think I finally hit the right stance with that rear ride height. I was going to temporarily mount the seat till figured out how to make my own. But here it looks okay. Still need some odds and ends like mounts for electrics. Really just need to figure where everything will go. On to electrical.

38A57E48-0F83-4A7A-A428-A7216C8FCD8F.jpeg
 
  • Like
Reactions: fasteddy