The Pennysworth model 1907

If it's the sort where the magnets are mounted inside the rim of a big flywheel, it can let go in a spectacular and very dangerous manner. Just imagine the perpiheral speed in mph, and then ask yourself if you want to risk jagged lumps of metal hitting major arteries in your leg or removing your thumb at that velocity.
 
What in the world is an electrical stutter box? I wonder if there's a way to use the existing governor but reset it to around 5,000 red line. SB, a stutter box is a rev limiter. The governer is adjustable with a flat tip screwdriver At the factory setting the screw has plenty of adjustment up and down adjusting the screw puts either more or less tension on the governer spring. The gov. on these is similiar to most stationary engines as it has a little air vane next to the flywheel if ya shave a little of it off, the top end rpm's will go up.
 
ludwig, heres a pic of the flywheel. The magnet is rivited on with what appears to be 2 pretty heavy duty rivots. Curtis, Ive thought about removing the fins but I'm worried about it overheating. Rick
 

Attachments

  • bikes.jpg
    bikes.jpg
    112.8 KB · Views: 173
Somewhere in the northern woods of Minnesota there's an old bear shaking off the need to den up for the winter just a little longer.

Steve.
 
Last edited:
well worked on the bike a bit today, hit a couple minor snags. fired it up the motor ran for a couple minutes then started to leak fuel from the carb. Should have known id have to rebuild it. Then I went to install the chain guard. The crank has a step on it at the base 1/16th inch. Im going to turn the step on the crank down with the lathe. This will let the clutch slide closer to the engine allowing the locking bearring to slide all the way onto the crank. The bearrings set in round 3 hole flanges bolted to the chain guard. This will (hopefully) allow the guard to be mounted on the crankshaft and jackshafts only. Remove 4 set screws to remove the guard.Heres a few pics
 

Attachments

  • chain cover 003.jpg
    chain cover 003.jpg
    99.1 KB · Views: 170
  • chain cover 001.jpg
    chain cover 001.jpg
    110.3 KB · Views: 174
  • chain cover 002.jpg
    chain cover 002.jpg
    115.7 KB · Views: 174
LOL, I hear bears get grumpy if they dont get enough sleep

I think our elder brothers the bears (nisaiyay muckwaawug) have the right idea regarding a long Minnesota winter. Pig out out in the fall, nap heavily until spring and forget winter. Being part bear I do my best at following that prescription and have lately been napping more. So, not very grumpy.

My cool Jacobsen engine arrived today. It really is a nice motor and I can hardly wait to try firing it up. It is so light! And it certainly looks well made. One question: what spark plug does it take?
SB
 
SB, Glad to hear it arrived in one piece. My Jacobsen has a champion CJ 14 in it. that carb looked pretty clean. when you set the high low ranges on it 1 1/4 turns out its a good starting point on those ones. When starting them, I've found that pull rope once with choke on, you want to see a little fuel condensing on choke flap then a brisk 2nd pull and mine always starts right up. Also had the one from this build on a older Kart Dyno 4.3 hp @ 4500rpm (goverened) and the curve was still climbing. I knew these were under rated.I bet with a good expansion pipe, better carb and a little port work these would turn 6hp easily. I'm going to play with different plugs, octane ratings, syn. oils and see what I can get out of it while still keeping the rpm under 5000rpm
 
Last edited:
Thank you, Rick.
Yes, the carb looks pretty clean, so maybe I'll get lucky. I was looking at the intake and wondering what kind of air filter it might have had, if any. It doesn't look like there was one or at least a simple means of attaching one. I'll have to do some 'creative staring' to see what I can come up with. What would be a better carb, I wonder? More power and something easier to protect with a filter would be good. Any suggestions? As I understand it, that carb can operate in any position, so it leaves more options for mounting the engine in the frame. I have a couple of pocket bike expansion pipes and will try to incorporate one of those into the exhaust. This probably won't all come together until summer, but I can have the engine ready and be accumulating bits and pieces of the build. Not sure yet if this will go on the American Flyer or onto a new build. There's plenty of winter ahead to dream and scheme. Wish I had a nice shop to work in. Maybe someday when I grow up I will!
Now get back to work so I can be looking over your shoulder...
SB
 
Thank you, Rick.
I was looking at the intake and wondering what kind of air filter it might have had, if any. What would be a better carb, I wonder? More power and something easier to protect with a filter would be good. Any suggestions? As I understand it, that carb can operate in any position.
SB
SB, it never had an air filter. I'm plannin on makin an adapter to hold a filter.As for the carb it was never meant to be variable throttle and will be a pain to set the hi/low w/throttle hooked up, alot of fiddlin is required.(but i did manange to get mine to work properly) I was thinking bout trying a larger chainsaw carb or maybe a MC carb. that carb (any carb w/o a float bowl) will work in any position.
 
Thanks, Gary and everyone else for the compliments. I am happy with the progress and believe that this will be a fun little ride. Sharp too!
 
A chainsaw carb sounds like a good possibility. I have my old Jonsured saw no longer running and so old that parts are real hard to come by. I used to run a three foot bar on it with a rip chain on an Alaskan sawmill. Had lots of power and was on the thirsty side, so I imagine it's big enough. Will have to see if there's a way to mount it to the Jacobsen. But that's later. First I want to see if I can just get it running with the carb that's on it. Tomorrow is my day in the big city of Ely, Minnesota (that's a joke as there are two traffic lights) where I'll pick up a spark plug and then can give it a go.
SB
 
I hadn't done anything on this build in some time, so I spent some time on it today. Got both fenders mounted. Mounted the primary chain cover. Managed to mount it to the crank and jack shafts. Only have to mess with 2 set screws to install/remove it. Here's some pics.
 

Attachments

  • bikes 013.jpg
    bikes 013.jpg
    131.9 KB · Views: 155
  • bikes 014.jpg
    bikes 014.jpg
    101.9 KB · Views: 150
  • bikes 015.jpg
    bikes 015.jpg
    109.8 KB · Views: 141
  • bikes 011.jpg
    bikes 011.jpg
    114.7 KB · Views: 170
Worked a bit on the exhaust today. This peice is made from the original exhaust, cut the center out of it, welded it, not it goes where I wanted it to.
Found 2 of these silencers out in my parts(scrap) pile, thought it'd look good on the bike. says "HOT" right on it for the "slower" crowd.
 

Attachments

  • bikes 017.jpg
    bikes 017.jpg
    113.4 KB · Views: 144
  • bikes 016.jpg
    bikes 016.jpg
    131.6 KB · Views: 152
  • bikes 018.jpg
    bikes 018.jpg
    90.7 KB · Views: 155
  • bikes 019.jpg
    bikes 019.jpg
    89.6 KB · Views: 159
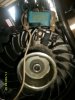
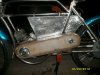
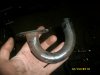
I was looking at earlier pictures and noticed the tube welded to top bar and with a flange at the other end to accept two of the engine head bolts for extra mounts and rigidity I suppose.

I made a mod to the frame on my bike that in sort does a similar effect for rigidity, where I put two pieces of sheet metal welded on the side edges of the top and lower tubes just forward of the engine and welded them in place.

I have seen some motor cycles that actually use the engine as part of the frame and this in some way adds to the frame and cuts down on weight.

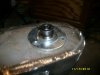
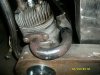
For you build, installation and removal of the engine, I could not see that close up, are the bolts that go to the top hold in a slot or do you take the head completely off?

I suppose in any case removal and torque down of the bolts mean using a star pattern so not much difference in time spent. If you loosen enough to have slack, you could just remove the two bolts, if you know what I mean?

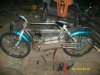
Most importantly wanted to congratulate you on the work and wondered how you got it jigged up so that it is all in line for welding! It looks perfect.

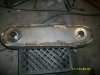
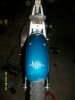
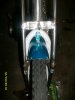
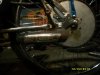
The other thing I saw but not on any other bikes so far is the fork strengthening parts welded in place like the triangle braces on train trestles. There are no shocks as part of the fork, but the work is all homemade!

MT

http://motorbicycling.com/showthread.php?t=29678&page=7
 
Last edited:
Back
Top