The Epic an electric tri car.

GoldenMotor.com

indian22

Well-Known Member
Dec 31, 2014
4,722
7,697
113
Oklahoma
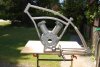
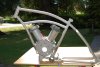
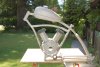
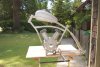
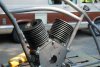
Right & correct you are Pete very tight using basically standard cruiser size frames. Anyone thinking of doing this should be adept at fitting 10 pounds of flour in a 5 pound sack. The full size 45 V-twin is ginormous! The best one can hope for is barely & that's quite enough.

Rick C.
 

PeteMcP

Well-Known Member
Jun 27, 2017
918
2,545
93
68
As you say Rick, barely squeezing the motor into so tight a frame space is the norm on such builds. Easily solvable though. If the motor is too tight, shortening the cylinder height by one fin will get 'er done..
 

fasteddy

Well-Known Member
Feb 13, 2009
7,440
4,877
113
British Columbia Canada
Your both correct. This is why I talk about Sportsman Flyer frames so often being the logical way to start. Problems cured before they start for not a lot of money and parts made to finish the job properly.

This started out as a quick way to use up all the spare parts lying around. Wheels came of that wagon when I saw Rick and Pat's electric builds.

I cut an 1" off the cylinders to get clearance for the heads. I'll mock the engine up again to show what it looks like. Trying to mock up the intake at the moment.

Steve.
 

indian22

Well-Known Member
Dec 31, 2014
4,722
7,697
113
Oklahoma
Steve even the Sportsman frame, though large compared to cruiser frames, had to be enlarged a lot in height and length both, inside the frame to house the F- head twin. Full scale motor cases require a lot of space. I'd say 75% would fit the stock loop frame of the Sportsman well, Pat's electric twins look fantastic in his standard frames. Get the proportions right for the frame you use and the rest is just execution without the termination of life part.

Rick C.
 

fasteddy

Well-Known Member
Feb 13, 2009
7,440
4,877
113
British Columbia Canada
Have some photos of the motor mocked up as best I could. Heads kept sliding off so I slide a couple of small bolts down the bolt holes in the head to hold them on. Bottom tube is going to have to come out so I can use the frame. No room for the spark plug to fit in the rear head if I don't. Either that or it will have to be a singe cylinder.

I put a Whizzer gas tank on it to see how it looked. I bought the tank a few years ago and the ad said the cap was sticking. The seller didn't have any answers when I asked him if he saw the solder that was melted around the underside of the cap so it would never come off without a lot of heat. Got my money back and he didn't want to pay for the tank to be sent back.

Steve.
 

Attachments

indian22

Well-Known Member
Dec 31, 2014
4,722
7,697
113
Oklahoma
Steve I like the tank forward. Have you thought about tunneling the tank to settle it deeper on the top bar? This is common practice on motorcycle bobber builds. Since the tank is purely cosmetic you don't have to worry about leaks. Same with the side ribs on the Whizzer tank, they can be ground down and tacked together, then as was suggested bondo applied with paint and you have a custom peanut tank form fitted. Just a thought. It looks fine as is.

Rick C.
 

fasteddy

Well-Known Member
Feb 13, 2009
7,440
4,877
113
British Columbia Canada
Hi Tom,

Hadn't thought about lowering the tank but as always, an excellent idea. It's the perfect candidate for that. The tank doesn't have any ribs on it. Just a miniature peanut tank so down on the top bar it goes. Raining today so I can't weld outside but I'll go and look to see how much lower the tank can go and needs to go and I'll bend some steel to fit.

Steve.
 

indian22

Well-Known Member
Dec 31, 2014
4,722
7,697
113
Oklahoma
May not be called a rib but it's where the upper and lower sections of the tank are joined it sticks out about 3/8" all around the Whizzer tank or the kit tanks. What I've done in the past is grind that down flush to the tank. To begin with select 5 or 6 sections about 1.5" long to grind down and then tack these sections to hold the tank securely together before grinding all around the tank. Then finish weld and grind the weld before applying filler and paint. Smooth as a baby bottom and really makes the tank stand out. Some work sure, but not as much as it would to hold fuel.

I used to tunnel, smooth as just described, flush mount the fuel filler and cut out/reverse the tank sides for knee indents. that was my signature bobber tank back in the day. I really never liked sheet metal work though I've done a lot of it. The tunnel tin is really just a section of sheet bent in a U shape. You can form a lip on each leg of the U wide enough to pop rivet & adhesive resin to attach to the tank or just tack weld.

Make sure if you weld that the tank is completely rinsed and water filled before striking an arc, I've seen what happens when an "empty & clean" fuel tank blows up and it's not worth it.

Rick C.
 

indian22

Well-Known Member
Dec 31, 2014
4,722
7,697
113
Oklahoma
Hi Rick,

Went down and checked the gas tank and there is indeed a seam. I'll have to look at whether I want to get rid of it or not. Sheet metal isn't my strong point though doing it as you suggested would certainly cut the warping down.

Steve.
Yes Steve the Tig is the proper tool for thin sheet, but using the plan outlined with a stick or flux wire /mig works too. Use small rod or wire to tack. The tank can't mis-align or warp if you leave the majority of the original tank flange/rib attached as you progress with alternating tacks on each side of the tank brush & clean each tack as you go; this slows you down and allows the metal to cool and leaves the metal clean for the next series of tacks as well. When you're satisfied that you've got a good mechanical connection on those 5 or 6 weld points cut the flange at 4 or 5 more points around the tank and repeat. eventually you will have removed the complete flange and can cross tack the remainder of the tank at the same slow pace with the alternate tack & clean pace. It goes faster than you would think, because you're always busy with the alternating cleaning, grinding and tacking process. Don't overgrind the flange prior to tack as the metal is quite thin as the tacks grow into stiches use a tack to attach subsequent tacks, this helps to prevent burn through and remember your tacks don't have to be perfect on this one. Leaks are allowed & a little finish grinding and body putty will finish the tank out beautifully. It is some work, but can turn out really nice.

If you decide to do this I'd tunnel the tank first to see how it looks astraddle the top tube, cut a little and look a lot as you go.

The major point of all this is not to cut the existing flange off before the tank is adequately stabilized to prevent warp and alignment issues.

Rick C.
 
Last edited:

fasteddy

Well-Known Member
Feb 13, 2009
7,440
4,877
113
British Columbia Canada
I have most of the fins welded onto one cylinder. Going surprisingly well. Rick {Indian22} recommended using a 1/4" spacing between the fins so I cut out some 2" disks out of some 1/4" plywood I had sitting beside the drill press.

I figured that using wood I didn't need to worry about welding a metal spacer in place somehow and it has worked out well. To get a clean place to weld through the mill scale on the metal I ground four small angles in the inside of the fin where it would meet the cylinder. This gave a clean spot to weld and allowed the weld to fit into the ground out angle making the weld smaller.

I used metal spring clamps to hold the fins to the spacers after the first fin was welded on. I'll get some photos up tomorrow to show what I'm doing. Really pleased with the look and the way it's going.

Steve.
 

indian22

Well-Known Member
Dec 31, 2014
4,722
7,697
113
Oklahoma
Steve I looked at all those steel discs and thought OMG!! Once you get that first disc in place on the cylinder and true it goes pretty quickly with the use of spacers. It's pretty hard to screw the fins up. Clean spatter as you go etc. I'm anxious to see the progress.

I'm really thinking of doing either a slightly scaled down e-V-twin flat head or a scaled single next to replace a China girl on one of my older builds I've got three to choose from.

Rick C.
 

fasteddy

Well-Known Member
Feb 13, 2009
7,440
4,877
113
British Columbia Canada
All welded up Rick. Just have to line everything up and weld them to the mounting plates on the crank case. Really easy once the first one is on. Have photos that I'll post shortly.

Had six fins left over since I had to lower the cylinders an inch to make everything fit. Already planning how to use them in a single.

Steve.
 

indian22

Well-Known Member
Dec 31, 2014
4,722
7,697
113
Oklahoma
Good news & a few more is better than too few!

I welded square cylinder base plates to each of the cylinder tubes and used 4 bolts to attach each jug to the crank case housing. Either cut a 3" hole for the tube in each square plate or just weld tube direct to the flat plate, no connecting rod to contend with on these cylinders!

Up top you got attaching the heads already figured out? Also attaching the intake manifold can pose some problems That's one reason I suggest that each cylinder can be removed to allow extra room to get the intake aligned. I'd also suggest the heads be attached for easy bolt on and perhaps as secure attachment for upper motor mount. Torque on the electrics is pretty awesome, but vibration is non-existent.

Just some random thoughts.

Rick C.
 

fasteddy

Well-Known Member
Feb 13, 2009
7,440
4,877
113
British Columbia Canada
I have two plates cut out so they bolt to the crank case with a 3" hole in them. Cut a V in three fins on each cylinder to clear the intake manifold.

I plan to weld bolts or all thread inside the cylinder to hold the heads on.

My nephew sent me a couple of photos of a young man riding a bicycle with a sidecar on it rat rod style. It seems my grandniece needs one or her dad want's her to have one.
She's seven and can ride it but they can be hard to ride and steer so I suggested a wheelbarrow based electric hot rod as a T bucket Ford.

I have most of the parts needed to build it and I talk to him on Saturday to see if he want's to do it or if the sidecar is what he want's.

Steve.