The Basics, Port & Polish and Port Matching

GoldenMotor.com

sportscarpat

Bonneville Bomber the Salt Flat record breaker
Jun 25, 2009
1,844
485
83
california
re: The Basics, Port & Polish and Port Matching

Just a thought from my fabrication perspective, if a somewhat "standard" configuration can be developed for both the intake and exhaust ports on the cylinder I can easily design and laser cut matching flanges to the final port shape. Each port can have it's own shape, that is, and I can cut the two different flanges. We could then use these flanges as templates on the cylinder. Bolt up the bare flange and grind the cylinder until it matches. I could then supply the exhaust flange to weld to the exhaust pipe. I could also take my current intake design and swedge the manifold tube to match the new intake port shape. You would then be ported from the carb, through the cylinder, and right on out the exhaust pipe. Couldn't get any better than that.
 

sportscarpat

Bonneville Bomber the Salt Flat record breaker
Jun 25, 2009
1,844
485
83
california
re: The Basics, Port & Polish and Port Matching

Maybe I need to put a little more time into understanding cylinder porting, but are you guys porting both the cylinder internal and external port shape, or just the internal shape inside the cylinder?
 

BarelyAWake

New Member
Jul 21, 2009
7,194
21
0
Maine
re: The Basics, Port & Polish and Port Matching

This thread is essentially a basic primer regarding the cleaning and smoothing of the stock port size and shape and the attempt to match the stock intake and exhaust manifolds to their finished ports as well as possible - the finishing stages overlooked by the manufacturer in the interest of budget, it's also remarkably easy.

While obv removing material makes it larger, I'm not really getting into oversize porting (true porting) other than suggesting any modification is at the owner's discretion- not to alter it's overall shape and remember to leave enough for proper gasket seating.

There's simply too much experimentation and variables in application to give specifics beyond this basic "cleaning" (carb & manifold type, exhaust system, engine size & manufacture, etc.) - but feel free to do whatever you wish with your engine(s), remember to post any results you achieve or even create a performance thread!
 
Last edited:

BarelyAWake

New Member
Jul 21, 2009
7,194
21
0
Maine
re: The Basics, Port & Polish and Port Matching

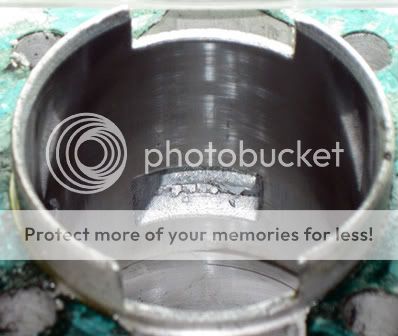
Well, we've done the cylinder's intake and exhaust ports and that leaves the lower transfer ports... their primary purpose in our HT engines to provide lubrication to the crank's bearings, their size and shape critical for timing: A two-stroke


Because of this and just how difficult it is to actually reach down into them with any sort of power tool bit, we're just gonna leave those alone beyond simply smoothing what you can. Don't get too crazy though and do not increase or alter their size and shape. There's often a casting flash ridge that should be cleaned, but your gonna hafta do that by hand;


Getting to that ridge with any tool is defo a problem, I made a "custom" Dremel bit by extending it's shaft - but you'll need a TIG welder to do it and it's sketchy as it's out of balance and prone to "chatter" (bouncing and skipping). Another method that's somewhat tedious is to take a X-acto knife, wrap the handle with masking tape (prevents cylinder marring) and bend the blade to about a 45 degree angle... be careful when trying to bend the blade and face it away from you - they tend to snap suddenly when doing something as silly as that. If you pick up a cheap "generic" set you'll have better luck as it's not as high a carbon steel and will take a bend. Now you can whittle that ridge down, sure it's slow but the aluminum is soft and it'll get the job done.

Fortunately the rest of the transfer port in the engine case is usually just fine. You can trim the gasket a bit so there's no flap sticking out into the port but other than that I'd leave it alone too;


BarelyAWake

New Member
Jul 21, 2009
7,194
21
0
Maine
re: The Basics, Port & Polish and Port Matching

Alrighty then - back to the easy stuff FTW heh

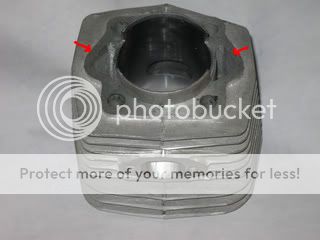
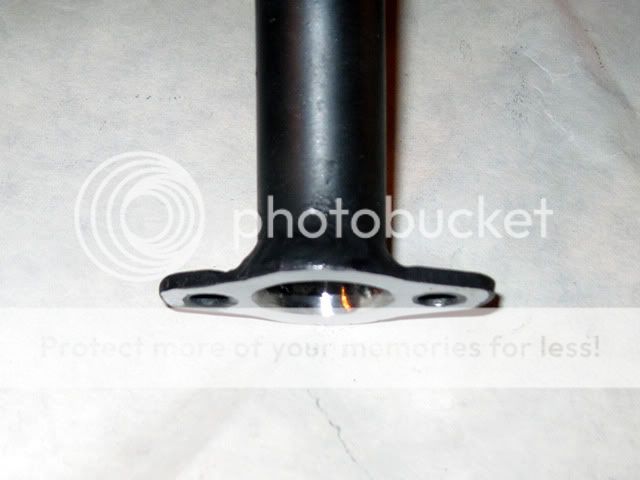
The stock intake and exhaust manifolds and their gaskets are just plain wrong, up to 1/3 smaller an opening then even the unaltered ports they're essentially a wall with a pinhole in it. The welds are often really sloppy with tons of over-penetration, there's gobs and chunks that need to be ground flush as well. If there's anything to be done to these engines - this step is a must, you can skip all the previous steps if you don't want to tear the engine apart but this really outa be attended to.

This is the stock exhaust, notice how much smaller the opening is than the rest of the pipe - let alone the cylinder port;


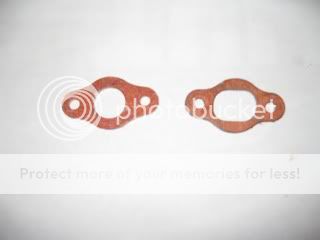
If you take the original gasket and take a close look, often there's the outline of the port pressed into it if you've had it put together before - if not simply take a sharpie, paint marker, or pencil and scribble a bunch on the cylinder's port, reassemble the intake/exhaust with the gasket in place and pull it back apart - the shape of the port should now be embossed/outlined on the gasket.

Using the Dremel and the small sanding drum (low/medium speed & 120gt), enlarge the gasket to match the outlined cylinder port;


Take the nicly enlarged gasket, place it over the manifold yer doing and trace the larger opening like this;


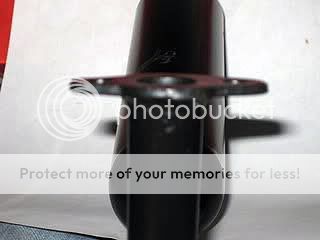
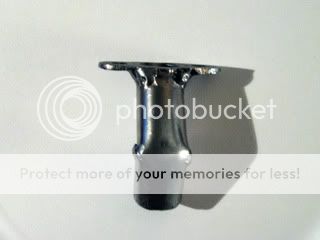
This will tell you just how much material you'll need to remove to get it even close to what the port size really is. You're somewhat limited in how much you can open it up without cutting through the pipe or the mounting flange so keep a close eye on it's thickness while yer working by looking at the manifold in profile like this;


silverbear

The Boy Who Never Grew Up
Jul 9, 2009
8,325
670
113
northeastern Minnesota
re: The Basics, Port & Polish and Port Matching

Barely,
Thanks again for the tutorial. I think I've got a much better understanding now of what this is all about. It sounds like at the very least to do this last part of opening up the gaskets to match the ports and then opening up the manifolds to their gaskets' new configurations. I did this already on the newest engine. Next motor will get taken apart for the fuller treatment. I also found the link to how a 2 stroke works very interesting and for the first time have an inkling of what an expansion chamber is all about. Very cool. Things are so much more fulfilling when we understand what is going on and can picture it in the mind's eye. I am often amused and astonished at the lack of understanding many people demonstrate of the world around them. Heat works in our homes by changing the thermostat. Electricity comes from a little hole in the wall called an outlet. Water comes out of the faucet from somewhere else and goes down the drain someplace. Food in the grocery stores comes in packages with a kind of magical disconnect to having been alive... plants reaching for the sun and water and nutrients... animals who were born and died to feed us. How can we be grateful for what we are given without knowing where it comes from? In the same way I will now be able to see my little China Girl more clearly and better know what's going on as she sings to me on the open road. Many thanks, my friend.
SB
 

BarelyAWake

New Member
Jul 21, 2009
7,194
21
0
Maine
re: The Basics, Port & Polish and Port Matching

Now that you've got the outline traced it's time to start carving away at it... but this ain't aluminum heh and it's gonna be just a lil bit tougher to deal with. It's also gonna get HOT so a quenching bucket (coffee can w/water or w/e) is a must as is a pair of vice grips or pliers if you've got sensitive fingers... but it's prolly better to just hang on to the thing and dunk it when it's getting hot - this is kinda precision work and pliers are a pain and will mar the surface.

For the weld gobs on the inside of the pipe, I'd use one of the coarser, small grinding cylinders (high speed) to get in there, unlike the ports in the cylinder there's no need for such careful patterns as before, hog it out whatever way is easiest - just be sure not to take too much off and weaken/cut through the pipe.

Once you've got that cleaned up, now we're gonna flair out the opening as much as we can in order to come as close to matching it's port. While you can use that same grinding stone I've found it's somewhat easier to get a nice shape and faster material removal to use the edge of one of the thick cut-off wheels... but this is kinda twitchy and you prolly shouldn't try it unless you've got really steady hands and have used a Dremel a lot before.

Remember - there's no way that yer gonna get the inside diameter of the manifold even remotely as large as the cylinder port and you defo need to leave enough for a good gasket seal, what we're after is just a nice, smooth transition between the two. If ya want a true "high flow" system, yer just gonna hafta build or buy something else as these pipes are just too small. Yet this "flaring" helps a LOT so yer defo not wasting any time doing this.

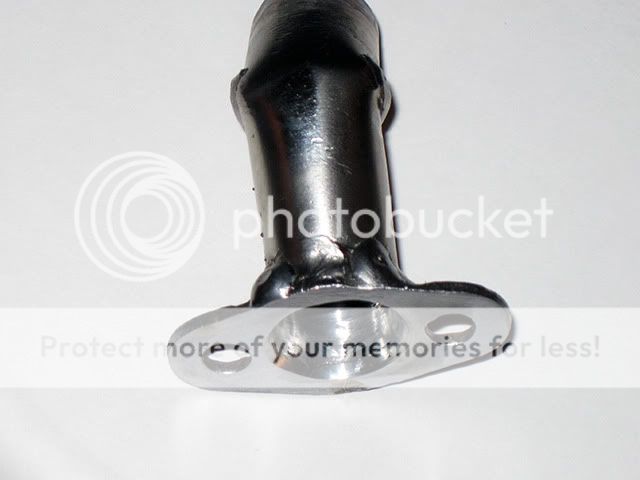
Once you've "hogged out" the majority of the excess material with the coarse stone/wheel and gotten yer shape you'll wanna smooth it out a bit as it'll be kinda rough with tooling marks and ridges. Even though it's steel - I've found that the sanding drums are far better at smoothing than the finest stone... but ya might go through a couple drums as this is tough stuff. Now ya don't wanna press too hard as you'll generate a lot of heat and might even melt the bit - but the fine grit, large sanding drum is about perfect for this. If you start "inside" the pipe and gently round it out you should end up with a nice transition like these;


At this point ya prolly outa take a flat file and/or belt sander and make sure the flange's surface is flush and smooth for a good gasket seal and I really do recommend making your own gaskets out of a quality gasket material (any good auto parts store, bring in yer old gaskets to size) but other than that - yer done FTW!

Again, for an excellent tutorial on how to tear down and reassemble the engine and it's proper torque ranges - it's all right here in glorious detail thanks to Norm: http://motorbicycling.com/f3/engine-top-end-rebuild-engine-stand-211.html
 

BarelyAWake

New Member
Jul 21, 2009
7,194
21
0
Maine
re: The Basics, Port & Polish and Port Matching

I gotta apologize for the somewhat... odd way in which this tut was written and the pics in it, I really wasn't planning on makin' a true tutorial - but a coupla peeps asked me to really nicely lol so I hadta get offn my butt and do it :p

As for the pics... well, I port and polish my engines as soon as I get them, knowing just how sloppy they can be I've always considered the engine itself a "kit" and this as just needful finishing work. As a result I usually don't take pics and what ones I do have were mostly just taken to help someone out in a PM for some other reason.

In fact I was kinda "lucky" in that I hadn't done anything to the above intake manifold, planning on making my own (I've a CNS carb and the fit is poor) I had cut and rewelded it to change it's angle "just for now" till I can make a new one but hadn't actually cleaned it up any - fortunately for this tutorial... but not so fortunate for my camera as I dropped it in the freakin' quenching bucket yesterday morning as I was workin' on the manifold.

Blarg... well - all's well as it actually dried out fine and seems to work like it always did, I guess ya jus' gotta "suffer for the art" heh


Anyway - should this tut be confusing please just let me know, ask whatever questions you need to - I'll even rewrite the thing if people feel it nessasary ;)
 

BarelyAWake

New Member
Jul 21, 2009
7,194
21
0
Maine
re: The Basics, Port & Polish and Port Matching

Barely,
Thanks again for the tutorial. I think I've got a much better understanding now of what this is all about. It sounds like at the very least to do this last part of opening up the gaskets to match the ports and then opening up the manifolds to their gaskets' new configurations. I did this already on the newest engine. Next motor will get taken apart for the fuller treatment. I also found the link to how a 2 stroke works very interesting and for the first time have an inkling of what an expansion chamber is all about. Very cool. Things are so much more fulfilling when we understand what is going on and can picture it in the mind's eye. I am often amused and astonished at the lack of understanding many people demonstrate of the world around them. Heat works in our homes by changing the thermostat. Electricity comes from a little hole in the wall called an outlet. Water comes out of the faucet from somewhere else and goes down the drain someplace. Food in the grocery stores comes in packages with a kind of magical disconnect to having been alive... plants reaching for the sun and water and nutrients... animals who were born and died to feed us. How can we be grateful for what we are given without knowing where it comes from? In the same way I will now be able to see my little China Girl more clearly and better know what's going on as she sings to me on the open road. Many thanks, my friend.
SB

Whoops! Here I was all tappin' away at the keys and never even saw yer reply silverbear - sorry 'bout that heh


Thanks man, yeah - I dearly love these lil 2smokers for their sheer simplicity, I even love how "raw" and unfinished they are as it gives me stuff to do with my trusty Dremel - the feeling of accomplishment I get from even just a purringly smooth idle perhaps disproportionate... but it gives me a case of the lols every time heh

Another thing about these HT kits is because they are so cheap and simple - there's really not much better as a learning experience for those new to engines to just get one and rip it apart to see what's up. I know most get them with the idea of just bolting it to a bike and vrooming off - but in some ways they're shortchanging themselves and loosing out on a good chunk of the experience, not to mention always wondering why the engine doesn't run as well as others, even not knowing what might be wrong should it break.

I know a first-timer may not get it back together perfectly the first time, that as simple as they are they might break or lose something... but given how cheap just an engine is - who cares? The knowledge gained is worth so much more than the motor, it'll last a lifetime and is a great introduction to how all engines work FTW


Of course... I've a terrible habit of taking everything apart, sometimes this doesn't prove to be as wise a move as it coulda been lol *shrug*

"...where's that blasted springy thingie go anyway o_O dangit..."
 

2door

Moderator
Staff member
Sep 15, 2008
16,302
175
63
Littleton, Colorado
re: The Basics, Port & Polish and Port Matching

Geoff,
Not trying to glom onto your tutorial but I was planning on doing one about smoothing intake and exhaust flange welds. Instead of a seperate one I decided to throw it in here where there's already an audience who might benefit from it. After all, the Drermel is all warmed up so might as well kill two birds with one stone, so to speak. Hope you don't mind.
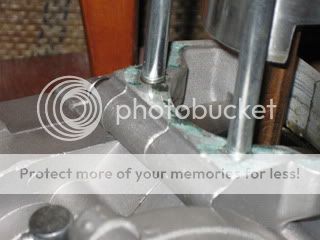
Fastener failure has always been a bug-a-boo with a lot of guys and from experience with the little 2 strokes here's one way to help eliminate a cause.
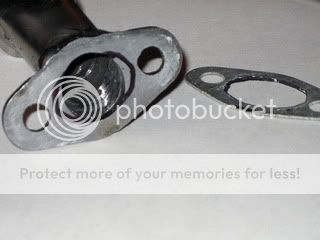
The weld beads around the pipe and flange on the intake and exhaust manifolds are just too darn big. They often extend into the area of the washers and nuts, or bolts. Torquing the fasteners down in a cocked angle will promote fastener failure and loosening. I think the photos will show better what I'm getting at. The first photo is studs setting in an intake flange and you can see how they do not sit flush due to the washers interference with the weld. I grind that weld bead, using a cut off wheel and stone to give clearance for the fasteners. Hope this explains what I'm saying.
Tom
 

Attachments

silverbear

The Boy Who Never Grew Up
Jul 9, 2009
8,325
670
113
northeastern Minnesota
re: The Basics, Port & Polish and Port Matching

Good one, Tom. That's very clear and makes me wonder why I haven't done that. Not one engine has had enough clearance for washers and it never occurred to me to do something about it besides grumble. When I get an engine out of the box now I'll also get out the Dremel for cleanup work. I don't know what I'd do without that thing. It is so handy for bike work.
SB
 

BarelyAWake

New Member
Jul 21, 2009
7,194
21
0
Maine
re: The Basics, Port & Polish and Port Matching

That's great Tom, defo - it's an awesome tip and this the place for it! That one defo needed some clean up heh

If anyone's got a tip or somethin'helpful about the stuff outlined here - by all means share it! I'm just kinda hackin' away with this when I have the time, bored or even both heh and I'd love learning a bit myself while I'm at it :D


I got lucky with the welds on this un'
 

Attachments

Last edited:

palmclub

New Member
Feb 17, 2010
58
0
0
Los Olivos Ca.
re: The Basics, Port & Polish and Port Matching

barely, your right on portin these moters is a real good idea other wize ,might suck in some slag and score your moter ,,we did that on my kids first moter,, but all this work ,one should also throw good quality crank bearings in also we got some in my sons bike and the old square chinese stock bearings in mine ,a differance of night and day there not cheap but what a quiet ride and did i say smooth
 

Yoshua

New Member
Oct 18, 2009
8
0
0
New Zealand
re: The Basics, Port & Polish and Port Matching

I guess this is the place to post it as you all got ya dremels out. I was thinking of porting and polishing but as i took the in take off i had a look in at the piston and turned over the motor a few times. I was a little surprised to see that at top dead center the piston does not fully clear the intake port! Puttin 2 and 2 together it seems a though you can make your ports as big as you like but if your piston dont fully clear the port then that would be a pretty big bottle-neck. This brings me to my questions.

Can I dremel a little half circle out of my piston to make it fully clear the port?

Will this unbalance the piston?

Does the piston even need to clear the port fully?

what do ya reckon. Yoshi
 

BarelyAWake

New Member
Jul 21, 2009
7,194
21
0
Maine
re: The Basics, Port & Polish and Port Matching

A light bevel can be added to the edge of the piston to help w/flow, you won't unbalance it any more than it's already unbalanced lol, but yea - in an ideal world the piston would clear.

There's many lil steps I didn't get into with this thread as it's just a basic port tut, an introduction to the process - but essentially it's just clean up and not all-out modification. You do need be careful and somewhat conservative when first experimenting with porting & associated mods, oversized porting and piston alteration may have dire consequences - like hanging a ring.

Ifn ya want more extreme stuff, I'd go check out http://motorbicycling.com/f13/40mph-speed-secrets-revealed-11141.html :D
 

snyder561

New Member
Apr 11, 2010
1
0
0
florida
re: The Basics, Port & Polish and Port Matching

I have ta disagree wit' ya thar. When ya do those things (polish, clean up intake and exhaust manifold and match it to the ports you are whats called Match Porting Real porting is a lot more dangerous but it is opening up your ports to allow more flow, change port timing, etc. It is a much more daunting task and dangerous topic for a n00b with a dremel(cuz if you mess up ur engine might blow up as soon as you run it) I am not suggesting people play with there ports but I'm just sayin' that portin' and match portin' is uh different.

Interestin' story #2 according to my now aging father back in the day of husqvarnas ruling the race track(watch any sunday great movie) a fad came out to polish up intake manifolds so that they were mirror shiny and extremely smooth. The funny thing was tho was that once it was that smooth the fuel didn't atomize as well and they found have a rougher intake actually was better.(without casting burs of course, those need to be removed!) This is just a story that was told to me, but I thought it was interestin'.
thats right . you can polish the exhaust ports but do not mirror polish the intake. everrr!! the fuel with not atomize with the air. this will kill all hopes of producing any kind of power. :-||
 

aquarianmonkey

New Member
Sep 27, 2009
29
0
0
sedona Az.
re: The Basics, Port & Polish and Port Matching

BASE GASKETS ? Well my Eng. Blew a Base Gasket after a year of Full Throttle Riding. So It's ready to port LOL. My Question. Are There any Better base Gaskets out there? or is there a good Sealant that I can use Instead?
I Assembled the top end after cleaning the old Gasket and it rotates freely. I plan on doing it over with some Putty on the piston so I can get an idea of the cold clearance.
Anyways any feed back would be good I have a spare Eng. so I'm not walking and have time to put this on the shelf. Thanks
 

BarelyAWake

New Member
Jul 21, 2009
7,194
21
0
Maine
re: The Basics, Port & Polish and Port Matching

Runnin' w/o a base gasket (or usin' goop) will alter the port timing slightly... how much it'll effect your engine's performance I dunno as I've not done it, but I suspect more than you'd be happy with...

If ya want a quality base gasket I'd order a new one and use it as a template to make yer own out of good gasket material (auto supply store). As far as I know everyone sells the same replacement base gasket... but w/o a new one to trace it'd be a pain to make heh
 

CoastalCruiser

New Member
Apr 28, 2010
338
0
0
Spaced Coast
re: The Basics, Port & Polish and Port Matching

Just my .02
Intake ports are best left as a satin finish to promote atomization of the incoming intake charge. They will still flow plenty fast.
Exhaust ports are best left as a mirror polished finish to promote fast flow and reduce the chance of carbon build up.

The above is what I was taught by pros in the know.
I couldn't have said it better!. Just look into the MOPAR hemi head. It's what is known as a turbulent combustion chamber. Turbulence promotes atomization which promotes combustion. I learned this in Auto Machine School.
 

Masterm222

New Member
Feb 14, 2009
132
0
0
Billings, Montana
re: The Basics, Port & Polish and Port Matching

One or two questions about port timing. I know this has been talked about before but I cant seem to find the information I am looking for. I have a spare jug that I want to try some mods on. Isin't it lower the intake and raise the exhaust port? I have already widened them some. Is this right? How much material should I take off? Raise and lower by 1/8"? More? Less? What performance differences can I expect. Guess I want this little china girl to run like my old Kaw. 500 2-stroke triple that I sold because I decided if I kept it I would kill myself on it!