You are using an out of date browser. It may not display this or other websites correctly.
You should upgrade or use an alternative browser.
You should upgrade or use an alternative browser.
Old Guys Simplex moto-peddle bike
- Thread starter indian22
- Start date
silverbear
The Boy Who Never Grew Up
Yes, but for page 28 only. This one is back to normal. Bike is coming right along!
SB
SB
indian22
Well-Known Member
Thanks Paul for the fix & Butch don't blame yourself all's good now even page 28 works, back to sweet and narrow!
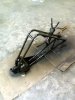
Cleaned the frame and painted satin black. Have some filling in to do with a light skim of body putty but the metal is protected from the condensation that's occurring with our unseasonably warm days and cold nights coupled with high humidity. I'll let the paint cure a coupled of days and reassemble - this time with engine.
I'll size some photos & post this evening. Rick C.
indian22
Well-Known Member
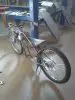
Silver bear it's been almost a year in the making, but the Simplex is finally near the top of my to do list and yes it is progressing at last. It' is a very solid frame; I'm glad to report. It's heavy but with an extremely low center of gravity. The actual ride height of the saddle, loaded is 26". That's 3" lower than the top of the rear tire. I've retained the aggressive fork rake of the stock Simplex & coupled it with the lowered, stretched & taller frame. Looks as if it's in motion while on it's center stand.
There's a lot of traffic through the shop each week and the raw frame has been a magnet for young and old alike. It's their smiles without comment & the 360 degree walk around that let me know for certain they approve the progress to date. I catch myself doing the same thing at odd moments. This build is starting to become a lot of fun! Rick C.
There's a lot of traffic through the shop each week and the raw frame has been a magnet for young and old alike. It's their smiles without comment & the 360 degree walk around that let me know for certain they approve the progress to date. I catch myself doing the same thing at odd moments. This build is starting to become a lot of fun! Rick C.
Attachments
indian22
Well-Known Member
Butch got to your photobucket using s278, but was blocked from entering due to photobuckets "privacy issues" of your personal information. I'm a rube with computers & don't know what that even means. RCstill trying to add image<http://s278photobucket.com/albums/kk106/butch27photos/>
indian22
Well-Known Member
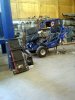
Watching paint dry and swapping in a new Lifan motor for the go cart.
Black frame is really monochromatic; can't wait to see lots of bare metal in contrast to the frame & tank, including the 125 cc 5 speed Honda clone. Once the engine is in place the total perspective will change & lend direction to what's required to successfully complete the little bike. Little details count...the eye wants what it wants! Rick C.
Black frame is really monochromatic; can't wait to see lots of bare metal in contrast to the frame & tank, including the 125 cc 5 speed Honda clone. Once the engine is in place the total perspective will change & lend direction to what's required to successfully complete the little bike. Little details count...the eye wants what it wants! Rick C.
Attachments
indian22
Well-Known Member
Butch the short answer is Picassa. The rest is just my ramblings which might be helpful or not?
I use an Android phone which I understand is Google friendly therefore I use Gmail and Google Chrome...e mail, browser & camera/phone all Google stuff.
I'm not computer smart so I'm not sure any of this is important, but I also had difficulty posting photos to this forum & others. My main problem was in "sizing"
photos that could be posted. I needed a program to "edit" my photos which could involve a lot of variables to improve the quality of my poor camera skills. my main edit goal was and is sizing the photo which allows the pics to post to the forum.
I chose Picassa (another Google program?) to size & improve my photos and installed it on my laptop. I then started my own thread on the forum and experimented with it until I successfully posted pictures. Got some help from others along the way, thanks to all those who were patient with me by the way also.
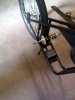
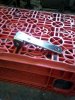
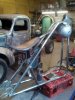
Photo is the bracket I fabricated for the saddle air shock. Paint is officially dry and re-assembly can begin! Rick C.
I use an Android phone which I understand is Google friendly therefore I use Gmail and Google Chrome...e mail, browser & camera/phone all Google stuff.
I'm not computer smart so I'm not sure any of this is important, but I also had difficulty posting photos to this forum & others. My main problem was in "sizing"
photos that could be posted. I needed a program to "edit" my photos which could involve a lot of variables to improve the quality of my poor camera skills. my main edit goal was and is sizing the photo which allows the pics to post to the forum.
I chose Picassa (another Google program?) to size & improve my photos and installed it on my laptop. I then started my own thread on the forum and experimented with it until I successfully posted pictures. Got some help from others along the way, thanks to all those who were patient with me by the way also.
Photo is the bracket I fabricated for the saddle air shock. Paint is officially dry and re-assembly can begin! Rick C.
Attachments
silverbear
The Boy Who Never Grew Up
I also use Picassa. Might seem hard at first, but once you have used it a bit you'll find it is nice software making it easy and quick to re-size and do simple fix its.
So nice to see the bike coming together. I'm having trouble inspiring myself this winter, so am going to make a push to get something minor done in hope that it primes the pump, so to speak. In my winter place, an apartment in town, I have three bikes in the living room with the idea that they are art works in progress... and I do look at them a lot, but don't find myself tinkering. The "kindalikeawhizzer", Indian Hiawatha tri-car and 1934 Elgin "Velocipede" all want attention and deserve to be finished. There's still a long winter ahead, plenty of time to get some things done if I get myself motivated. Seeing your progress and hearing fasteddy getting excited about finishing up his Indian tri-car is starting to light a fire under this old bear. Think I'll do some tinkering on the hybrid trike in the bedroom over the holidays. Thanks for the inspiration, Rick.
SB
indian22
Well-Known Member
You are welcome SB though I'm certain most of those who frequent this forum would agree that it is you who have been and are one of the long time resident inspirations. The three bikes you mentioned are just your latest "works of art" & I along with others are awaiting their completion. No rush or pressure to complete. I'll personally enjoy watching your progression and in turn be inspired to fabricate a bit here and there. I take great pride in the accomplishment of others who create what wasn't. Rick C.
Attachments
indian22
Well-Known Member
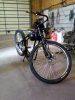
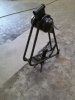
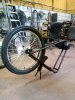
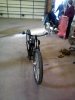
Paints dry & reassembly begins. 27 mm crown race came in (shipped me a 26.5 mm which I didn't notice till splitting it on previous install. Cut excess off the springer tube and and assembled the front end of the bike.
As you can see it's wheels on with bottom bracket co-axle ready to go. Pedal side chain line is good with great tire and frame clearance. Clearance issue I'm worried about is pedal side chain to engine case...it will be very close. As is frame carb placement. Engine height and exhaust to ride side frame tube could also create a problem. I'll know more after I set the motor to frame. I'll let you know later this evening or sometime tomorrow is more likely...especially if I encounter problems. Merry Christmas, Rick C.
As you can see it's wheels on with bottom bracket co-axle ready to go. Pedal side chain line is good with great tire and frame clearance. Clearance issue I'm worried about is pedal side chain to engine case...it will be very close. As is frame carb placement. Engine height and exhaust to ride side frame tube could also create a problem. I'll know more after I set the motor to frame. I'll let you know later this evening or sometime tomorrow is more likely...especially if I encounter problems. Merry Christmas, Rick C.
Attachments
indian22
Well-Known Member
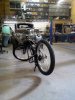
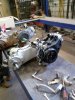
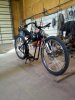
Spent a couple more hours test fitting the engine & good news is it fits, but so very close in every area mentioned in the previous post. The pedal side sprocket & chain misses the engine case by only a quarter inch. Carb misses frame but special angle mount intake manifold will be necessary to fit an air cleaner to the carb assembly. All 5 motor mounts have sufficient clearance as well. Pedals, kick starter and shift lever have a lot of room to function properly and the exhaust will clear the frame with a bit of ingenuity.
Engine drive side of the co-axle line up well, with only a small spacer needed to line up both primary and secondary chains. Primary chain won't end up being more than 6" if even that in length. Top of engine clears the fuel tank panels about a inch.
As to pedal clearance my wide ones are too wide and the narrow one won't clear the starboard side plates, may have to make up a custom set. It appears the port side won't require a "bent" pedal for case clearance.
Really close tolerances but it will all fit in the allocated space.
Few pics but not all sized I'll post more tomorrow with the engine in place & you'll see what I mean about tight. Rick C.