Cafe Creme - my Boardtracker project.

GoldenMotor.com

Beachcomber

Well-Known Member
Nov 3, 2012
302
574
93
80
Redditch [UK] and Reichenau [Saxony ]
Moved on to Hi-Tech now ............. gone from Cardboard Aided Design to Wood Aided Design !!!

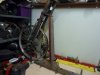
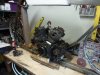
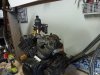
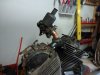
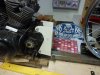
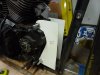
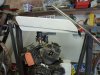
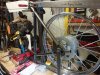
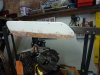
However, while I'm waiting for the headstock and top tube to be tacked, I thought I'd just check my original sums.

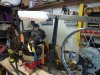
Here's the headstock at 67 degrees, the rake is 3 1/2". It can't be finalised until I get the headstock assembly, but we're in the ballpark. I also need to get the rear engine plate ass'y sorted so I can position the engine - mainly from a cosmetic point. I started out with 5" ground clearance, but that will place the engine too low and look a bit stupid. 7" will still give me plenty of clearance between the carb [ tallest point ] and the underside of the 2" x 2" top box tube. I want to leave enough room behind the engine to mount the cut down 2 gallon vintage petrol can - which will be my fuel cell [ 1 3/4 galls - imperial ].
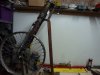
 

Attachments

Beachcomber

Well-Known Member
Nov 3, 2012
302
574
93
80
Redditch [UK] and Reichenau [Saxony ]
Looks wonderful. Always the inevitable waiting for parts or someone to free up time to do something.

Steve.
Thanx for the kind words Steve. Yes - seriously frustrated about having to rely on other peeps !

However - good progress today and I worked out how I'm going to attach the bottom Shock mount.

I even got some more done to my VF400 Street Tracker. The beauty of having several projects on the go is that while I'm waiting for people or parts for one - I can switch to the others !!
 

Beachcomber

Well-Known Member
Nov 3, 2012
302
574
93
80
Redditch [UK] and Reichenau [Saxony ]
My pal who does all the tacking of parts has been very ill, but now back to rude health and called me this morning to say he has tacked the headstock in place into the 2" x 2" box section.

It's a 2 handed job [ at least ] to get the top yoke into the headstock so we can finalise the headstock angle.

Once we're happy with that we can attach the jig fixtures to hold everything in place so we can use the laser gizzmos to align everything before it's tacked up.

I also made a cardboard template for the rear engine plates, they'll be transferred onto ply so that the pattern can be finalised.
 

Beachcomber

Well-Known Member
Nov 3, 2012
302
574
93
80
Redditch [UK] and Reichenau [Saxony ]
Some progress !

I managed to get the top tube / headstock onto the fork yokes on my own - not sure why there wasn't a big disaster, but all OK. Again, this is POC stage and I'm doing this to check out what was in my head - is in reality !

Chuffed - trail and headstock angle as I planned. Scope for adjustment when we have a proper check when my pal brings his laser gizzmos round. I also have scope to alter the wheelbase from 55" - 60" [ if required ] without changing the jig.

Couldn't resist cutting and fitting the tank and dropping in place as a "whatif"...... happy with it, but when the engine is in it's final position [ maybe 5" higher than the attached pix ] the tank might not be cosmetically deep enough. Mainly because I want to hide all the modern squitter under there - coils, ECU, fuel pump, etc.

I also made the final [ CAD ] rear engine plate patterns .............. just before the engine decided to leap off the bench and crash nearly 3 feet to the concrete floor. I feared the worst, but damage was confined to one top fin, which I was able to Araldite back .... good as new. While I had the Araldite out I decided to attache the SU flange [ alloy ] to the copper bend [ house plumbing ! ] ready for it to be silver soldered. Success - all fitted in the correct orientation with the float bowl level and the carb vertical ............ until you go round corners of course !

My pal is coming round to give me a hand to raise the engine into it's postion - he's bringing my scissors engine jack which is currently under the KZ750 Caff Racer [ yes, that's still going ].

Once that's at the correct ride height [ aiming for 7" ground clearance ] we can check out the position for the front downtube and the rear diamond.
 

Attachments

Beachcomber

Well-Known Member
Nov 3, 2012
302
574
93
80
Redditch [UK] and Reichenau [Saxony ]
More CAD today - sorted out the support mount for the SU carb, hoping to make that out of brass - if it's not ridiculously expensive [ in my world ]. I also decided that the proportions of the "tank" [ cover ] weren't right - so more CAD to lower the sides to see "whatif" ..........works for me.

Bear in mind that the engine will be raised about 3" - 4" from that in the pix.

Rear engine plate pattern finalised. I have a cunning plan for the front and rear downtubes ......... wait and see.

The headstock is now located by 25mm x 25mm x 3mm angle .... going nowhere. I'm using some more 2" x 2" box [ as per the top tube ] to locate the top tube relative to the base jig [ also 2" x 2" ] so that everything is locked into position prior to tacking.

Unfortunately the cut down Shell Mex vintage petrol can can't be used - it's far too big enough .... going to look silly. So it's a 1.2 gall [ imperial ] fuel cell under the top tube and hidden by the "tank". I know a bloke that's **** hot with fuel cells !

That's a bummer as I wanted to hide all the modern squitter under there - ECU, coils, Regulator, fuel pump etc., etc. Not many little nooks and crannies on a Boardtracker.

And the bonus .................... it's been pissing down today - but my garage is bone dry for the first time in 15 years !!!!
 

Attachments

Beachcomber

Well-Known Member
Nov 3, 2012
302
574
93
80
Redditch [UK] and Reichenau [Saxony ]
Even more progress !

I had the 2 x 2" box section supports pre-mitred by the suppliers [ 9 degrees ] which puts the headsock / top tube in the right orientation.

Getting closer to being ready for tacking up.

And the cunning plan for the front and rear downtubes ??? I was quoted £95 for a split downtube with weld bungs and clevises ....................................... £10 for a hevy duty BMX fork !!!!! AND it's spot on dimensionally. the one in the pix is for the rear. The front one should be here at the weekend.

The guy that made the under frame fuel cell for my KZ750 Sixties Cafe Racer is going to make the fuel cell to go under the "tank", it's just over an imperial gallon.
 

Attachments

Beachcomber

Well-Known Member
Nov 3, 2012
302
574
93
80
Redditch [UK] and Reichenau [Saxony ]
The POC mockup is getting ever closer.

We got my scissor engine stand under the engine and it's now at 5" ground clearance, which looks about right proportionally.

A soon as I get the engine strapped securely [ !! ] to the stand I can move it back and forth to get it in the correct position.

Couldn't resist dropping the rear diamond into place to get some idea if it's all going to work. Again -looks OK.

I've now obtained a smaller vintage 1 gallon ex paraffin can / pourer [ Valor ] which my well work behind the engine as my fuel cell. This was my preferred idea [ 2 gall. vintage can ] but the 2 gall was way too big enough. Hope so, as then I can go back to my original plans to lose all the modern electrical squitter under the "tank".
 

Attachments

Beachcomber

Well-Known Member
Nov 3, 2012
302
574
93
80
Redditch [UK] and Reichenau [Saxony ]
Starting to resemble a bike now ! Rear diamond mocked up to check lower chain run clears etc. and also finalise the rear wheel spacers.

I'm happy with the proportions now, the only point to finalise is the wheelbase, which I can easily alter without changing the jig. That will depend on how much room I need for the Valor paraffin can which will be my fuel cell.
 

Attachments

Beachcomber

Well-Known Member
Nov 3, 2012
302
574
93
80
Redditch [UK] and Reichenau [Saxony ]
Now you see it, now you don't !! How to disguise a 1950's Valor paraffin can as my new fuel cell.

The metal plaque will be trimmed so it fits in the radius at the top ........ the bottom won't be seen, but the can will be painted same coulour as the "tank". The plaques [ one each side ] will face outwards just behind the engine. The spout will become a breather exiting to one of my 1900's brass accessories.

I found matching headstock badges, so once I have removed any referrence to Yamaha on the engine ........ it's an Edoardo Bianchi bike !!!!! The Blue one will go on the Bantam headstock ............... the other one - not sure yet.
 

Attachments

Beachcomber

Well-Known Member
Nov 3, 2012
302
574
93
80
Redditch [UK] and Reichenau [Saxony ]
Watching this come together. Edoardo will be proud to have his name on it.

Steve.
Why thank you kindly Steve, I'd like to think that any of the Old Timers of the day would approve.

Oh ....... this just arrived this afternoon - repro Burman hand change for early 1900's BSA. I'm planning on hooking up the foot change to it as well. Pulling off might be a bit of a challenge with hand clutch as well !! Have plans for a "real" wood handle / knob.
 

Attachments

Beachcomber

Well-Known Member
Nov 3, 2012
302
574
93
80
Redditch [UK] and Reichenau [Saxony ]
Today we got the rear wheel perfectly aligned using my pal's laser equipment and that allowed us to check the engine and chain lines for centre. All good.

Made a novice error and didn't check the TS125 rear sprocket [ .428 pitch ] ....... the Virago gearbox sprocket and my new chain .520 pitch !!! Oooops.

Painless way out, the TS125 gearbox sprocket is a direct replacement for the Virago and a new .428 chain and we're all back to square one.

Next stage is to tack the jig spacers in place to the new alignment, then we can continue to aligning the front end.

My new tank top decal arrived - from Australia !!! Well pleased and only £4 delivered.

I've also located some Edoardo Bianchi rubber block pedals [ early 1900's bicycle ] and although a bit extravagant at £35, will be absolutely ideal for my footpegs.

Slow but sure .....................
 

Attachments

  • Like
Reactions: indian22

Beachcomber

Well-Known Member
Nov 3, 2012
302
574
93
80
Redditch [UK] and Reichenau [Saxony ]
Intake manifold completed. Spot on - carb positioned exactly where I want it.

Also completed the pattern for the car support, my pal is going to make the finished item from Brass with a Copper overlay.

Engine mount patterns also completed and trialed .... ready for laser cutting.

The tank bottom extensions have been made and fitted, just waiting to be filled and surfaced ready for primer.
 

Attachments