
You are using an out of date browser. It may not display this or other websites correctly.
You should upgrade or use an alternative browser.
You should upgrade or use an alternative browser.
Bike builders that have machine tools/shops
- Thread starter Tom from Rubicon
- Start date
Spigot fer? Fer mounting holes perp to block I got one of these.
https://www.kalamazooind.com/products/5c-collet-fixtures/a1-5c-collet-indexing-fixture/
Tom
Yeah man! That's a cool tool. It ain't the easiest but I've got an electronic protractor that'll get me the 20 while clamped in the mill vise. It's sensitive to .05 degrees, which means you can't ever hit the number exactly! But it'll be close enough.
Tom from Rubicon
Well-Known Member
I have been wondering about the hex holes. Are they needed or are they just fancy
Tom
I have been wondering about the hex holes. Are they needed or are they just a fancy way of coring to reduce molded material?I got more pitchers!
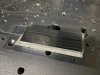
This is the stock plastic manifold cut down for an insulator.
View attachment 105139
There's an intake manifold lurking in that piece of aluminum it's sittin' on. I just gotta find it ...
Tom
I have been wondering about the hex holes. Are they needed or are they just a fancy way of coring to reduce molded material?
Tom
The hex holes used to have two trapped nuts to mount the original flange mount carb. I won't need them so I knocked 'em out.
Bad news on my intake. I scrapped it!  It ain't like this is the 1st time that's happened ...
I tried using a transfer punch to locate the mounting holes and balled it up. It won't screw on to the back of the motor.
Gonna do a full layout drawing and use the tables on the mill next time. Learning the hard way is what I do best.")
It ain't like this is the 1st time that's happened ...I tried using a transfer punch to locate the mounting holes and balled it up. It won't screw on to the back of the motor.
Gonna do a full layout drawing and use the tables on the mill next time. Learning the hard way is what I do best.
Tony01
Well-Known Member
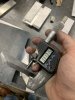
Getting so frustrated. Have to hold .0005” thickness on some little aluminum parts about 4” long. we had these go out to lapping but they don’t want to do it anymore as the tolerance is so tight (.3135/.3130). I machined a little .002”dp pocket on the surface plate, I’m sticking them down with double sided tape and cutting them down just a couple thousandths per side, jogging by hand with a 1/4 2F end mill and doing only about a .120” stepover. The other day when the machine was warmed up my good part streak was 10, right now I’m struggling to make a single good part. The machine can’t even hold .0007” over three minutes. And we needed this yesterday. Gonna come in early tomorrow and see if the day shift guys use the machine, hopefully I can catch it on the tail end when it is all warmed up and holding .0002” like it did that one day.
Been at this job two months and they just made me the swing shift supervisor. Running back and forth. No time for bike stuff..
edit... f’in finally...
Been at this job two months and they just made me the swing shift supervisor. Running back and forth. No time for bike stuff..
edit... f’in finally...
Attachments
Last edited:
Tom from Rubicon
Well-Known Member
Aluminum machining to tight tolerances is challenging. Just holding it grows a couple tenths. The double sticky could vary in thickness. You ever use one of these Tony? https://www.vortec.com/cold-air-guns
Tom
Tom
Last edited:
Tony01
Well-Known Member
FOG I think that may be per inch of thickness. I put one part in the fridge and the mic in a room with AC. I saw maybe 50 millionths difference on this approx 1/3” part.
Tom this place is way too cheap for a setup like that. Know what is though, I’ve used a kool mist in the past; great setup. I would have used air blast but the compressors suck and I can’t have the production job machines stopping cause of low air (tool changes).
well I came in this afternoon and the machine was in the same shape as I left it, turned off with the table centered under the spindle. I topped off the waylube reservoirs, wrote a little warmup program and let it run in circles for about 3 hours. Set my zero, cut a setup part which came out super flat and parallel and about .0005” over. . Made an adjustment and proceeded to hold the next 15 parts within .0002”. Prep is key...
I almost got an intake! But not yet ...
It's that angle that's messin' me up. When you rotate a surface to an angle the dimensions change. I need to figure out how to deal with that.
What got me on Round 2 was the spigot's too low and now the carb's hitting the frame where it used to clear. It angled down on me.

Using the X-Y tables on my little mill nailed the bolt pattern tho. M5 screws are .190 and all 4 slipped thru .193 holes. That's progress.
So, Round 3 comin' up and I'm gonna further compound my angular issues by going with a 30 degree cut instead of 20. That'll angle the carb up 10 degrees, which won't hurt a thing, and gain me some more air cleaner clearance.
Back to the drawing board ....
It's that angle that's messin' me up. When you rotate a surface to an angle the dimensions change. I need to figure out how to deal with that.
What got me on Round 2 was the spigot's too low and now the carb's hitting the frame where it used to clear. It angled down on me.
Using the X-Y tables on my little mill nailed the bolt pattern tho. M5 screws are .190 and all 4 slipped thru .193 holes. That's progress.
So, Round 3 comin' up and I'm gonna further compound my angular issues by going with a 30 degree cut instead of 20. That'll angle the carb up 10 degrees, which won't hurt a thing, and gain me some more air cleaner clearance.
Back to the drawing board ....
I got too messin' with my Round 2 effort on loose screws to see what 10 degrees might look like and realized, " we don't need no stinkin" 10 degrees"! More like 2 or 3.
So I did some skim cuts at ever increasing slight increments and scored! The top portion got a little thinner but that's fine and the carb and cleaner clear too.

Time to move on ...
So I did some skim cuts at ever increasing slight increments and scored! The top portion got a little thinner but that's fine and the carb and cleaner clear too.
Time to move on ...
Tom from Rubicon
Well-Known Member
Patience pays on an already thin part taking into account clamping pressure of the mill vice will generate some distortion.
Primo!
Tom
Primo!
Tom
I always like to pressure test my 2 stroke motors. When properly sealed they should hold 5-10 lbs for a few minutes. But my little pocket bike motor don't want any part of that! Uh-uh. Total fail!
It's leaking all around that piece of plastic I cut down for an insulator. It's only .200 thick now and I dunno what's goin' with it, but I can't get it to hold air at all. I even went from a gasket sandwich to straight Yamabond and it's still bubbling soapy water from both sides.
All I have on hand is a piece of Delrin that might work. Emphasis on the "might". Heat absorption isn't what Delrin is designed for. Nawh. I'm thinkin' no.
So I beamed up a 5mm thick piece of red bakelite on E-Bay. I've never machined a phenolic before but I'm not expecting any difficulty. Those could be famous last words .....
This is a good example of why a 2 stroke should be pressure tested tho. Visually it looks fine. You'd think it was sealed by looking at it. But it's not. What it is is an intake leak.
Here's what the test set up looks like.
![DSCF1007[1].JPG](https://motorbicycling.com/attachments/dscf1007-1-jpg.105294/ "DSCF1007[1].JPG")
It's leaking all around that piece of plastic I cut down for an insulator. It's only .200 thick now and I dunno what's goin' with it, but I can't get it to hold air at all. I even went from a gasket sandwich to straight Yamabond and it's still bubbling soapy water from both sides.
All I have on hand is a piece of Delrin that might work. Emphasis on the "might". Heat absorption isn't what Delrin is designed for. Nawh. I'm thinkin' no.
So I beamed up a 5mm thick piece of red bakelite on E-Bay. I've never machined a phenolic before but I'm not expecting any difficulty. Those could be famous last words .....
This is a good example of why a 2 stroke should be pressure tested tho. Visually it looks fine. You'd think it was sealed by looking at it. But it's not. What it is is an intake leak.
Here's what the test set up looks like.
Tom from Rubicon
Well-Known Member
Machining bakelite even with HS is not bad but it does stink.
Tom
Tom
Tom from Rubicon
Well-Known Member
From email,
BW Montauk 17' 1987 / Seat Bracket for Forward Pedestal
Hello Tom,
MY name is Eric,
know your post was from back in 2010 but was wondering if you still are able to make or tell me who I might contact to get one of these?
(This one came out of the blue)
To which I replied.
Hi Eric,
Hear is the story, Twenty years ago I wanted a pedestal seat mount for the anchor locker bulkhead originally made of cast aluminum by Fisher-Pierce. When I first searched the internet in 2002, Ebay included, nothing. I assume you have looked too.
Continuous Wave has a great library of Fisher-Pierce blue prints which I am sure you have reviewed.
So back in the day, I created an AutoCad design file. Ordered a 6061-t6 billet from which I machined two copies of Whalers seat mounts to the original design.
The one I sold in 2010? I lost money on because I supplied every thing including the tapered wood plate to level the tapered bulkhead. The one on my 1973 Cohasett II functions correctly.
Back in the day, I asked Sue Lodel if my asking price was in line with the original? Her reply via her husband foundry man from Two Rivers,WI could be produced at ½ my cost. The difference is replicating the original casting v/s machined barstock.
Sue’s husband thought back in 2002 a cast seat could be produced.
The problem Eric, is original examples that could be used to make a casting pattern mostly don’t exist.
How bad do you want one? The problem is old Whalers either have one or don’t Salt ate them.
I would love to use up the 6061T6 billet I have in house. What is your budget?
And you have not spect’d the hull.
There many ways to skin a cat as my Socials Study teacher George Echols used to say.
Warm Regards,
Tom