
You are using an out of date browser. It may not display this or other websites correctly.
You should upgrade or use an alternative browser.
You should upgrade or use an alternative browser.
Bike builders that have machine tools/shops
- Thread starter Tom from Rubicon
- Start date
Tom from Rubicon
Well-Known Member
Poor engineering on my part Rick,
Side by side 6-32's would have left some meat in the cross sections, and adequate clamping force
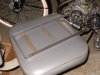
This tool box was going nowhere.
Dan's tool box per my numbers, left a 1/16" gap between tool box and Flyer gas tank. That I took up by cutting a section of bicycle inner tube into halves to dynamically tension and balance the side to side spacing.
My ride today, I never once looked at the hose clamps.
On starting the Sportsman Flyer, the tool box with closure on the right hand side made for quick stowage of the pull start rope.
Side by side 6-32's would have left some meat in the cross sections, and adequate clamping force
This tool box was going nowhere.
Dan's tool box per my numbers, left a 1/16" gap between tool box and Flyer gas tank. That I took up by cutting a section of bicycle inner tube into halves to dynamically tension and balance the side to side spacing.
My ride today, I never once looked at the hose clamps.
On starting the Sportsman Flyer, the tool box with closure on the right hand side made for quick stowage of the pull start rope.
Attachments
Lathe work's all done. Time for the mill ...

The problem with this is a square mill vise doesn't work with round parts. Need a quick fixture and I like MDF for stuff like this. It cuts so easy even a crude fly cutter like this one works fine.

After a split and with some support from below it's ready.

The problem with this is a square mill vise doesn't work with round parts. Need a quick fixture and I like MDF for stuff like this. It cuts so easy even a crude fly cutter like this one works fine.
After a split and with some support from below it's ready.
Tom from Rubicon
Well-Known Member
Bill, I take it you don't have a rotary table? I got one years ago for a project requiring large radiused profiles. Only a 12" but that is about all I can pick up these days.
Tom.
Tom.
Tom from Rubicon
Well-Known Member
Got to start cutting parts for Indian style back rack. Main platform frame was formed up couple weeks ago and then I got distracted. But first I have to set trap for a raccoon that tore the bird feeder apart last night. Living near a creek it is a annual event.
Tom
Tom
Bill, I take it you don't have a rotary table?.
I have a shop buddy I borrow a 12" table from on occasion and you're right about lifting it! It's best to plan ahead and know where you're gonna put it back down.
Tom from Rubicon
Well-Known Member
Bill 3.0
Back many years ago, I was between real positions. I took a temp. at Autometer Sycamore, Illinois.
https://www.autometer.com/about/our-history
As it always goes, guy who started it cashed out.
New owners wanted all fab work off shored but assembled in the Good Old USA. I was there during the transition. A lot of draw dies to maintain and a few new ones to be made. I was in the right spot at the right time when the liquidated the toolroom. Logan. Bridgeport, the list goes on. But one thing was this hand made 2x2x 3 ft high cart, and that is where my turn table resides. Slide on slide off. Otherwise engine hoist.
Tom
Tom from Rubicon
Well-Known Member
Bill 3.0,
Envelope came today, a little worse for wear but USPS taped it up and it came intact. Once I got my reading glasses on the mystery is fading. You only mentioned the Ford etching but neglected to mention the other two etchings. On the obverse side was etched 60 degrees, and on the Ford side below the Ford script was etched.
C. E. Johansson. it's a gage block accessory.
https://en.wikipedia.org/wiki/Carl_Edvard_Johansson
Thank-you so much Bill3.0, this is a artifact of a earlier time before CMM's.
Tom
Tom from Rubicon
Well-Known Member
Shortly after the thrill from Bill. Brewskis in hand. I trundled out to the shop to make some progress on the rear rack.
Main frame set with a 6.25 inside, cut three inside platform slats. All this steel is hot roll with a slag surface that will have to be removed to get good welds. Stays and mounts next.
Tom
Main frame set with a 6.25 inside, cut three inside platform slats. All this steel is hot roll with a slag surface that will have to be removed to get good welds. Stays and mounts next.
Tom
Attachments

Greg58
Well-Known Member
Its been over five years since I left my job with the machine shop equipment, it takes some time to adjust to not being able to make what I need for a project at home while at work. Now I have to try to find a pre made piece or adapt something. I have a much better job situation now but miss the tools. I've never told this on the forum but I worked as a A-level technician for Sears Holdings for 34 years at the local distribution center here, at the high point of the company we had over 1000 people working there. We made, repaired and installed parts and pieces on 2 -1/2 miles of conveyor with over 900 motors. Sorry this is not about machine tools but I just had to vent a little.
Tom from Rubicon
Well-Known Member
Your experience counts Greg, like fasteddy, Indian22, Pete McP, and others. If it is personal it's good.
This is in the Tavern after all.
Tom
This is in the Tavern after all.
Tom
Tom from Rubicon
Well-Known Member
Meant to tack weld a bit today on the parts photo'd, but still trying to firm up all the parts it will take. I did cut two straps for the seat stay attachment points with metal to spare in case my" Rack of Eye" fails. In the end it is a numbers game. The Pre 1920 Indians also used arched straps to make their rear rack more rigid.
Clear as mud, tomorrow is another day.
Tom
Clear as mud, tomorrow is another day.
Tom
MEASURE TWICE
Well-Known Member
I was looking to make a carrier for my bike. Problem is as a trail bike and using banana seat, there is no where. Maybe a little space but not much infront on frame behind fork. Anything over the small gas tank would obscure access to the tank. Maybe a hinge that latches and unlatches?
If procrastination was an Olympic sport I'd be a serious contender for gold. ") But I was feelin' fussy yesterday so I got right to work in my cylinder head. Four mounting holes 1st.
But I was feelin' fussy yesterday so I got right to work in my cylinder head. Four mounting holes 1st.

Without removing it from the vise I was able to check myself by dropping a standard head on ... and doesn't that look a little small!

To do the slots necessary to create fins I need to use a long and very slender endmill. It's only .155 in dia and I gotta reach in there a half inch deep. Tom can probably guess what happened next. I snapped that puppy right off on the 1st cut! It barely went a little sideways and tink ... it was gone.
Thankfully it was double ended so I have one more opportunity to fail.
One problem was I forgot to crank the spindle speed up. Little mills need high rpm. The other is the .025 cut I thought would be fine in aluminum might've been too much. With only one end of the end mill left I've been pussyfootin' my way thru with 10 thou cuts and making progress now.

At 10 thou a cut it takes 50 cuts to cut a half inch deep! Another fine mess I got myself into,, but I'll get it done. Now I know why they cast these things ....
But I was feelin' fussy yesterday so I got right to work in my cylinder head. Four mounting holes 1st.Without removing it from the vise I was able to check myself by dropping a standard head on ... and doesn't that look a little small!
To do the slots necessary to create fins I need to use a long and very slender endmill. It's only .155 in dia and I gotta reach in there a half inch deep. Tom can probably guess what happened next. I snapped that puppy right off on the 1st cut! It barely went a little sideways and tink ... it was gone.
Thankfully it was double ended so I have one more opportunity to fail.
One problem was I forgot to crank the spindle speed up. Little mills need high rpm. The other is the .025 cut I thought would be fine in aluminum might've been too much. With only one end of the end mill left I've been pussyfootin' my way thru with 10 thou cuts and making progress now.
At 10 thou a cut it takes 50 cuts to cut a half inch deep! Another fine mess I got myself into,
, but I'll get it done. Now I know why they cast these things ....Tony01
Well-Known Member
Take a picture of your machine and the setup? Should be able to go .030 at least. What do you have for cooling? Might be worth investing in a kool-mist or making your own to help blow those chips out. If not you could rough it with a saw.If procrastination was an Olympic sport I'd be a serious contender for gold.
View attachment 104683
Without removing it from the vise I was able to check myself by dropping a standard head on ... and doesn't that look a little small!
View attachment 104684
To do the slots necessary to create fins I need to use a long and very slender endmill. It's only .155 in dia and I gotta reach in there a half inch deep. Tom can probably guess what happened next. I snapped that puppy right off on the 1st cut! It barely went a little sideways and tink ... it was gone.
Thankfully it was double ended so I have one more opportunity to fail.
One problem was I forgot to crank the spindle speed up. Little mills need high rpm. The other is the .025 cut I thought would be fine in aluminum might've been too much. With only one end of the end mill left I've been pussyfootin' my way thru with 10 thou cuts and making progress now.
View attachment 104685
At 10 thou a cut it takes 50 cuts to cut a half inch deep! Another fine mess I got myself into,
My normal limiting factor is the mill itself. We ain't talking Bridgeport ... It's a Seig X3 from Harbor Freight.

But in this case it's that skinny little endmill. I do have the spindle speed up where it's supposed to be now. It might cut bigger. But ya don't know until it snaps off ...
But in this case it's that skinny little endmill. I do have the spindle speed up where it's supposed to be now. It might cut bigger. But ya don't know until it snaps off ...
Tom from Rubicon
Well-Known Member
Bill 3.0, using a ball end or flat bottom two flute @ 3000RPM with strong air / mist would be nice. But your table top mill.
https://www.harborfreight.com/vertical-milling-machine-40939.html
lacks a controllable power feed in Y which provides more consistent chip load. Manual is going to keep you out of trouble for a good long while. Hope your wrists aren't shot like mine. Tony must have had a bad experience with
https://en.wikipedia.org/wiki/Medium-density_fibreboard
But clamping directing directly to the mill table, is as good as it gets stability wise. Being able to use the T-slots of the mill table is the make or break. It will be interesting to see if Bill's application serves him. I am rooting for you.
Tom