"kindalikeawhizzer"

GoldenMotor.com

silverbear

The Boy Who Never Grew Up
Jul 9, 2009
8,325
670
113
northeastern Minnesota
Ah, that will do it! First I'm going to give a look on the internet to see if I can order them. If no luck that way then I'll try lawn mower shops. I did remember you had an alternate method, just couldn't remember what it was and did not know if it would work in my case anyway. I can see that this will work. How do you spell "relief"? msrfan is how I spell it. Ha!
SB
 

msrfan

Well-Known Member
Sep 17, 2010
1,808
120
63
Southern California
This photo shows a couple different types of cable clamps and a conduit clamp. I bought a box of the conduit clamps only to find they are too light weight to hold the spokes. Hope this info helps.


silverbear

The Boy Who Never Grew Up
Jul 9, 2009
8,325
670
113
northeastern Minnesota
While looking for zip ties so that I can hang the engine I ran across a center stand I forgot that I had. It is too short by a couple of inches so I am to going to modify the legs.

The red bike is my 1934 Indian Hiawatha, posted to show how I modified this stand ( same kind )to make the legs longer. Actually this one was salvaged from a truck fire where the stand had been on a 1939 Elgin which was wrecked. Most of one leg on the stand was melted away, so I made a kind of peg leg for it out of copper so that I could use it temporarily on the Hiawatha. I liked the copper leg since the bike already has a copper gas tank so decided to go all the way and amputate the other leg to give it a matching copper one.

(By the way, that's Fasteddy working on the tri-car assembly.)

So, I have now cut two copper "legs" to the length I want and have a couple of elbows to give it "feet". Next time I'm in town I'll pick up end caps to solder on to the feet. Then I'll cut off the lower portion of the stock legs so that what remains are straight sections. These fit inside the copper extensions and will get drilled for small brass bolts to hold them in place.

This beats buying new and I've grown fond of the copper legged stands as they have a kind of old time look to them. Besides, I'm a fool for copper.and the "kindalikeawhzzzer" has a copper gas tank to go with. Some time down the line I intend to make a copper chain guard/ belt guard to carry the copper theme a little further yet.

Pretty soon I can remove the rear drop stand which was just temporary anyway.
SB
 

Attachments

Last edited:

silverbear

The Boy Who Never Grew Up
Jul 9, 2009
8,325
670
113
northeastern Minnesota
Intrepid,
Thank you, I like them, too. I got the stock legs cut off and soldered up the copper peg leg fittings, drilled a wee bolt hole in each one to affix them to the stubs, gave the upper part of the stand a coat of the brown paint I intend to use on the bike frame, bolted it onto the bike and here 'tis.

The height is good and I am thinking I may leave the rear drop stand. It helps to give the bike good stability and one can always use a bit more copper, you know. On softer ground having both might be good insurance. Pictures show the stands in different configurations, extended, tucked up and away. Rear rack legs are bolted down and I like it... doesn't interfere with raising up the drop stand.
SB
 

Attachments

silverbear

The Boy Who Never Grew Up
Jul 9, 2009
8,325
670
113
northeastern Minnesota
Ray,
I wanted to thank you again for the feather chain guard and also wanted you to know that I am kind of paying it forward as the saying goes. The tin gas tank in the photo below I have sent to Curtis Fox for his Schwinn/Briggs build. He's a happy camper! Giving things to others on the forum is a great way to feel like you're rich even when you ain't. Way back when I made that gas tank in the photo it was through the kindness of Tinsmith who showed me how and for the most part made the copper version I'm using for this project. I don't need the tin one and when I saw what Curt was up to I thought, "Aha"! and asked if he wanted it. He did. Curtis is nearing completion on a leaf spring fork he is making for my going-on-forever Indian Hiawatha build, so it goes back and forth with no money exchanged. I upholstered a vintage seat for him a couple of years ago, earlier this year he sent me a differential axle I can use for a trike. What a great forum and what a good way to deal with each other. The best thing about it is the friendships which come.

I know you were on the lookout for a genuine whizzer center stand for me and I appreciate your consideration and your efforts to find one. This being just "kindalikeawhizzer" my copper stands are good enough. If there is something I can do for you or a part I have that you can use, please don't hesitate. When you need to have a seat redone and it doesn't have to be perfect ( I don't do perfect anything), keep me in mind.
SB
 
Last edited:

curtisfox

Well-Known Member
Dec 29, 2008
6,048
3,960
113
minesota
Awesome thank for the tank love it. I may just clear coat it and leve it like it is.
Love your center stand polish the copper will look awesome.............Curt
 

silverbear

The Boy Who Never Grew Up
Jul 9, 2009
8,325
670
113
northeastern Minnesota
Curt, I'm glad the tank will fit your frame and look forward to following along on your build. If you need help with posting photos let me know. Someday we'll get together for a ride, maybe down the road from here through the forest to Bearhead State Park. Vintage Schwinns with twin gas tanks putt putting along with two smiling old farts on board... woohoo!
SB
 

curtisfox

Well-Known Member
Dec 29, 2008
6,048
3,960
113
minesota
Ah yes sure will be fun. My son is helping me with the photos and then will be putting my buid on here, after the snow flies then into the garage...............Curt
 

silverbear

The Boy Who Never Grew Up
Jul 9, 2009
8,325
670
113
northeastern Minnesota
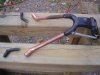
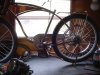
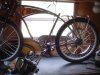
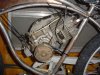
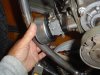
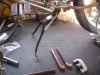
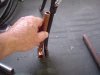
Zip ties arrived today so I have started the engine mock-up. From the tip of the spark plug to the carburetor located at the bottom of the engine there is a pretty good reach from end to end, leaving few options for engine placement. Here's the first of what I see as possibly two. The other I'll try tomorrow with the spark plug facing the front of the gas tank and front tube of the frame. The second option looks more cramped yet, but the measurement says it is the same distance. I can buy a bit of space with a shorter spark plug which I have, but is not in the engine. The other end with the carburetor, which by the way is a Walbro reed valve and can be in any position in order to run OK... has a bit of wiggle room. In one picture I am holding a tuna fish can against the carb as that looks like my best option, to make a "leaping Tuna" air filter. More on that later, but it is an air filter I have made before and works fine.

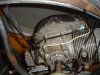
I think the engine might look better facing the other way, but will know better when I mock it up that way and then do some staring at it. One way or the other may end up being dictated by the jack shaft assembly which I envision being attached to the seat post.

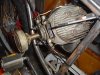
The engine shaft sticks out a good ways so the overall engine width will be fairly big, a far cry from the Whizzer engine designed for a bicycle frame. Obviously this engine is not. In that way it presents some of the same problems as the Predator and Greyhound motors. Wide. The key way on the engine shaft is close to the end of the shaft so I am figuring on reversing the centrifugal clutch so that the chain sprocket is inboard. I don't see why that won't work OK. The plan then is for the drive chain to come off of the clutch and go to the jack shaft sprocket. Next to the sprocket on the inboard side will be a pulley aligned with the sheave. I could be wrong, but the initial impression I have is that I will not have to alter the frame for belt clearance. I hope that proves to be true.

I can see that I will need to have a wide pedal crank assembly in order to clear the engine... not so much for pedals running into the engine since it is fairly high up in the frame, but for leg and foot comfort in reaching the pedals which need to be outboard of the engine. On my American fFlyer build I have an extra wide one piece crank and will have to see if that will work. Pedal extensions will also buy a little room and if need be I can cold bend the pedal arms. Last choice due to expense would be to buy a three piece pedal crank in their widest configuration from sick bike parts. That would also necessitate buying a bottom bracket adapter. Every purchase adds up.

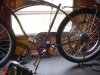
The Briggs conduit clips arrived today so over the next couple of days I'll grind down the little leg on each one to make it work for affixing the sheave to the wheel. I had originally intended to use a 20" bicycle rim as a poor man's sheave, but I can see that the Whizzer sheave is the real deal. Spend the money where it counts. Thanks again to Chainmaker for that sheave! I'll take a close up photo soon so that you can see how they have made a groove specifically for the V belt so it has no chance of wandering about. Alignment will be precise.

That's it for now.
SB
 

Attachments

Intrepid Wheelwoman

New Member
Oct 29, 2011
2,830
62
0
Hauraki District, New Zealand
Mounting the clutch like that should be fine SB. The centrifugal clutch originally fitted to some Villiers engines mounts in exactly the same way which puts the pull of the chain drive close to the crankshaft main bearings which must be a good thing from an engineering point of view.
I must try out that method of using zip ties to test mount an engine. I tend to prop engines with pieces of wood which isn't always the best way when it comes to odd shaped engines.