
You are using an out of date browser. It may not display this or other websites correctly.
You should upgrade or use an alternative browser.
You should upgrade or use an alternative browser.
The Rustoration Build Off
- Thread starter BarelyAWake
- Start date
silverbear
The Boy Who Never Grew Up
Fasteddy,
Pretty cool about the chrome work being done this month and the frame will be stripped very soon. Will you paint it yourself? I'm guessing it will be the original color and paint scheme. We'll all be riding this spring and I for one can hardly wait.
One week in California won't work for me since the only way I could afford to get there is on my bike. About six weeks riding to get there, a week napping upon arrival... a week of motorbicycle bootcamp with Bairdco and a six week ride back home. I'll have to take the correspondence version of the course. I'm sure there'll be another winter bike project and I hope another rustoration buildoff. This has been a whole lot of fun and I've learned a lot from you guys. I'm looking forward to seeing that sidecar mounted to your bike. I can see the top of my bike trailer poking out of the snow pack, and in another week want to take the fabric off to expose the frame better. It's gonna be my wonder dog side car for Aaniimoosh, I hope. I think she may need a pair of those Snoopy aviator goggles.
SB
silverbear
The Boy Who Never Grew Up
REAR DROP STAND
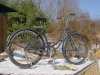
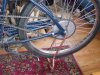
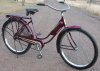
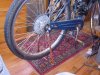
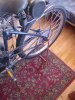
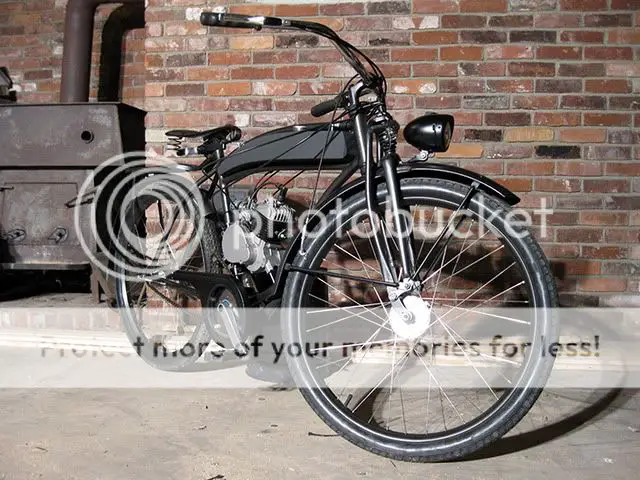
Yesterday I picked up 10' of 1/2" heavy wall copper water pipe, 2 ninety degree elbows and 4 forty five degree elbows. I already have a cipper pipe cut off tool which was what I used to cut the pieces to length. All I have on hand is silver solder so that is what I used, but I would think lead/tin solder would work fine for this. I don't know if there's a difference in strength, but it seems to me that the lead/tin solder flows better for smooth, nice looking joints. The first photo shows my 38 Elgin I picked up this winter off of ebay, in part because of the rear drop stand. I used it as the rough model for dimensions in my first attempt in aluminum channel a few posts back. This one is a little different because of the standard copper fittings. Copper pipe for water comes in two wall thicknesses. I chose the thicker for greater strength and it is quite stout, much stronger than the aluminum channel and much easier to solder together (aluminum uses a rod called "alumirod", which I think is kind of hard to work with). Anyway, I'm pleased with this copper version and will make another just like it for another old Elgin I have back home in Minnesota (1934 and next winter's project) of the same model as my rustoration 39 which this stand is made for and which is pictured below. It works well and I like the look of it. Now I can remove the center stand I robbed from my Schwinn American so that it isn't a leaner anymore. I had originally thought I could get three stands out of the ten foot section, but three would require another foot or so. The pioe was expensive at close to $25.00 with tax. Then add about $4.50 for the fittings. With solder and propane call it $30.00. Fittings for another stand would bring the total to $35.00 for two stands. So that's $17.50 each.
I'm undecided at this point on whether to leave it alone or paint it to match the bike frame. What do you think?
The last photo is from a current ebay listing for a 41 Elgin of the same model as my 39. It is currently my wallpaper on this machine as inspiration to get my danged fenders painted, mounted and be done with my Rustoration project in time for riding weather in a couple of weeks. Can't wait! Snow is melting as I write.
SB
Attachments
bairdco
a guy who makes cool bikes
i'd paint it. while the copper is cool, since you don't have any other copper parts, painting it would match the bike.
also, although i think it looks cool, it does have a sort of "floor lamp" look to it all shiny like that. i don't mean that in a bad way, i mean it like it would look great if the bike "sat in the corner as a display" way.
i'm still trying to figure out what to do about a stand on my new bike. i bobbed the rear fender, so i'd have to make a bigger, taller stand to wrap around the tire to reach it. i think i might just try to find a vintage two legged "butterfly" center stand.
by the way, nice to see some dirt on your bike")
also, although i think it looks cool, it does have a sort of "floor lamp" look to it all shiny like that. i don't mean that in a bad way, i mean it like it would look great if the bike "sat in the corner as a display" way.
i'm still trying to figure out what to do about a stand on my new bike. i bobbed the rear fender, so i'd have to make a bigger, taller stand to wrap around the tire to reach it. i think i might just try to find a vintage two legged "butterfly" center stand.
by the way, nice to see some dirt on your bike
silverbear
The Boy Who Never Grew Up
Bairdco, I think you're right about painting it. This weekend. I would still like to find a source for steel in a shallow channel to try just bending to make one. Still, this will work.
I think finding a vintage butterfly stand is a good idea... or as I think about it, why not a fabricated one? Now that's something to think about. Were the old ones all spring loaded like the modern version? Even so, hmmm...
SB
I think finding a vintage butterfly stand is a good idea... or as I think about it, why not a fabricated one? Now that's something to think about. Were the old ones all spring loaded like the modern version? Even so, hmmm...
SB
silverbear
The Boy Who Never Grew Up
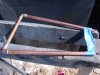
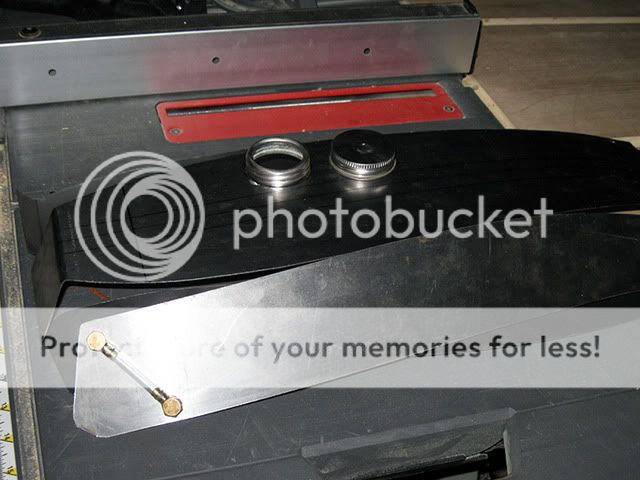
REAR DROP STAND #3
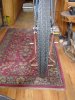
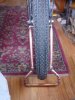
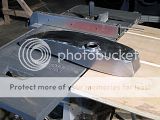
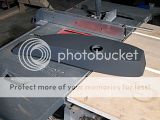
I'm not sure why I thought the rear drop stand had to be so strong, but the one in the prior post is overkill and I don't like the geometry of it. Looks off to me, so today I made another one to see if it would be as strong or at least strong enough. I needed more elbows and picked up a five foot section of the thinner walled 1/2" copper pipe at Lowes which costs half as much per foot as the heavy wall. I wanted a stand more like the original so tried this. I discovered when I tried to bend the upper ends inwards that what bent was the elbow itself which both surprised and pleased me as I had thought the pipe would bend. So, I bent it the way I wanted it to be with a 4 1/2" spread at the upper end, which is the distance between the dropouts, taped it secure and soldered it together. Tape removed, it kept the shape I wanted. The upper end gets mashed flat in the vice and then the hole drilled followed by a little shaping with cut off wheel and grinder. This took much less time and only cost around six dollars to make. That's more like it. Sometimes I tend to make things harder and more complicated than I need to. This appears to be plenty strong and once painted will not announce itself as home made. If I did want it to be more heavy duty I would use the heavy wall pipe. Now I don't feel any need to find steel channel to bend and try to duplicate the original. This is close enough for me. As soon as I have fenders mounted I can figure out a holder for the stand in the up position.
SB
Attachments
BarelyAWake
New Member
Lookin' good silverbear! Tho I gotta say yer cheatin' lol - you've got dropstand mounts o.o I defo like it far more than the centerstand you've got on there, while effective - it's just not nearly as groovy. I'm assuming yer gonna use the retainer clip on the rear fender - same as the originals had?
I dunno... paint... I'd be seriously tempted to let the patina develop *shrug* but painted is good too
I dunno... paint... I'd be seriously tempted to let the patina develop *shrug* but painted is good too
BarelyAWake
New Member
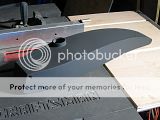
Progress w00t!!1!
The tank welding done, it wasn't quite flawless - but far, far better than I feared. A "small" detail overlooked when setting alla this up is my poor buddy's lack of a foot control on his TIG machine... essentially just a stick welder with a TIG gun instead of a clamp - he's got no amperage control and the machine's lowest setting 'bout twice as much as needed for this lil project. With that in mind - I've nothin' but respect for my friend as he managed to not incinerate alla my work lol
Upside? While the welds may not be the most cosmetic in the world - they're freakin' strong and with the over-penetration developing a consistent bead on the inside, it's "gusseted" so to speak. So... a lotta grindin' and a lil filler... and a bunch more sanding and I've my fuel tank FTW ...and no, it's not gonna stay flat black heh - there's more sanding and painting to be done ofc... which is all that managed to prevent me from stickin' my nifty fuel filter and sight gauge on it for the pics.
The temptation was there tho lol, bad enough I hung the chainguard just for the pic - let alone the tangled nightmare of cables


Attachments


BarelyAWake
New Member
Thanks dule ")
The tank has no leaks (whew) but I just "plugged" the fittings to test it... any fitting leak can be dealt with anyway should I need to.
A "fuel sight gauge" is so basic it simply can't help but work lol, but as the tank does curve down (in the back) and the size of the fittings it's not gonna be able to register... oh I dunno - like the last 1/4-1/3 tank at most? I figure when I can't see the fuel anymore - that'll be my "emergency reserve" and cause to start lookin' fer fuel.
I plan on usin' it mostly as a warning device to mark "the point of no return", that I'm down to 1/2 tank and should I not turn around and head back - I ain't gonna make it heh... and TBH it's mostly for the "stylie" factor as I suppose I could just take the cap off and have a look-see
In case ya missed it (or ifn I forgot to post it lol), this is the sight gauge in alla it's glorious complexity
Last edited:
silverbear
The Boy Who Never Grew Up
Lookin' good silverbear! Tho I gotta say yer cheatin' lol - you've got dropstand mounts o.o I defo like it far more than the centerstand you've got on there, while effective - it's just not nearly as groovy. I'm assuming yer gonna use the retainer clip on the rear fender - same as the originals had?
I dunno... paint... I'd be seriously tempted to let the patina develop *shrug* but painted is good too
I made another one which has no flattening at the upper end and being just 1/2" wide allows the stand to flip all the way up and attach to the small rear rack... if I didn't have a rear fender, that is. I was just fitting the stays to the fenders and holding the rear one in place to eyeball things and realized that the fender stay (is that the right word or are they struts?... the dealy that connects the fender to the axle. And I have to have the rear fender even if it didn't turn out as nice as I would have liked or I have to give up the fender skirts and we can't have that! I made a final (probably) version of the rear drop stand with end caps soldered onto the upper ends which makes it look more finished, more solid and more more. That one gets painted today and was primed yesterday. You're also right about the copper losing it's brightness in no time... a little weather, road use and it would look like an antique itself. Today it gets fenders mounted. Woo hoo! Then I have to figure out the fender clip deal for the rear rack and make something up.
Simultaneously I'm putting my 63 American back together after a modest makeover of new paint (gray) making over a new rear rack (from a Schwinn front rack like the one on the 39 Elgin, finished up a headlight and tail light made from tin cans and covered in harness leather to go with the juice can/ leather covered gas tank. This is my old faithful bike with over a thousand motor miles on it which looked so sad and neglected in the woodshed this winter. It's been good to me so... I have a new motor coming for it in a couple days (another automatic from BGF) which I'd like to try light porting with before it gets painted black. So, my goal is to have both bikes ready to test ride next weekend, weather permitting. I'll post photos of the Elgin as officially done after I give it a first ride. That was one of the requirements of this build off as I recall... that it has to run when yer done.
SB
silverbear
The Boy Who Never Grew Up
Barely, your Rollfast looks awesome. You have done such a nice job with it. It must feel real satisfying to stand back and look at that tank and remember making cardboard pieces held with tape as patterns, cutting everything out and the long wait for completion. Very nice. I like your chain guard, by the way.
It's getting closer and closer to getting ridden... pretty cool.
SB
It's getting closer and closer to getting ridden... pretty cool.
SB
Venice Motor Bikes
Custom Builder / Dealer/Los Angeles
Awesome tank Barely!! ")
BarelyAWake
New Member
Thanks guys
I wish I could get more done & faster... but that dratted "IRL" thing comes into play and these days I can only really get anythin' done on the weekends
In fact - the bike isn't nearly as close to being finished as it looks, although I could jus' slap everythin' together and vroom off at this point, it'd be counter productive as I know then I'd not bother with some of the other spiffy stuff I've planned. I really don't wanna put off the behind the seatpost tank (there's sumfin' tricky I'ma plannin fer that... but it's a secrut heh) and other groovy stuff - I'm thinkin' about usin' copper tubing sections to route the wiring as an example... which in itself is gonna take some time & thought.
It is at least pretending to get nice outside tho... so we'll see if I cave in to my temptation or persevere with alla my grandiose plans - just as another example, I've still not even purchased my side-pull throttle grip yet lol
So if "runnin' by spring" wasa "requirement" I'ma looser and that's a fact
Hey silver - "63 American back together after a modest makeover of new paint (gray)" *gasp* yer stealin' my color?!?! Hehehe sweet - or was it always gray? I wanna see! I know whatcha mean by yer old faithful bike feelin' neglected - tho I've been riding it all winter, my Schwinn is hurtin' for some TLC... the Rollfast gettin' what attention I can spare - it's gettin' to the point where my "daily driver" really outa be torn down and redone. Not the engine so much as it's been fine - but just about the entire bike really could use a going-over. Nothing's broken or failing (cept my rear brake pads, pifft), but the lack of maintenance is gonna catch up w/me sooner or later... jeebus, it's been on the road fer 4500 miles + at this point
Oh right - ya defo needta post summore pics of yer awesome work silverbear, yer fine leatherwork inspires me to get offn my butt and do some myself!
silverbear
The Boy Who Never Grew Up
Barely,
If there is one lesson I've learned from this build off experience it is that the next time I try something like this I need to have a place to work in besides my tiny trailer space where I live. Having no real place to work really limits a person, especially when the great outdoors ain't so great with snow, cold and rain. What joy it would be on a cold and rainy day like this one to be inside a workshop with a wood stove burning, tools laid out in plain view, parts and materials in an organized state. That's my plan, to somehow have a dedicated work space.
Neither bike will be ready to ride this weekend and it is a steady rain anyway. At least the rain is eating the snow, so that when Grandfather Sun returns the valley go green. And I'll be ready to ride.
My American is making progress and helps while away time until the Elgin can test ride. Fenders and skirts are on the Elgin and there isn't much more to do... some little things. I admit to being influenced by your Gray Ghost, or whatever cool thing your Rollfast will be named. I'm conscious of my American and Elgin bikes' dubious origins as ladies bikes and know that color choice can be one more step toward being a serious motorbike. The deep blue of the Elgin and the change from blue to gray on the American help with that. Not a big deal, but it does influence choices. It is kind of fun going over the old American, still a solid ride. It has the adapted rack on the back with a large size juice can tank (coffee can sized at about 2/3 gallon). Matching leather covered head and tail light are done and mounted. After being mis-delivered I finally got the new BGF automatic china girl yesterday and ported the intake and exhaust last evening at the kitchen sink. Hope I got that right and that it helps give a little performance boost. I'll paint the engine today in the woodshed and hope it drys eventually. Should be together by the time this stretch of bad weather is over and done with. Pictures of both bikes will follow when there is some sun to help make them look good. As for the 'spring deadline', I don't think there is one. If time is the yardstick, Bairdco has lapped us many times over and is the clear winner. Trying to compare these bikes is problematic. All they have in common is age and rust. I think Bairdco also deserves special recognition for thinking outside of the box and sheer inventiveness. Quite the swashbuckling builder. Your own is going to be a pretty spectacular ride with the shift kit, custom tank and attention to so many little and not so little details. I don't mean to raise unrealistic expectations, but I know that you are a craftsman and will do your best to finish off this bike as well as you can.
For my own build I guess I can say that I'm willing to think outside of the men's bike- ladies bike constraint. By necessity I need a step through, so I want to do it in style and I think this old Elgin is going to be a looker (not up close, though), just a nice old art deco styled motor bike from another era and something definitely different. Stock engine, no great innovations, some borrowed ideas (like the juice can tank) and some perseverance resulting in what I hope is a nice ride. As you pointed out early on, the prize in this 'contest without a winner' (no voting) is that each of us gets the bike we wanted which is in each case a perfect expression of who we are.
SB
weekend-fun
New Member
I am realy realy sorry I haven't replied.. Some family matters came up
I think I'll have to drop out for now... I'm not moving to Texas now were going to California.. I'm going to wait till then whenwe are setteld down. Good Job everyone!
I think I'll have to drop out for now... I'm not moving to Texas now were going to California.. I'm going to wait till then whenwe are setteld down. Good Job everyone!
BarelyAWake
New Member
Ya don't hafta "drop out" weekend - there's no time limit (thank gawd lol) and we'll be here keepin' an eye out fer you and yer bike whenever ya get a chance
silver - 'Grey Ghost' is an awesome name fer the bike, but I thought it immodest given the only reference I was aware of was the 1920's Rolls Royce Silver/Gray Ghost: CarPictures.com - Rolls-Royce 20HP Sedan - The Affordable Silver Ghost - 1929 Pictures Much as I like my bike... it's no Rolls lol - Still, perhaps it'll stick heh
As for a nice workshop w/a woodstove - yes that'd be freakin' GREAT! Don't let my pics fool ya, although that is my basement and that woodstove does get used... sadly the shop space has been completely infiltrated by piles other people's stuff. Surrounded by 'puter equipment, piles of laundry and a ton of random tools - the Rollfast has been (almost) entirely built in my office/bedroom... which my 'puters nor my bedding appreciate very much heh. In all fairness to my housemates - part of the chaos was due to the repeated floods we had this season and my (perhaps misplaced) desire to be nice and reduce the 4am noise by putting another door between them and my tinkering, the reliable baseboard heat mighta had sumfin' to do with my retreat as well lol
As for the different styles of build between you, bairdco and I - I've always thought it the very best thing about this thread! Baird's psychopathic lil screamer inspiring awe and fear - proving "old" has no relation to "slow" heh, and yers proving there's nothing "girlie" about vintage step-through frames... with a engine, a TON of work, and endless care and craftsmanship - it's defo a "looker" and then some
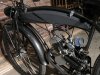
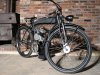
I actually managed to get a bunch done yesterday - tho little of it is apparent in a pic. One of the things that's not blatantly obvious in the photos is the fact that my bike's hasn't actually been truly assembled - tho the parts have been in place, it's just a "fitting" as I've had to fabricate so much, there's little point in gettin' stuff dialed in when I hafta just take it all apart again and again and again... Yet yesterday morning I got up and started sanding and painting the tank (more is needed still ofc) and while it dried I tackled the rest of the bike, sorting out details and adjustments and tryin' to beat the cables into submission.
I needed to grab a few things from work (longer plug wire & NGK cap, copper tubing & compression fittings etc.), as it was sucha nice day I wanted to be able to pedal in on the Rollfast - to not only strut my stuff but to see how "dialed in" the bike was. I'm happy to report that although it's freakin' heavy it rides like a dream, the sturmey archers not only working flawlessly but surprisingly silent, the bike also coasts foooorever with little to no drag. If it weren't for what will be a screamin' 2smoker - the name 'Gray Ghost' may be more appropriate than I thought heh
I thought I was used to the responses with my Schwinn, anyone that rides one of these things gets inured to the flattering but incessant questions... but even though I was just pedaling an incomplete project - people FREAKED out! While with the Schwinn I expect questions and comments when I come back out of the lil convenience store - I had not one but TWO cars pull over and stop while I was rollin' down the road, just to ask about my ol' bike
The first was an old fella that recognized the Rollfast for what it... well... usta be as he had one when he was a kid, the other a buncha motorheads that I imagine will now be ordering kits of their own lol I have noticed I get lots more questions/comments when it's simply nice outside - no one cares much 'bout motorized bikes when there's a blizzard heh
Anyhoo - here's a coupla pics, I managed to get all the cables routed about how I want them, their curves right - I just need to have 'em on top of the lower tank tube instead of under it (didn't bother as I need to pull the tank again), bairdco will be pleased to see both the brake noodle on the clutch and the CDI tucked away under the motor (I fear he'd hunt me down ifn I didn't lol), The lil copper fuel line sorted and the SBP exhaust completed - except lacking an exhaust clamp and those pesky hose clamps on the chainstay. The hose clamp method of mounting the glasspack silencer works great, my Schwinn not only had thousands of miles with it mounted like that, but it even survived being cartwheeled in a pretty epic crash (my buddy crashed the Schwinn months ago) - I just don't think them up to the same standard as the rest of the build. I'll be welding a mount plate to the backside of the aluminum silencer... at some point lol


*shrug* There's still no electricals... I don't think I'll be wiring up a kill switch on this 'un as I'd rather keep the wires to a minimum (and use the button for the horn that's in the headlight housing), there's more than enough blasted cables on this thing as it is. Besides, the CNS has that nifty remote choke so why not use it? The gen hub, headlight & taillight... yea... I'm gettin' to 'em heh
Last edited: