Trek Lime Lite 100cc build

GoldenMotor.com

Untame

Member
Sep 8, 2023
27
25
13
49
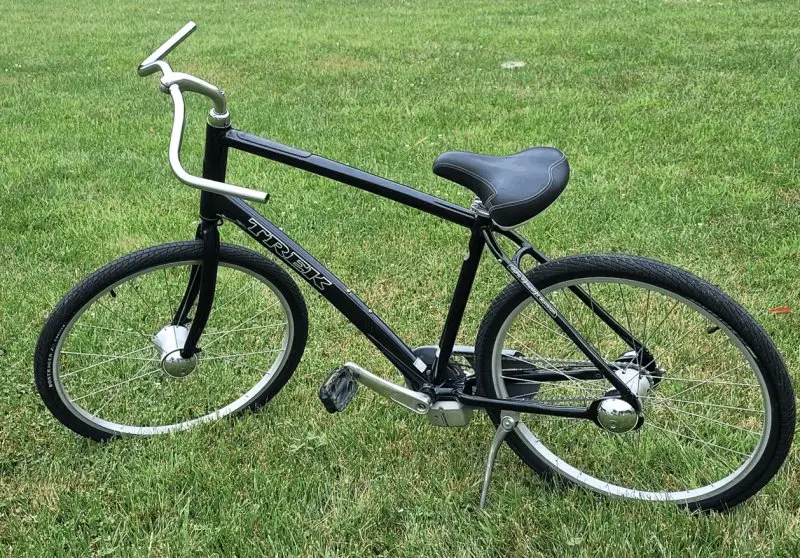
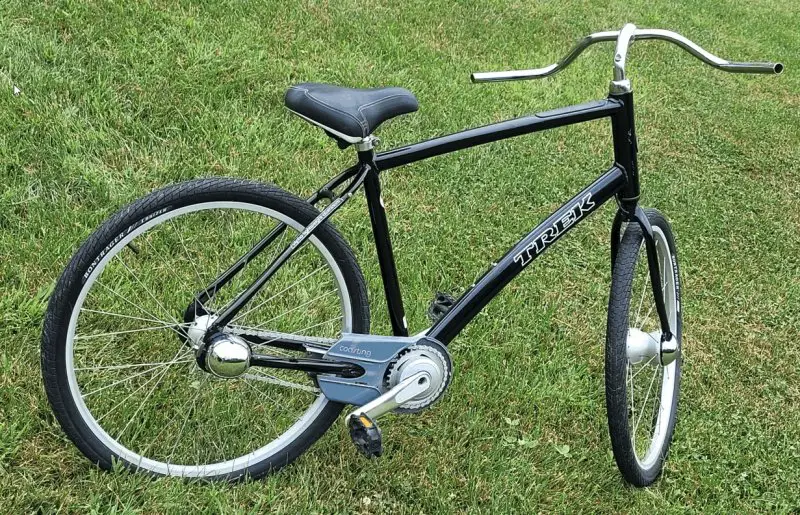
Hello everyone. First post. A friend recently did a conversion and turned me on to the idea. I picked up a Trek Lime Lite (aluminum frame) on FB Marketplace to use as the canvas. Odd bike... has a 3-speed computer-controlled automatic transmission. Front wheel hub is a magneto that powers a computer under the crank. The computer uses sensor to measure load and speed and actuates a gear selector at the rear wheel to select one of three speeds. Evidently, there is a planetary 3-speed transmission inside the rear hub.

Anyway, planning on using a 100cc black-engine kit. I already cleaned it up a bit by removing reflectors and extra stickers (primary branding is under the paint clear coat, so it will stay). I inverted the handle bars and removed the grips. The seat bracket was inverted to get it an inch lower, and I cut 1.5 inches off the seat post receiver to get the seat as low as possible.

Waiting on a crank removal tool so I can get the rest of the plastic chain guard off. It will get a black steel chain guard as well as flared black fenders. Thinking about swapping out the plastic pedals for retro steel rat trap pedals.

Hope to flip this one (to at least break even) so that I can start on my second build (... and third). Already have a couple ideas for rad retro bikes.

Bike progress 1.jpg


Bike Progress 2.jpg
 
  • Like
Reactions: fasteddy

Sidewinder Jerry

Well-Known Member
Dec 19, 2011
2,011
955
113
62
Rockwood, TN
Most of us here don't like aluminum frames. Are you planning on running the engine's drive system through the auto shifter? If so, can you adjust the speeds which the auto shifter shifts at?
 
  • Like
Reactions: fasteddy

Venice Motor Bikes

Custom Builder / Dealer/Los Angeles
Mar 20, 2008
7,275
1,814
113
Los Angeles, CA.
The biggest problem I see with this bike is how to mount the new rear sprocket for the engine.
You might, (or might not) be able to use a SBP shifter kit, but the parts might not all jive with the bike's computer controlled shifting parts.

If this is your very first build?, you might consider a different (& easier) bike to start with.
 

Sidewinder Jerry

Well-Known Member
Dec 19, 2011
2,011
955
113
62
Rockwood, TN
The biggest problem I see with this bike is how to mount the new rear sprocket for the engine.
You might, (or might not) be able to use a SBP shifter kit, but the parts might not all jive with the bike's computer controlled shifting parts.

If this is your very first build?, you might consider a different (& easier) bike to start with.
If he can't adjust the shift speeds; I wouldn't run engine power through the auto shifter. Otherwise, he'll have to be going extremely slow before it'd down shift. Meaning the lower gears wouldn't be very useful.

On the LandRider, it had a cadence adjustment screw. I turned it to the max; I also added an additional 180° twist to the spring so that it didn't shift out of 1st gear until you were going around 15 mph. In my videos you can actually hear it downshifting automatically coming up steep hills.
 
  • Like
Reactions: fasteddy

Untame

Member
Sep 8, 2023
27
25
13
49
Yes, first motor bicycle build. But I have a lot of mechanical experience (hobby and professional).

The shift signals come from the crank, so if I want the motor to utilize the auto shifting I would need to drop the drive chain to the crank. But then I would have to pedal like crazy. I thought about taking the crank arms off and just having pegs, but then it is no longer classified as a "moped" in the state of Wisconsin.

So I am planning on running the chain back to the rear wheel. Probably just pedal it up to third gear before engaging the motor.

If I get the kit and realize it is overly complicated I could flip the bike for a profit and look for another donor chassis. Only paid $50 for it. It hadn't been ridden in 7 years, so I have put some elbow grease into it and it looks pretty good.

So what is the gripe on aluminum frames?
 
  • Like
Reactions: fasteddy

Untame

Member
Sep 8, 2023
27
25
13
49
The two builds I have in mind (after the Trek) are an OD green military style and a Cafe Racer style.

Military Motorcycle.jpg


Cafe Racer.jpg
 
  • Like
Reactions: fasteddy

Venice Motor Bikes

Custom Builder / Dealer/Los Angeles
Mar 20, 2008
7,275
1,814
113
Los Angeles, CA.
Yes, first motor bicycle build. But I have a lot of mechanical experience (hobby and professional).

The shift signals come from the crank, so if I want the motor to utilize the auto shifting I would need to drop the drive chain to the crank. But then I would have to pedal like crazy. I thought about taking the crank arms off and just having pegs, but then it is no longer classified as a "moped" in the state of Wisconsin.

So I am planning on running the chain back to the rear wheel. Probably just pedal it up to third gear before engaging the motor.

If I get the kit and realize it is overly complicated I could flip the bike for a profit and look for another donor chassis. Only paid $50 for it. It hadn't been ridden in 7 years, so I have put some elbow grease into it and it looks pretty good.

So what is the gripe on aluminum frames?
Like I said... I think you're gonna have a lot of serious headaches with this particular bike... Go ahead & buy the engine kit & start looking into how to mount the rear sprocket to the wheel & you'll see what I'm talking about.

Don't use a cheap cruiser like the Huffy... Get a old American made Schwinn cruiser from the 70s... Find one that already has the thick spoke rims.

The gripe with aluminum frames is that a lot of guys end up finding cracks in the frames over time... I don't have any problems using them, but I have a few tricks that I add to protect the frames from the heavy vibrations... (again, it's just more problems for a 1st timer to deal with). :(


Last... If you're into those old Honda Cafe racers?, you need to check out my Instagram page!!!
I've built many of them over the years!! (it's been a few years since I've built one, so you'll have to scroll down a bit until you start finding them). (^)

There's a link to my Instagram in my signature.
 

Sidewinder Jerry

Well-Known Member
Dec 19, 2011
2,011
955
113
62
Rockwood, TN
These actually do have a cadence adjustment screw the lowest setting the gear changes occur is at 7 mph and 11 mph. At the lowest setting it takes a cadence of 73 to change to 2nd gear and a cadence of 55 to maintain 2nd gear. To change to 3rd gear you'd need a cadence of 86; you'd have to maintain a cadence of 65 to stay in the 3rd gear.

On my bike the chainrings are turning 127 rpm when the engine is at 7000 rpm.

1694252927620.png
 
Last edited:
  • Like
Reactions: fasteddy and Untame

Untame

Member
Sep 8, 2023
27
25
13
49
Rear sprocket would have to clear hub diameter of 1.834in. I'm guessing the kit sprocket has a center hole much smaller than this.

One thing I have is CAD and a 3D printer. I could print a mount for a different sprocket with a larger opening. I was already planning on printing mounts for the motor and gas tank (plus etc.).

Screenshot_20230909_081452_Gallery.jpg
 
  • Like
Reactions: fasteddy

Untame

Member
Sep 8, 2023
27
25
13
49
Looking on Ebay it looks like they are called a "chainring" (pardon my ignorance)... I would go with steel, but how many teeth do you guys recommend?
 
Last edited:
  • Like
Reactions: fasteddy

Greg58

Well-Known Member
May 1, 2011
5,353
2,575
113
66
Newnan,Georgia
Looking on Ebay it looks like they are called a "chainring" (pardon my ignorance)... I would go with steel, but how many teeth do you guys recommend?
Good luck with this build, most rear sprockets are from 36t to 44t depending on rider weight and the terrain you will ride on, along with the desired top speed. As a choice I run the 41t or 44t for hill climbing, cruising at 25-30 is a good ride for most.
 
  • Like
Reactions: fasteddy and Untame

Untame

Member
Sep 8, 2023
27
25
13
49
After an obsessive amount of research I settled on the 66/80 cc kit (with seperate head - unpainted). Should get it later this week. Planning on tearing it down completely, porting, inspecting everything, and reassembling. Going to replace several kit components (intake gasket, chainring, tensioner, maybe the chain).

Also ordered a 42T chainring. Need to start working on the 3D printed adapter.

Sounds like a front fender is a terrible idea, so I might just do a rear fender. Saw another bike with the shorter front fender on the rear, and it looked good.

You guys clean the baffles out of the muffler? Noise isn't a big deal where I'm at.
 
Last edited:
  • Like
Reactions: fasteddy

Untame

Member
Sep 8, 2023
27
25
13
49
Anyone know the bolt circle diameter on the Chinese kit sprocket?
For the sake of posterity, I measured it at 74mm (actually 73.5ish depending on the holes measured, but they are Chinese circles, so I am guessing 74 was the manufacturing intent). It is the 44T sprocket.
 
  • Like
Reactions: fasteddy

Untame

Member
Sep 8, 2023
27
25
13
49
Started reworking the kit last night. For whatever reason I decided to start with the muffler. I cut the can and tube off flush with the top cap, removed the baffles, doubled the number of holes in the tube (from 9 to 18), and welded it back together. I also drilled a pair of 5/16" holes in the bottom cap to reduce pressure. I'm planning on getting some stainless steel dish scrubbers and packing the can to reduce echoing. Should flow well.

(FYI... ran the welder a little too hot and blew a nice hole in the can. Spot filled it. Not the prettiest, but it is sealed up.)

20230914_203910_resized.jpg

20230914_205339_resized.jpg

20230914_213044_resized.jpg


20230915_074658_resized.jpg
 

Untame

Member
Sep 8, 2023
27
25
13
49
Cylinder and head castings look like they were tossed around a bit before assembly. I was able to hone all of the dings out the head mating surface, but there is a large ding on the cylinder mating surface. I honed as much as I'm comfortable at this point, and I can still feel a divot when I run my finger over it. Hopefully, it is far enough to the outside that the gasket has enough grip on the flat surface.

20230915_083437_resized.jpg


20230915_083950_resized.jpg


20230915_084313_resized.jpg
 
Last edited:
  • Like
Reactions: fasteddy

Untame

Member
Sep 8, 2023
27
25
13
49
Printing the first draft of the chainring adapter. The inside tabs are meant to lock into the back hub cover. On the top side there is a recess to match the inside of the chainring. This print in PLA is just to verify fitment before I print the final version in solid PETG. One unknown is how much it will shrink when it cools.

20230915_084925_resized.jpg


20230915_084856_resized.jpg
 
  • Like
Reactions: fasteddy