The Raven

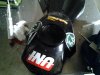
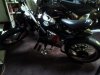
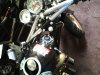
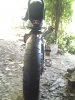
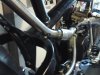
I'm clumsy and burn myself by grabbing hot exhausts so I think I'm keeping it low, that way if I reinforce the seat to take the weight of me and a passenger the girl wont get a stripe too.

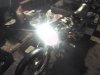
For a racer I'd say up level looks better, but I just know I'll have issues with the hot tailpipe up high near everything.

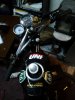
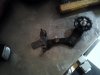
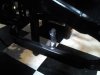
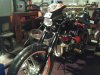
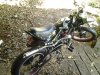
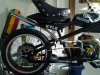
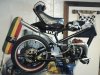
I might be able to get it up underneath the seat if I can have the seatpost high enough to clear a 5" hole between the top of the tire and the rear fairing. I have a piece of bent conduit to route the pipe up possibly, which would look nice I think.
 
Last edited:
attachment.php


This is the new routing. Just gotta chop down the muffler some and add some wool to it, and make a mount where the rear fender bolted to.
 

Attachments

  • 0225131530.jpg
    0225131530.jpg
    279.3 KB · Views: 346
Coffee break
attachment.php

Prolly gonna shorten the canister a couple inches.
attachment.php

I can put some lockwire around the pipe or a spring here if it needs it
attachment.php

A little simple mettalurgy goes very far, this mild steel rod was very soft and I bent it to final shape with my bare hands, to keep it in its shape, I heated the crtitical areas red hot in a carburizing flame slowly and quenched them. Now it's stiff enough to support the pipe.

I can still bolt in a inner fender to keep crap from flinging onto the motor since the mount is a fastener in itself. It holds the allthread inside the pipe so I can quickly change the guts of the muffler with the acorn nut.
 

Attachments

  • 0226131611d.jpg
    0226131611d.jpg
    216.5 KB · Views: 303
  • 0226131611.jpg
    0226131611.jpg
    258.5 KB · Views: 322
  • 0226131612.jpg
    0226131612.jpg
    187.7 KB · Views: 302
Last edited:
attachment.php

So there's that, put a couple 1/16 holes for a spring to hold the pipe down to the crescent.

Now onto the brake master mounting bracket and then the pedal, then the forks. The brake caliper needs a mount, the drum slot needs an adaptor, and it needs a couple tacks on the steering tube adaptation.

There's still a ton of stuff to do, chipping away at it slowly...
 

Attachments

  • 0226131701.jpg
    0226131701.jpg
    241.6 KB · Views: 329
very very nice craftsmanship...im impressed...i am also now subscribed to this thread 16...keep up the diligent work and u r sure to have one heck of a reliable mode of transport...good job
 
Thanks Wickedest1

Today I will paint and assemble the frame, and while I'm at it get a kill switch harness together and make the redundant cable brake drum work on the front wheel. Almost getting to a running bike!
 
attachment.php

Welded a camel toe on on the front hub for the drum brake tab on the forks :p
attachment.php

I welded a reinforcement/bracket on the rear to have a place to bolt a tool box to for the battery, + a shiny coat of paint.
attachment.php

Painted the little nub I had to grind off from the old steering damper bracket which conflicts with the OCC frame. The old steering tube remant used for adapting the fork is tacked in four places, and cn be dremeled off if these re used on a threaded 1" bike later, doubtful though.
attachment.php

Just a sample of the random crap strewn across my place, lol. The hub I painted silver to match the wheel, and random brackets flat black epoxy. My head clamp was starting to corrode so I painted it black, seems the brushed finish causes corrosion. I drilled holes in the ears for the headlight to accept the mirror stalks.
 

Attachments

  • 0302131606.jpg
    0302131606.jpg
    195.3 KB · Views: 335
  • 0302131722.jpg
    0302131722.jpg
    200.4 KB · Views: 309
  • 0302131721a.jpg
    0302131721a.jpg
    202.2 KB · Views: 303
  • 0302131720.jpg
    0302131720.jpg
    210.1 KB · Views: 289
Last edited:
attachment.php

Added a digital hour meter/tach to keep track of the motor.
attachment.php

Made the hole bigger for a trim ring.
attachment.php
Gave the trim ring a brushed look and bolted it to the fairing.
attachment.php

Pardon the mess! :p
 

Attachments

  • 0302132034b.jpg
    0302132034b.jpg
    150.3 KB · Views: 319
  • 0303131527a.jpg
    0303131527a.jpg
    245 KB · Views: 296
  • 0303131702a.jpg
    0303131702a.jpg
    265.6 KB · Views: 297
  • 0303131702d.jpg
    0303131702d.jpg
    253.4 KB · Views: 300
attachment.php

attachment.php

attachment.php

attachment.php

attachment.php
 

Attachments

  • 0303132018b.jpg
    0303132018b.jpg
    151.4 KB · Views: 280
  • 0303132018e.jpg
    0303132018e.jpg
    192 KB · Views: 280
  • 0303132039c.jpg
    0303132039c.jpg
    139.3 KB · Views: 292
  • 0303132208b.jpg
    0303132208b.jpg
    115.5 KB · Views: 280
  • 0304130244a.jpg
    0304130244a.jpg
    190.2 KB · Views: 274
Thanks Wickedest,

Trying to figure out this Dellorto PHVA clone carb tuning, found this pic, maybe it's helpful to fellow riders using this carburetor.
dellorto_carb_diagram_phva_page_1.jpg
 
Last edited:
I found out that the idle screw is the one with the spring, and the other one inset in the float bowl with no spring is mixture.
attachment.php
 
Last edited:
I'm hoping to get it running tomorrow, just need some wires, gas, and a kick :)

attachment.php
 

Attachments

  • 0304131642.jpg
    0304131642.jpg
    267.4 KB · Views: 351
Here's why it's not good to rush, you just end upgoing back and doing it right. Better now than later :)
attachment.php

This makes it so the pedal chain side isn't janky, now there's a real idler instead of a nylon bushing on a bolt.
attachment.php

Here's a sturdy mount for the 3/8 bolt that holds the drive idler from Pirate.
 

Attachments

  • 0305131344.jpg
    0305131344.jpg
    254.8 KB · Views: 309
  • 0305131458.jpg
    0305131458.jpg
    166.3 KB · Views: 363
attachment.php

attachment.php

Something to hold the ignition switch.
skiier3_9.gif
 

Attachments

  • 0310131640d.jpg
    0310131640d.jpg
    351.8 KB · Views: 328
  • 0310131640a.jpg
    0310131640a.jpg
    312.8 KB · Views: 319
attachment.php

Wiring, yuckkk! Hoping to finish this pinout nightmare tomorrow.

Today I finished hooking up the drum brake as a e-brake using a happy time clutch handle, so if the bike rocks forward it won't fall off its stand, and it can idle with the wheel spinning. Pics once I download.
 

Attachments

  • raven diagram.jpg
    raven diagram.jpg
    233.3 KB · Views: 358
attachment.php

attachment.php

attachment.php

attachment.php
 

Attachments

  • 0315130242.jpg
    0315130242.jpg
    218.8 KB · Views: 324
  • 0315130236a.jpg
    0315130236a.jpg
    154.8 KB · Views: 282
  • 0315130236.jpg
    0315130236.jpg
    220 KB · Views: 284
  • 0315130243c.jpg
    0315130243c.jpg
    257.7 KB · Views: 318
Tried to start it, turns out the plug is too long, and the short ones for HT's are too short, need the right one. To the store I go!

Here's some pics from my roll outside on the first attempt.

attachment.php

attachment.php

attachment.php

attachment.php

attachment.php
 

Attachments

  • 0321131342e.jpg
    0321131342e.jpg
    333.7 KB · Views: 276
  • 0321131343c.jpg
    0321131343c.jpg
    317.6 KB · Views: 272
  • 0321131342d.jpg
    0321131342d.jpg
    331.6 KB · Views: 298
  • 0321131341a.jpg
    0321131341a.jpg
    425.7 KB · Views: 275
  • 0321131344a.jpg
    0321131344a.jpg
    374.6 KB · Views: 289
Back
Top