Ryo's Cafe/Cruiser/hot/ratrod bike thing.

GoldenMotor.com

Ryoskate

New Member
Nov 30, 2015
58
0
0
Houston!
Just came across this thread..... real nice... the seat custom your doing way cool!

I added gusset from three of the horizontal tubes just infront of my engine mount to spread out the stresses. You did similar, but I did not have it up by the head tube.

One other area I did was add extra metal under the engine mount to the frame. This way I have not two point to hold the engine platform, but four evening out the stress there also.

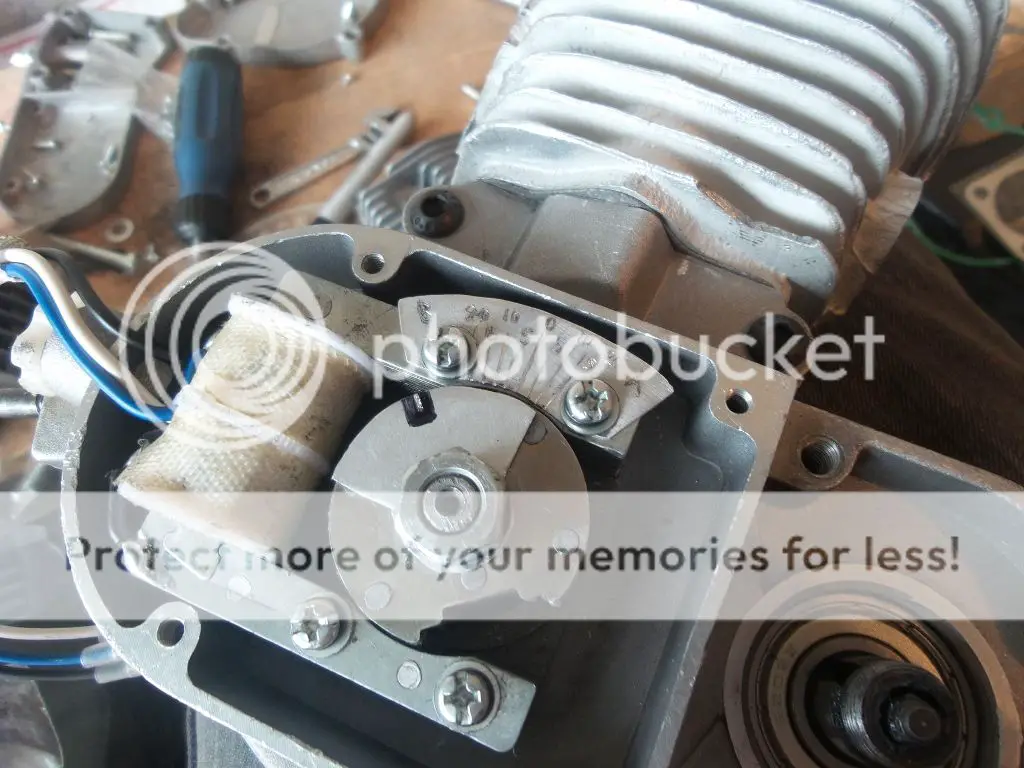
That two stroke engine should have good power, you would say!

MT

http://motorbicycling.com/showthread.php?t=54926 Trail Riding
Reason why I did mine at the Headtube was to reinforce the headtube since I really don't trust my welds yet.
Thanks for stopping by!

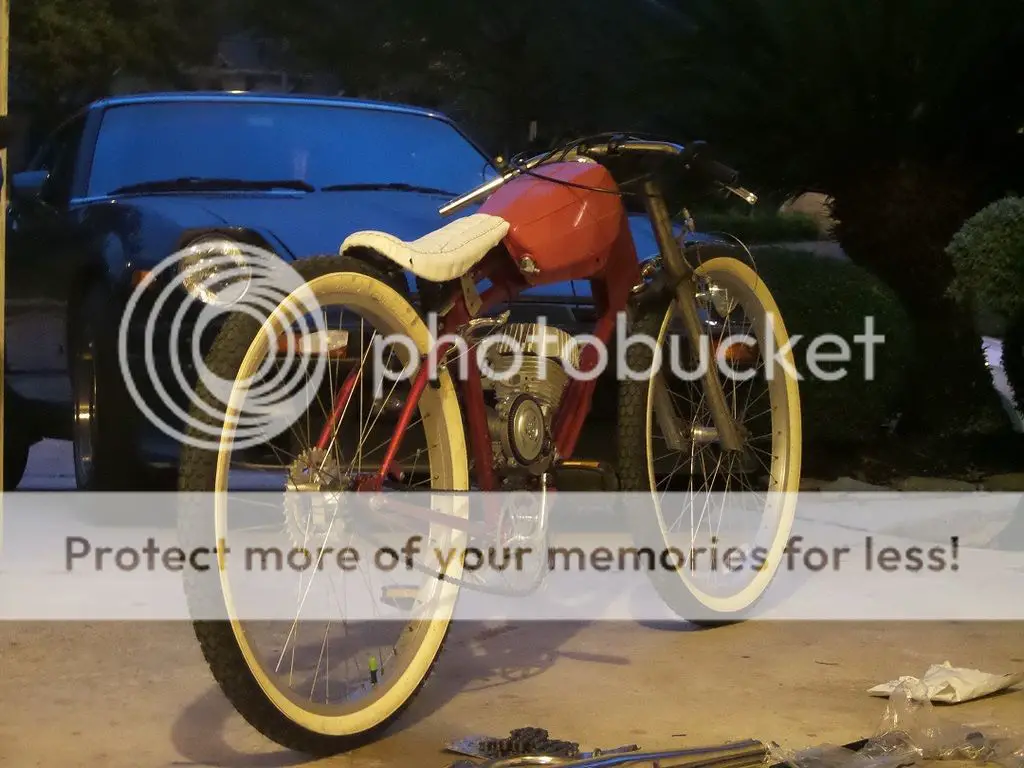
If you still have the coaster, I'd leave that in the rear. Front brake does most of the stopping anyways..just like a real motorcycle.
The coaster is washered for now so I can free spin the pedal backwards... But really reconsidering putting the coaster shoes back on.
 

MEASURE TWICE

Well-Known Member
Jul 13, 2010
2,744
1,219
113
CA
Got it about strengthening anyway you can.

I swapped in another fork that was for a 24 inch wheel with shocks on the front of my frame although it is a 26 inch frame. I use a 24 in front and 26 at the rear wheel.

I had to cut some of the head tube to have enough threads to hold the fork. This did not remove but about 1 inch so it did not concern me about strength. It is the tube that the engine platform sits on I wanted to transfer some of the load to the upper tube more directly.

I just know with my welder and only 4 amp power settings it won't adjust low enough not to punch through thin metal like at the head tube.

I can understand as you had tubes cut and welded back to the head tube, extra reinforcement makes sense.

I've never tried with my MIG 130 to use other than with shield gas AR CO2 mix, but I have some flux core wire which might work better for thicker metal and not have to make multiple passes. If it is possible flux core is less prone to punch through I will have to try one day.
 

caoboy

New Member
Sep 3, 2015
108
0
0
modesto
I just know with my welder and only 4 amp power settings it won't adjust low enough not to punch through thin metal like at the head tube.

I can understand as you had tubes cut and welded back to the head tube, extra reinforcement makes sense.

I've never tried with my MIG 130 to use other than with shield gas AR CO2 mix, but I have some flux core wire which might work better for thicker metal and not have to make multiple passes. If it is possible flux core is less prone to punch through I will have to try one day.
Flux core penetrates deeper than gas shielded, due to it running on DCEN rather than DCEP.

If you are running gas shielded wire, you should be able to go down to about 20-24 gauge sheetmetal, dependent on the size of your wire. You won't be able to run a 12" pass in one go, but you will be able to run 12 1" lengths.

check the inside of your welder door for a material thickness guide..it should get you in the ball park as how to set it up.
 

Ryoskate

New Member
Nov 30, 2015
58
0
0
Houston!
Got it about strengthening anyway you can.

I swapped in another fork that was for a 24 inch wheel with shocks on the front of my frame although it is a 26 inch frame. I use a 24 in front and 26 at the rear wheel.

I had to cut some of the head tube to have enough threads to hold the fork. This did not remove but about 1 inch so it did not concern me about strength. It is the tube that the engine platform sits on I wanted to transfer some of the load to the upper tube more directly.

I just know with my welder and only 4 amp power settings it won't adjust low enough not to punch through thin metal like at the head tube.

I can understand as you had tubes cut and welded back to the head tube, extra reinforcement makes sense.

I've never tried with my MIG 130 to use other than with shield gas AR CO2 mix, but I have some flux core wire which might work better for thicker metal and not have to make multiple passes. If it is possible flux core is less prone to punch through I will have to try one day.

I used a Harbor Freight 90 amp fluxcore mig man! Haha... And boy I'll tell you it was not fun. And like Caoboy said, Fluxcore is easier to burn through.

I checked the inside of the head tube and it seems like I had decent penetration so I'm not too worried. Once you get the setting right, It's manageable... But I wouldn't do anything thinner than 12-14 gauge....
 
Last edited:

Ryoskate

New Member
Nov 30, 2015
58
0
0
Houston!
Sanded the rim, cleaned it, and shortened the brake lines... Seemed to have done the trick, both sides pulls evenly now.

I had really long brake lines since I was just mocking it up, but the kinks that the line made the break not work well...

I still need to fabricate something to hold down the front calipers better. It's really janky.
 

MEASURE TWICE

Well-Known Member
Jul 13, 2010
2,744
1,219
113
CA
I take the throttle and brake cables and coat them with graphite powder. I take a rag or paper towel and put a little pile of graphite dry lubricant cupped in the towel. Then I take the cable end and put it in the graphite pile and close the cloth around the cable. I pull it through and get the cable end to end covered so much as to see the shine of the cable metal turn dull graphite color after at least three coatings. Then I put the cable into the covering and even in damp weather and freezing temps, the cables pull nicely.

Extra length is OK to a degree. Too short is a problem I would say. It is just the radius of the bends that matter really. In front of my handle bars I have the cables extend as much as a foot forward as to have a large radius bend. I don't have a basket for Toto, as I trail ride, so some extra stuff for break down safety I carry in a pack.

MT
 

Ryoskate

New Member
Nov 30, 2015
58
0
0
Houston!
Made a little something today.
Feel free to copy the idea if you like... I don't plan on producing anything I make.


Also made a tool to match the combustion chamber to the piston shape.


Reshaped combustion chamber... To the best of my abilities with the tools I have.


After clay testing, I got the squishband down to 1.2mm with the gasket on... So I try without any gaskets and ended up with .6, which was what I was looking for. However when I went to assemble the motor, it seems that I didn't get an accurate reading with the clay test, piston hit the head while hand turning the motor.

I put the gasket back on for now but I'm afraid it doesn't have a good contact surface with the puch head. I will have to re-check tommorow.
 

Ryoskate

New Member
Nov 30, 2015
58
0
0
Houston!
Spot the rookie mistake.


And yes, I had to tear down the whole motor over again.

Anyways, should I keep the Patina-Orange gas tank or paint it the same color as the rest of the bike? Decisions decisions...


Ryoskate

New Member
Nov 30, 2015
58
0
0
Houston!
Got a few days worth of pictures to share. It was a pretty lazy weekend.

Solely for looks, I decided to use a Puch exhaust / baffle for my motor.


Chopped to re-angle / lengthen some of the parts using the remains of my handlebar, it was conveniently the same OD. ID was slightly smaller but not by much.


End result. I grinded the welds for a cleaner look and to check for leaks. It's really pain in the arse doing this with a $100 Harbor freight fluxcore mig.


What remains of my handle bar...


Ryoskate

New Member
Nov 30, 2015
58
0
0
Houston!
I moved on to make the chain tensioner and realized that I could integrate the exhaust hanger.


Test fit. The chain clearance at the rear tire was very narrow... I was wanting to go with wider tires but seems like it'll be an extra hassle to make that fit. I'll stick with the tires I have for now. slotting the engine mounts seems almost impossible to do... What are some ways to bring the chain out a few more mm?


Last edited:

Ryoskate

New Member
Nov 30, 2015
58
0
0
Houston!
**UPDATE 1/3/2016** The cable end thing came off. Attemp at own risk.**
I didn't take much pictures since it was uninteresting but started work on all the cables and wires. I like to keep things as neat as possible so I trimmed the throttle cable by cutting, per usual, and then soldering on the ends with a little fondry/mold thing I made out of polymer clay and aluminium foil. Also note that the aluminium 1/4 twist throttle sold on ebay will not work with the cable that comes with the kit without modifications to the cable as seen here.


a little porous, but as long as the wire was heated enough, then it'll stay pretty good. I purposely did it to the throttle side as a "just in case" it comes off.


I also re-did the front brake mount .

 
Last edited:

curtisfox

Well-Known Member
Dec 29, 2008
6,048
3,955
113
minesota
Like the exhaust pipe look cool, can you flip the sprocket so the dish is out for more clearance?....................Curt
 

Ryoskate

New Member
Nov 30, 2015
58
0
0
Houston!
Like the exhaust pipe look cool, can you flip the sprocket so the dish is out for more clearance?....................Curt
No can do... It's one of those CNC hub sprockets and have tapered holes and bolts. I was hoping I could bring out the Engine side sprocket out a little more since it's a lot closer to the wheel it's self.
 

Ryoskate

New Member
Nov 30, 2015
58
0
0
Houston!
Got a really long ladies belt for a dollar at goodwill to make a cafe-racer style tank strap out of.


I really didn't take much pictures of the in between process because since it's quite boring. It was literally just cutting it to length and sewing it.


Ryoskate

New Member
Nov 30, 2015
58
0
0
Houston!
That is an awesome exhaust mod!

What model puch exhaust did you use?

Just one like this?

http://www.ebay.com/itm/Puch-Stock-...ash=item1c5b1cd526:g:ztAAAMXQ1ZhTerPH&vxp=mtr

(it looks simliar)

Pretty sure the baffle / tip part is all the same. I bought it on ebay myself as a "moped" exhaust, it was only later that I found out it was puch / its brands. The "header" part is probably different but You'd have to modify it to fit anyways. Now do be aware they are pretty long and somewhat heavy. Plumbing it to fit nicely on the bike was a pretty big pain.
 
Last edited:

Ryoskate

New Member
Nov 30, 2015
58
0
0
Houston!
Well, good news and bad news.
Good news is that it ran, and ran FANTASTIC.
I was so EXCITED that I completely forgot to take a video!. The large baffle and the exhaust really makes it sound like a machine rather than a toy or a weed-wacker.
It pulled a lot more than I could ever imagine (110lb 5ft tall kid with a 36T and 26"+2" Wheel / Tire... Yeah... It goes...)

But, After about the 5th time roll-starting the bike, this happened.


The force put on the bottom chain on a pedal start was a LOT more than I though, causing the thing to just bend like jello.


More things to work on!
 
Last edited:

MEASURE TWICE

Well-Known Member
Jul 13, 2010
2,744
1,219
113
CA
I had to think about this for a while, but understand now. The pedal start ia right side chain. Top tension on chain. Then from hub of wheel transfer to sprocket left side. Then chain is bottom tension trying to jump start engine.

Can there be a pull recoil start and engine idles with auto clutch?

The need for a chain tensioner, could it be eliminated?

Beefing up the metal welded to hold the tensioner and adding gussets somehow, is that something that is wise? What I mean will it take out something else as a result of one fix. I don't mean to be knocking what is already there, but do you know if others have had any issues with similar.

If you have picture to show how the chain with the tensioner is from front to back to see how aligned it is, I would be interested. What I mean does the idler wheel on the tensioner only keep the chain raised up and not guide away from hub sprocket.

Forgive me if I don't know much about the chain drive, I've always used v-belt and sheave. Chains I use are of very short length on jackshaft.

MT

Oh before I forget... really nice build... the gas tank... how you make custom cable ends!!!
 
Last edited:

Ryoskate

New Member
Nov 30, 2015
58
0
0
Houston!
I had to think about this for a while, but understand now. The pedal start ia right side chain. Top tension on chain. Then from hub of wheel transfer to sprocket left side. Then chain is bottom tension trying to jump start engine.

Can there be a pull recoil start and engine idles with auto clutch?

The need for a chain tensioner, could it be eliminated?

Beefing up the metal welded to hold the tensioner and adding gussets somehow, is that something that is wise? What I mean will it take out something else as a result of one fix. I don't mean to be knocking what is already there, but do you know if others have had any issues with similar.

If you have picture to show how the chain with the tensioner is from front to back to see how aligned it is, I would be interested. What I mean does the idler wheel on the tensioner only keep the chain raised up and not guide away from hub sprocket.

Forgive me if I don't know much about the chain drive, I've always used v-belt and sheave. Chains I use are of very short length on jackshaft.

MT

Oh before I forget... really nice build... the gas tank... how you make custom cable ends!!!

There were a few things at fault that I should have saw coming.

1 - Compression ratio has been raised to somewhere around 11:1 (It's a guesstimate. about 6cc combustion chamber) And because of this, the "pedal start" is a lot more violent and harsher on the bottom chain. Now, the head DID come with a decompression valve, which was the whole reason I bought this particular Puch head but realized that the hardware is missing and I can't seem to figure it out.

2 - The chain tensioner is more or less needed for clearing the rear-bottom left tubing. I made the engine mount intentionally low for center of gravity sake and this was the result.

3 - The tensioner was alligned, but the steel sheet I used wasn't thick enough to take the "pedal start", bent, tensioner went out of wack, and the chain derailed from the sprocket.

4 - The tensioner was too close to the sprocket, making it vulnerable for the chain to eat the sprocket. It seems the sprocket don't want any more than half the circumference covered in chain.

Tommorow, I'll make a new tensioner out of thicker material with a better design, this time, a short tensioner closer to the tubing and out of a square tubing for the sides to act as a gusset.