Reclaimed from the junkyard!

I am fed up with the kit supplied peanut tank, looks cheap and store-bought! (I think I actually just read that somewhere recently)

I took a trip down to the local motorcycle salvage. After speaking with the owner and finding the smaller fuel tanks, I chose this one

P1010444_zps902e30e5.jpg

P1010443_zps2bc7d662.jpg


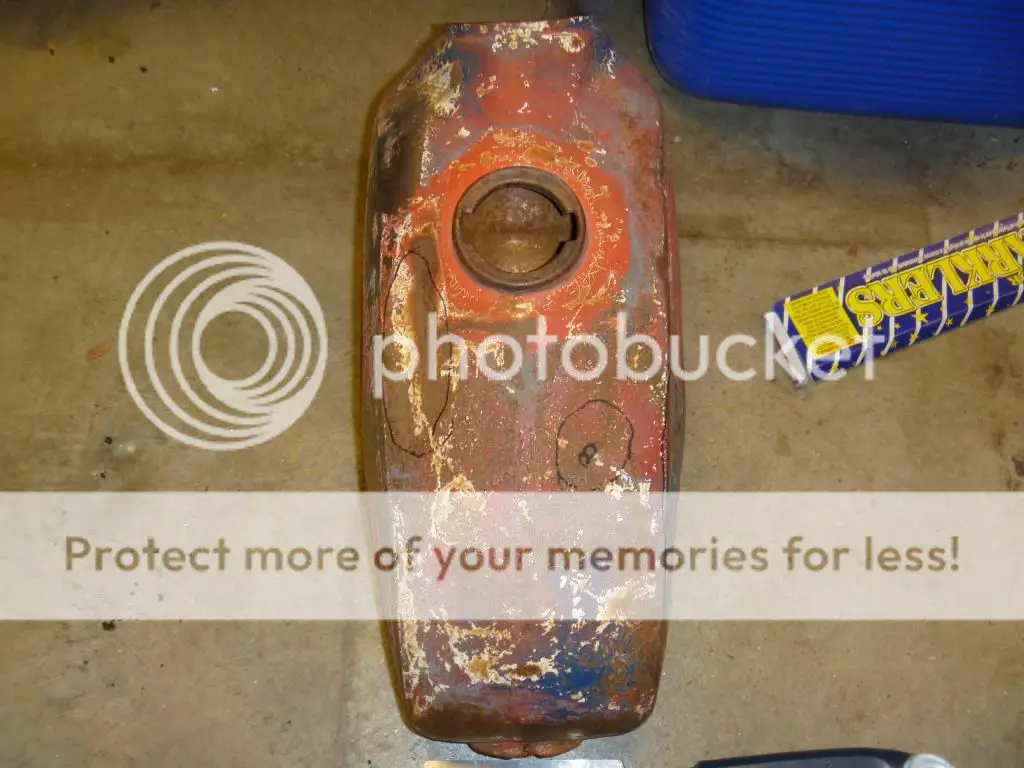
It belonged to a Yamaha JT-1 from the 1970's...

I noticed the light surface rust inside before purchasing and was not bothered by it a bit. OOPS!

P1010450_zpse24d68e5.jpg


Of course, after wire brushing the whole tank... I find about 50 total holes, after cleanup it looked more like a strainer. I didn't expect this but, I figure I can deal with this since they're not bad and I think of myself as a resourceful person...

P1010454_zps4f0a9492.jpg

P1010452_zps6cbf31a3.jpg


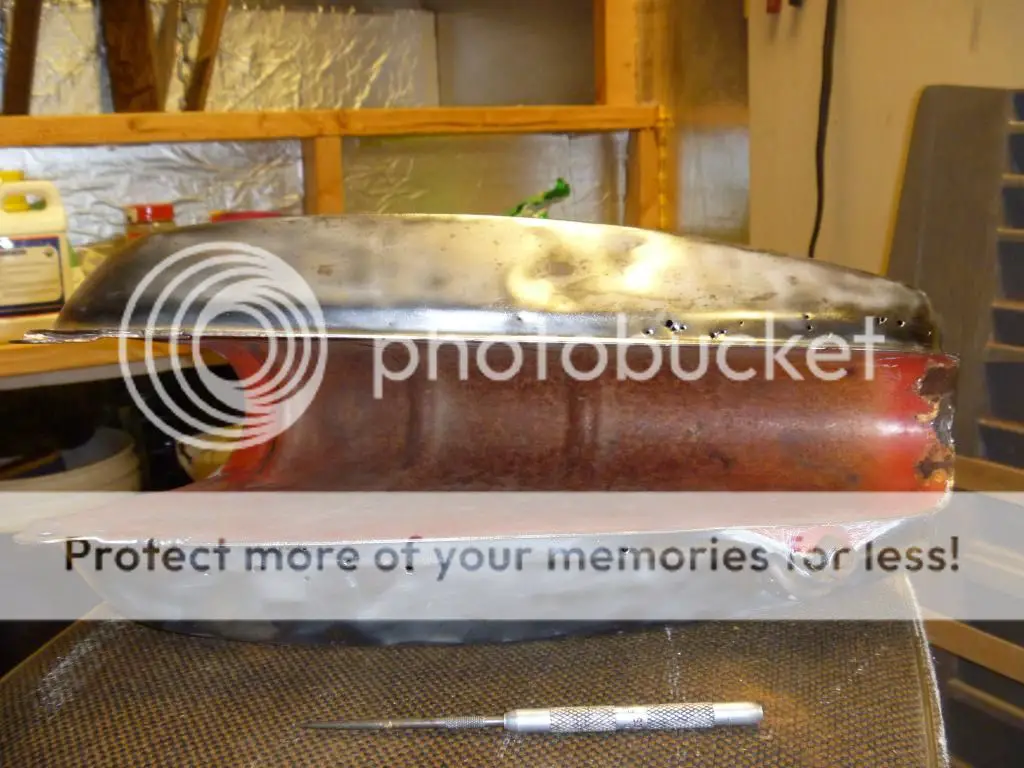
So this is what I ended up with, rolls of copper set into the holes as a filler to help the solder fill the holes.

I found that meticulous cleaning and preparation of the area to be worked helps a lot. Flux is the answer though, heat the surface with a torch and apply some flux. Heat the surface again and repeat, when the flux starts evaporating from the metal... apply the solder to the copper filler in the hole and melt some solder to it. You should see this hole and the copper start to suck the solder into the tank. When you see this, add more solder to the edges and make sure you have a solid connection between all of the metals. Grind down with a rasp/file and sand with a foam block or paper. Viola... DONE!
 
So, after getting a used petcock and tank lid I tested the tank and found no leaks in my new primer finish. I have only spent $20 bucks in total, this is the reason I did not do any Bondo or dent popping... besides, it'll probably rust out from under me in a year or two anyway.

P1010458_zpsa7af68d9.jpg

P1010459_zps446e231c.jpg


I'm going to do a Rust-oleum hammered black metal finish. I'll post pics soon!
 
Good restoration work. It's what the old guys used to do before chemical tank sealer came along. I hope it lasts you years. It should.

Just curious. Did you find that tank as Steele's? They're just off South Santa Fe in Englewood. I've bought several tanks from them. They usually don't keep real rusty ones and all their tanks are in pretty good shape. They have hundreds to choose from in their attic warehouse. They're a little pricy but $30. would get you a nice tank. A Yamaha MX 80 is a good choice. Last time I was there they had four of them.

I wish I'd known you were looking for one. I have a Baja tank looking for a home. No rust, no leaks.

Tom
 
Thanks Tom, sounds good. Someone else will probably buy it before I have the scratch, but that's ok. I do have a tank, just looking for a nicer one, but I'm sure I'll come across something eventually. Thanks anyway.
 
Rolls of copper?

Yeah, rolled thin sheet copper like a cinnamon roll... I don't mind a bunch of sharp spikes inside my tank!

Good restoration work. It's what the old guys used to do before chemical tank sealer came along. I hope it lasts you years. It should.

Just curious. Did you find that tank as Steele's? They're just off South Santa Fe in Englewood. I've bought several tanks from them. They usually don't keep real rusty ones and all their tanks are in pretty good shape. They have hundreds to choose from in their attic warehouse. They're a little pricy but $30. would get you a nice tank. A Yamaha MX 80 is a good choice. Last time I was there they had four of them.

I wish I'd known you were looking for one. I have a Baja tank looking for a home. No rust, no leaks.

Tom

Thanks for the compliment, I used to see cars restored with Lead a long time ago...

I actually got the tank at Ty's Motorcycle Salvage up here in Longmont. Truly didnt know I was looking for a tank either but, I was browsing!

As far as more tanks, I'll keep you in mind on my next build. This Baja tank however can go to Greaser if he wants it!

That was in rough shape, so many holes!
Looks great, any pics mocked up on the bike? How does the rear get held down?

Thanks... I'm going to mock it later next week, I believe I'm going to tap a hole in the backbone of the frame. Use a screw and small flange to hold the rear seam of the tank. The front is going to be a long bolt from Left to Right through the mounts with a frame clasp on the downtube.
 
Dents are good they add character to the tank ,sweet resto job mate ,if only I had a motorcycle scrap yard close I'd do the same ,nearest yard is some 40 miles away from my loc

Regards Hen
 
Alright, I fitted the tank... I'll tell this one in pictures!

At first this is what my bike looked like before!
P1010505_zps267544d6.jpg


I removed Mr. Peanut, after some fiddling I finally got it in position!
P1010507_zps40152bbb.jpg


I figure with some fine adjustment, it should be easy to make a bracket for this...
P1010509_zpsa54545ed.jpg


I also think a screw in the top-tube and a tab over the edge of the tank should be solid and not compromise the frame at all...
P1010510_zps0b584d44.jpg


Until you get to the petcock location... Couldn't be worse, I need to slide the tank back by 1" to get the front mount to work correctly! Spark plug is smack-dab in the middle of where my petcock would be. I can't move the motor around in this frame AT ALL, so that's out! The tank fits farther back on the frame but at that point, it might as well be a seat!
P1010515_zps650024d6.jpg


For now... I'm back to Mr. Peanut, I have to ride to work tomorrow!
 
Unless you're intent on using that petcock, you can replace it with a 90 or a 45 degree fitting and go with an in-line valve instead. Do you really need a 'reserve' position?

As for your idea for the rear mount, instead of just a screw into the top tube you could install a Riv-Nut. They should be available at most industrial tool suppliers. I typically use only a 10-32 Riv-Nut on the rear mounts for my tanks. If the front mount is strong the rear one just keeps the tank from bouncing.

Tom

Good suggestion on the Riv-Nut... I had never heard of one and since I have no welder; just became one of my favorite tricks!
 
Back
Top