Old dog learns new trick...Welding!

GoldenMotor.com

curtisfox

Well-Known Member
Dec 29, 2008
6,041
3,935
113
minesota
Maybe missunderstad Pro-15 makes a tank sealer. Its different from the rust coating.

Tank sealer is fairly thin and you have to roll the tank around for quiet a while to coat the intire inside then por off the exses. I don't think there is a problum with the bafflesnot that small of holes.................Curt
 

silverbear

The Boy Who Never Grew Up
Jul 9, 2009
8,325
670
113
northeastern Minnesota
Thanks for the suggestions. I did not want to keep on welding because I don't trust my welding enough to keep at it, keep grinding down smooth... maybe I will screw things up good that way. In spite of the thickness of the metal, I did blow through twice, but also got it fixed again.

Another thought which came in the middle of the night was sealing it up from the outside with solder. I might do some experimenting today to see if I can get solder to flow and bond.

The baffles (braces actually) are a concern, depending on how thick the commercial sealer is.

One thing I know. When I hear people complain about how much it costs to buy an in-frame hand made tank, I want to tell them they have no appreciation for what is involved. I think that Sportscarpat's tanks are a bargain for what you get. Stainless steel no less. That guy is good.

I'll let you know how the solder goes.
SB
 

silverbear

The Boy Who Never Grew Up
Jul 9, 2009
8,325
670
113
northeastern Minnesota
Norm,
That's very generous of you!
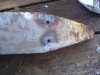
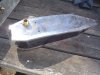
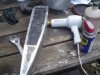
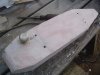
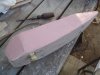
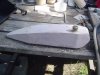
I did some experimenting today with solder, trying both lead/tin with regular flux and antimony with it's own flux, in different areas of the tank. It's strange, but it started pretty well, flowing along a line and seemingly bonding well with the steel. Then it went poorly with the soldr refusing to flow. I suspect it may have had to do with too much heat. The steel is too demanding for my soldering iron as it is so thick, so I was using a propane torch and it is difficult to control the heat. What might be the right flame in the beginning becomes too much as the heat spreads through the metal.

I also knew there was a risk of the tank becoming hot enough to melt the solder at the bung and petcock, which proved true for the petcock. I had to re-solder it. Someone with a real touch for this might be able to pull it off. I suspect Tinsmith could do it, but I'm no Tinsmith.

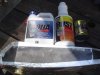
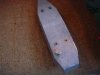
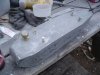
So, tank sealer it is. I've thought about the braces blocking flow of gas from one section to another and if that happens, then it happens, but it may not. If it does, then the tank will hold less fuel, but still plenty as both bung and petcock are in the main central section. Norm, your offer is both timely and kind. I thank you sir.
SB
 

2door

Moderator
Staff member
Sep 15, 2008
16,302
175
63
Littleton, Colorado
SB, We're all real proud of you and your work. You're the kind that keeps this hobby evolving and show what can be done with a little imagination and perseverance. The tank and the bike are awsome.

Here's a link to KBS Coatings. I've had good luck with it on a couple of motorcycle tanks and it is advertised as being compatible with ethanol fuels.
http://www.kbs-coatings.com/ Good Luck and keep us posted.

Tom
 

silverbear

The Boy Who Never Grew Up
Jul 9, 2009
8,325
670
113
northeastern Minnesota
Thanks for the input, you guys, and a special thanks to Norm of Venice Bikes who kindly offered me a bottle of Kreem sealer. I did some research today on the internet and found mixed reviews on Kreem, some saying it will not hold up to ethanol and others saying they've had no trouble with it. I decided not to chance it

I've used a POR 15 rust control kit on a rusted out Suzuki Samurai some years ago with great results and considered purchasing their tank seal kit. I also read some sterling recommendations for the KBS kit. in the end I decided on the KBS kit and just now ordered it for $48.00 with shipping. (gulp). I only want to do this once and be done with it. The kit is supposed to ship out tomorrow so I'm hoping to have it later in the week and the deed done by next weekend. Then on to prep for primer, gloss black tractor paint and follow that up with tractor clear coat. I'll allow whatever curing time is recommended so I may not have this tank on the bike until the end of June.
Norm, once again I want to thank you for your kind offer. It will not be forgotten.
SB
 

silverbear

The Boy Who Never Grew Up
Jul 9, 2009
8,325
670
113
northeastern Minnesota
The gas tank sealer kit arrived so I got to work on my project. The tank was already showing some rust from where the soldering flux was. I cleaned it up with the side grinder fitted up with a flap disc.

Instructions in the kit suggested using duct tape along welds to temporarily seal it up while using the chemicals. I use the actual metal kind of duct tape (known as Indian chrome on the Rez where it is used to patch holes on reservation cruisers. Works good and shiny, too). I like to use this stiuff to line the inside of bicycle rims to protect the inner tube from spoke nipple abrasion. For that I cut it half width, which is also what I did for this application.

Now the weld areas are covered and we're ready to go...
(cont.)
SB
 

Attachments

silverbear

The Boy Who Never Grew Up
Jul 9, 2009
8,325
670
113
northeastern Minnesota
The kit has three parts.

First is a wash to remove residues of any kind that might be inside the tank. In my case about all that would be inside the tank to get rid of would be oils from handling the metal and flux form the attempt to solder it up. While this solution (mixed one to one with hot water) is inside the tank you have to rotate and make sure that all surfaces keep wet with this cleaner. If this were an old gas tank with rust inside one might put nuts inside to help knock flaking rust loose. Then you pour it out. With a rusty tank you might need to repeat this until what you pour out is clean. In my situation once was enough. It gets rinsed thoroughly. Then it has to be dried. I used a hair dryer to blow air inside the tank to speed up the drying time. After holding it by hand for awhile, I realized I could position it so that the dryer could do it's stuff without me holding it.

Second is an acid etch to prep the metal and further remove rust. You have to stay with this turning and rotating the tank for at least a half hour and better yet an hour. Tedious, but if it works then it is time sell spent trying to do it right. Rinse thoroughly with water and they emphasize that the tank must be absolutely dry or the sealer will not bond properly.

Third is the actual sealer. You mix it up with a mixing stick provided, wear rubber gloves to protect your hands and pour in the whole contents of the little can. They say that once it has come into contact with oxygen you can not pour back what you didn't use and save it, so pour it all in. I did and was religious about rotating it and making sure that the coating got into every nook and cranny. You do this up to a half hour and then pour it out.

The instructions say that you can also paint the excess you poured out onto the weld seams from the outside. I figured it can't be saved anyway so what the heck. I removed my duct tape and painted the seams... then repainted the seams and then decided to just paint the whole outside and keep doing the seams until the stuff hardened up. So, this may be a little unorthodox, but what's to lose?

Today I sanded down the drips and runs, more or less smoothing it out. Not shown is the coating of Bondo auto body epoxy now drying on all four sides of the tank. I did one coat and when dried I sanded it down and applied another coat to help fill in where I missed the first time around. This will get sanded down, too and I'll keep filling until I have a nice surface ready for paint.

If I were a good welder I wouldn't need to use a tank sealer, but I'm a newbie and thankful that a good sealer is available. This stuff dries very hard and smooth like ceramic. It should be good; the kit cost $48.00 with shipping.
SB
 

Attachments

2door

Moderator
Staff member
Sep 15, 2008
16,302
175
63
Littleton, Colorado
Wow, SB, I never considered painting the outside of a tank with the KBS. It might make one heck of a paintable surface. I spilled some on my garage floor and it's still there, hard as a rock and nothing seems to have any effect on it. I also poured a little of the leftover into a crack in my driveway where ants kept coming up. Almost two years now and no ants. :)

Keep the progress coming. We're all watching.

Tom
 

fasteddy

Well-Known Member
Feb 13, 2009
7,440
4,877
113
British Columbia Canada
Thank you for the first hand report. How did the sealer that you painted on the outside sand down?
I'll use it in the tri-car gas tank when the time comes.

Looking forward, along with everyone else to seeing the tank finished and mounted in the bike.

Steve.
 

silverbear

The Boy Who Never Grew Up
Jul 9, 2009
8,325
670
113
northeastern Minnesota
Tom,
I'm expecting no ants with this tank and sure do hope it holds gas. I see in their literature that they have a paint kit for hot rod and motorcycle frames, either brush on or can be used with a spray gun and is supposed to flow nicely and give a rock hard surface. They also have a diamond clear coat of the same stuff. I was thinking that a bike painted with that would last forever. Their clear coat can be used directly on bare metal. I've always liked the look of a frame stripped down and showing the brazing, etc. That would be cool to have a clear coated bare metal surface for a real "I am a machine" look without ever rusting away on you. I like their products if not fond of their prices. I guess you get what you pay for.

Steve, I didn't try sanding it with a palm sander and sand paper, but I don't think it would tend to gum up the paper. It is too hard for that. I used an old flap disc so it would not be too aggressive and it took awhile to get drips and runs smoothed out. I didn't try to get real smooth as I was figuring to use Bondo to get a good surface. I wanted to leave as much of the sealer as possible on the welds. Even so, I sanded down to bare metal in a couple of spots. (Please don't leak!) Like Tom, I have some of the sealer on the work table surface that I suspect will be there for a very long time. Seems like good stuff.
SB
 

MEASURE TWICE

Well-Known Member
Jul 13, 2010
2,741
1,211
113
CA
About that acid wash I was wondering if the stuff used for copper circuit board etching would be OK to use. I don't want to buy more stuff like the muriatic acid for pool ph adjustment if I have other stuff just as good.

I have a bottle of circuit board etchant (ferric chloride I think) and when done can rid of it by bringing to the Hazardous Household Drop Off Day for free for residents in the county where I live.

I know that using the opposite of acid alkaline in a weak form like baking soda and water wash was used on battery exterior to neutralize any seepage on the older batteries that were not sealed. I used to measure the specific gravity with the hydrometer for charge measurement with the removable caps back then. Anyway I'd use a neutralizing wash after the etch and then rinse with plain water a lot.

I want to get chrome plating off metal so I can weld sheet metal without that contaminant messing with the steel or stainless steel.

MT
 

silverbear

The Boy Who Never Grew Up
Jul 9, 2009
8,325
670
113
northeastern Minnesota
2door,
I checked the leftover sealer still in the small can and it is still fluid. So, it can be stored at least for a day or two, which meansthat you could do a nice job of painting it on one side, allowing it to setup and then painting the next side, etc until the whole tank was painted. The instructions made it sound like it would harden in the can in no time and not to leave the lid on the can. It's outside and I don't listen to instructions very well anyway. If I ever do another I'll paint the exterior and try to do a nice job of it.

My neighbor stopped over this afternoon to see what I've been up to and was looking at the tank as I was sanding on it. He flies float planes for a living and has used the same sealer with success on his planes. So that's good.

Photos show the Bondo goobered on to the tank and then the last shot shows it after some sanding. It will get another thin coat this evening to fill what was missed, then sanded again and if need be, more Bondo. It is best to apply the Bondo when it and the tank are cool, and not in direct sunlight as you need for it to spread evenly and there is little time before it sets up and no longer wants to spread. So, mix small batches. Tomorrow i hope to have it ready for primer. I'm also doing a little body work with bondo on the front fender and filling a dent in the front of the sidecar. Good stuff, Bondo. I even like how it smells. Ha!
SB
 

Attachments

2door

Moderator
Staff member
Sep 15, 2008
16,302
175
63
Littleton, Colorado
SB,
When you've sanded the plastic (Bondo) you'll have little pin holes. They are inevitible. I like to use a finishing putty. It has many brand names, I use 'Icing' made by USC. It is pourable and brushable and sands easily. It will fill all those minor imperfections and make the part ready for primer. I use a heavy fill primer too. It will also hide some of your sins. Sand, sand then sand some more starting with 280 or so, increasing the grit number down to at least 400 and even 600. Sand between coats, preferably wet sanded and then shoot the color sanding it between coats until you're ready for the clear coat.

Good luck. Keep us informed.

Tom
 

silverbear

The Boy Who Never Grew Up
Jul 9, 2009
8,325
670
113
northeastern Minnesota
I have some of that I purchased at NAPA... don't know what brand, but the putty stuff is red. Can I find it? No. I'll look some more tomorrow. Gave it another thin coat of Bondo this evening. Should be getting close to done with Bondo.

And now back to a welding question. I was done riding the Panther today and noticed something shiny on the frame... good Lord, the chain has been rubbing against the frame ( I forget what you call those frame parts, seat stay and chain stay I think) and worn a good bit of it away. I have a problem, not just in what caused the chain to rub in the first place. It didn't used to. I admit, I just get on this bike and ride it hard. It always starts, always rides nicely and I neglect it. I've been anticipating a makeover at some point and I guess now's the time.
This is serious. The frame is still sound incredibly, not that it would be much longer.

I took the bike completely apart this evening. They sure come apart quicker than they go together. Can I build this metal back up by welding it? How should I go about that? Do it in layers and grind it down some between layers of weld? A real welder could fix this. Fasteddy would flip that welding helmet visor down and just go at it. Am I in over my head or is this doable? Anyone's suggestion is welcome and appreciated. I'm still flux welding, no gas yet.

I considered not sharing this openly here on the forum. It is pretty humiliating and I'm ashamed of myself that I let this happen. But it is what it is and I am what I am. Now I want to fix it to make it right again. Once repaired the bike will get new paint, new leather for the seat and apologies for abusing an old classic. And of course it will have a new gas tank. I set it in the frame mid way in dismantling just for a look to cheer myself up.

I could have gotten seriously hurt if this went on much longer. It's kind of funny, but when I ran China girl motors I was all the time checking everything, half expecting something to have gone wrong. With these four strokes they just keep running so I have gotten complacent and don't much check anything. No more. Regular checkups!
SB
 

Attachments

tooljunkie

Member
Apr 4, 2012
663
5
16
Manitoba,Canada
very nice.i see your patience is paying off.
if you find your filler hard to sand,like some of the polyesters,a finer paper will cut better.
i prefer to work the filler as soon as its cured,the longer you wait,the tougher it is to rough in.
not that its necessary in your case,but i have made a bow out of thin plywood for working curved surfaces,it works very well.
working with the sandpaper in a criss cross pattern yelds a nicer end result and using a foam block on the paper will give a better finish also.
if i have pinholes in my filler,i will open them up with my knife so next coat fills the hole instead of closing it.

that wear looks kinda scary.
iffn it was me,i would clean it,remove the thinned parts with a small file and carefully tack weld,or very small short welds,cooling it with a rag after a couple tacks.if you could find a rod to insert into the gouge and weld it in,it may be another way to tackle it.it would give you some backing to weld to.heating the frame too much will weaken it or at least make it brittle.unless it could be re-tempered after welding was done.

you need a piece of a similar frame to practice on.
good luck.
 
Last edited:

bairdco

a guy who makes cool bikes
Aug 18, 2009
6,537
264
63
living the dream in southern california
silverbear, if that was my chainstay, i'd fill in that spot with as many welds as it took, then grind it smooth, then find a piece of pipe that fits over it, and weld a "sleeve" over it.

then, i would solve the chain rub problem someway.

either weld a chain tensioner/guide on, or re-position the motor. (you can weld now. you can make your own mounts and stuff!)
 

Allen_Wrench

Resident Mad Scientist
Feb 6, 2010
2,784
26
36
Indianapolis
Lookin' good, SB. I haven't reached the point of welding steel (yet). I'm getting rather practiced at brazing brass and aluminum. They may be two different methods, but neither is easy if you want quality results. I think you've done well here.