My fourth build

CTripps

Active Member
This is my fourth build.

I started with an "Extreme" 'MTX 757' mountain bike.
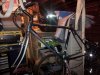
The motor is a 66cc that I had prepped and put aside for a different build a while back. By 'prepped' I mean that it's been apart, had any junk and manufacturing waste cleaned out, ports smoothed out.

The bike had 36-spoke wheels to start with, so mounting the rag joint was pretty straightforward. I did have to open up the center hole of the sprocket a bit for it to sit nicely.

attachment.php
 

Attachments

  • 20131101_171207.jpg
    20131101_171207.jpg
    159.3 KB · Views: 182
  • 20131101_171124.jpg
    20131101_171124.jpg
    149 KB · Views: 174
The frame has a 1 3/8" dia. downtube. The problem I encountered is that the front motor mount (molded into the lower) is built for 1 ¼" downtubes. Solved the problem by opening up the mount by 1/16" each side. I left the factory studs in the holes while working on it to prevent doing any damage to the holes. I replaced the studs with good steel afterwards.

picture.php


Overall it came together pretty nicely. I had to file the holes in the muffler bracket a little to change it's angle, but that was the only problem encountered related to the cranks.

picture.php


The bike itself needed very little. I learned how to repack bearings on the front wheel of this one. It looked and felt like someone had done a lot of deep-frying near the front hub. It was covered in an old, sticky, greasy residue. Inside there were thick globs of the same junk. Once cleaned up, I packed all the bearings and put it back together. Spins smoothly now. (Yay, me. ;))

I refitted the CDI with a decent wire and boot, and installed an NGK plug. Rplaced fuel line with some decent line, too.

The petcock I installed in the tank leaked like a sieve, so I had to change that out. I'm going to have to try another gasket on the petcock though. When tight the lever is underneath it, almost against the crossbar. Not the easiest place to work it.
 
So, I took it out for it's first start up on Saturday, and it's alive!

Today I'll solder the wiring connections, seal the magneto and see if I can find a kickstand for it in the parts bin.

picture.php


If I've done this right, this link should lead to a 47 second clip. This is less than five minutes after it first started, I haven't adjusted anything yet.


So, just a short'n'basic thread.. so far, anyway. ;)
 
It's cool the way you machined the front motor mount for a better fit. That frame seems well suited for motorizing.
 
The engine sounds very sweet. Something I'm curious about, - does the label with the EPA information on it have to be permanently attached to the engine or can it be removed?
 
It's cool the way you machined the front motor mount for a better fit. That frame seems well suited for motorizing.

Thanks. It made a lot more sense to me to do it that way to fit the motor, rather than using an adapter, since the difference was only 1/8" to make it fit. The frame feels nice and solid, without being very heavy.

Boy, that's running nicely. Bike looks like it will be a joy to ride.

Steve.

The engine sounds very sweet. Something I'm curious about, - does the label with the EPA information on it have to be permanently attached to the engine or can it be removed?

It should sound even better after it breaks in a bit. It feels like it wants to be quick. I've only had it up and down the back lane and idling on it's kickstand so far, but if it's nice enough tomorrow I'll take it out for a shakedown.
The label could be removed easily. Just a gentle warming with a heat gun or even a hair drier will soften the adhesive and it will lift right off. I forgot to mention, actually, that I had to remove the colour label on the seat tube as it was too chewed up by the lock holder being jammed on it to be worth saving.

I'll be walking around with that 'builder's grin' we all get for a week.
 
It sounds good and looks great! The more you ride it the longer that grin will stay on your face. I like the feeling one gets after a successful build. You definitely deserve it.
 
The test ride went well. I was right, it wants to be quick. According to the GPS speed, it jumps to 30 kph before you've gone two car lengths.

My usual ride around is a 26 km (16 mi) route. For the first leg, I tried to keep it around 30-35 km/h (18-21 mph). It wanted to go faster. It climbed the bridge smoothly both ways, from Van to Richmond and back. For the next leg, I ran it around 40-45 kph (25-28 mph) and it was very happy. This is where it wanted to be before. I let it build up as it was ready for it from there on the long flat run, and it settled at 55 kph (34 mph) and ran steady.
I pulled into the Canadian Tire, locked up and grabbed another bottle of 2-stroke oil, unlocked and it fired up as soon as the clutch lever was fully released (had been sitting for about 15 mins, no drips on the ground). It ran well all the way home, and even made it up the steeper hill from Kent St. to Victoria Drive without bogging out. (Click on the thumbnail and it'll give you an idea of the climb)

Kent to Victoria 3D.jpg

picture.php


picture.php
 
Love the enthusiasm! I feel like those of us who have been doing these gems awhile sometimes lose sight of the sheer fun they are! I get so wrapped up in what the market wants and will it sell that I forget WHY I do this.
FUN!
Selling them just finances my addiction to machines that make people grin.
:)
Sounds like you got a good engine there ctripps..I've had a few like yours that just felt snappy right from day one! Consider dropping to a 36tooth rear gear and adding a tuned pipe for mid-range torque. You won't be disappointed!
 
Back
Top