Indian Tadpole

GoldenMotor.com

fasteddy

Well-Known Member
Feb 13, 2009
7,475
4,962
113
British Columbia Canada
The tri car part of the trike did indeed get painted and the bike frame was done today. I feel that the two of them turned out well for being painted with a rattle can and black at that. Black is infamous for showing up every imperfection for those that haven't used it. I always heard that is why so many hot rods were painted bright colours. Only the builders that were really sure of their work used black.Probably a rumor but every bodyman I worked with took extra care when a car was painted black.
Me? I don't give a $%*# and the fenders and rims were painted black anyway. Black was one of the colours available in that year also.

I don't have any photos yet of the exquisite paint work but I plan to put the bike together in a couple of days or as soon as the bike frame hardens up some more. Nothing like looking down and seeing your finger prints in the "dry" paint.

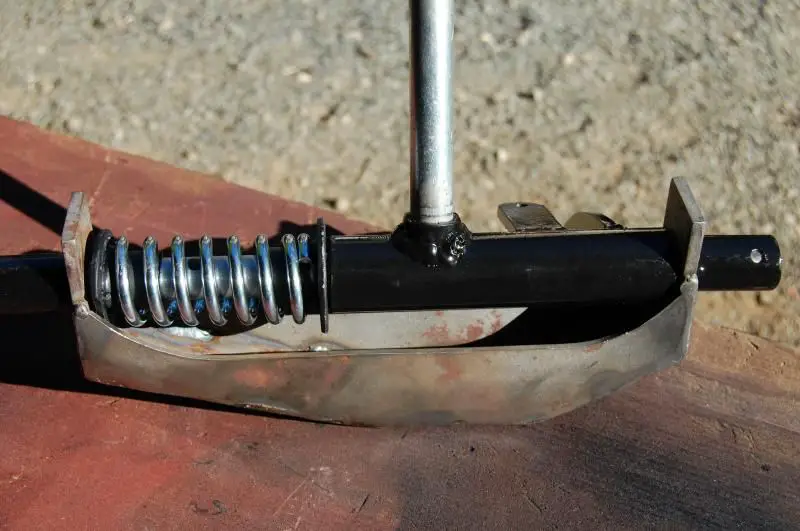
Made up some spring holders to center the springs on the king pin. The hole in the spring is 1-1/8" and the king pin is 3/4" so the spring slopped around quite a bit and tended to jam on the spindle. The "top hats" centered on the king pin being 3/4" inside and the outside of the tubing is 1" so it left a little play in the spring spacing so they won't jam and bind.
I used a lighter, smaller diameter washer on the top of the spring and cut notches on both sides so it slid into the spindle holder at the top. A heavier, larger diameter washer was used on the bottom since the spindle and the whole bike will ride on it. I'll use either an Oilite or Teflon washer top and bottom of the spindle to make steering easier.

Steve.
 

silverbear

The Boy Who Never Grew Up
Jul 9, 2009
8,325
670
113
northeastern Minnesota
Sometimes I joke that by the time I'm done on a project I'll know how to do it, but when it is new territory that's how it is. You just don't know, make some guesses and some of the guesses turn out right and others need to be scrapped or tweaked some. If you do build another tri-car the next one will be a whole lot easier. I know you've done a lot of creative staring and brain storming over that tri-car front end. Now you're an expert! Bet that black paint looks sharp...
SB
 
Last edited:

fasteddy

Well-Known Member
Feb 13, 2009
7,475
4,962
113
British Columbia Canada
Hi Silverbear,

Lay awake more than one night going over in my mind how to do something. Had a pen and paper beside the bed because the answer wouldn't be there in the morning without it.
Those golf cart front axles we bought are going to figure prominently, I'm certain, in any future builds. Of course that's no guarantee as you well know. :) Mr Fingers just can't leave well enough alone.

As I said I'm really please with how it's turning out and for the first time I'm excited about the build. Hoping that by Sunday it will be together with just the upholstery and gas tank left to do.

Yes, that is so true. Once the bike is finished you do know how to do it but then you've done it and the new challenge presents it's self and we charge off in pursuit. I just can't help but try to lead the charge. I seem to have this need to find out why wise men fear to tread there.

Steve.
 

fasteddy

Well-Known Member
Feb 13, 2009
7,475
4,962
113
British Columbia Canada
Well fellas, your both close to what's up. No rain though. For once it's been super hot and sunny for over two weeks. Hot here in the area I live in is 75F with a nice ocean breeze. Now it's been as high as 90F without a whisper of a breeze but the last two days it's been upper 70's and the breeze is back.

Yes, I feel sorry for me as well. :)

I have however, been super busy. The front end is on the bike and set up. Had to modify a lot of it since the spokes and rims weren't on the hub when I set everything up. Had to put spacers in between the hub on both sides so that put everything out and required everything to be moved accordingly.
Almost a full day on each side to get it right.

I was going to use freeze plugs that go into car blocks as the spring holders to hold the springs in place. I then switched horses and made my own using washers and some 1" tubing that went up inside the spring. The washers made a wonderful tinkling noise as they hit the spokes as they went by. Hence the spacers that I had to put in to clear the washer/spoke problem.
I ground the washers down but they barely cleared so it was time for spacers.

The Caswell tank sealer arrived Monday and with luck I'll get it sealed this week end and primed. I have the decals for the gas tank as well. Really great looking. They came from a company in Britain called Classic Transfers. I found them on Google. A first rate company run by a husband and wife team. I ordered them Monday afternoon and they were here Friday at 11am when the mail was delivered. Fantastic packaging and they included a spare piece of the material they used to make the transfer so you can put it on a piece of painted metal like you are using and clear coat it to see if it lifts when you do. Instructions on how to apply the decal are included as well. I'll post photos of it all tomorrow.

They have both water transfer and vinyl decal depending on what the maker used for motor bikes and motorcycle from all over the world. Well worth a look to see if they have yours.

The cost was just under $21.50 delivered. They only accept credit cards.

I was able to find an upholsterer who covered some buttons for the seat today. Thirty buttons covered in my material in 15 minutes for $33 with tax. I'm a happy man. :)

There will be detailed photo's tomorrow evening.

Steve.
 
Last edited:

fasteddy

Well-Known Member
Feb 13, 2009
7,475
4,962
113
British Columbia Canada
As promised here are some photos. I put captions as to what everything is on the photos. They're on the bottom so you may have to scroll down to see them.

The gas tank is in the works tomorrow. It will be interesting to see how bad it leaks before the sealer stops them. Next week will be the seat.

After rolling around on the garage floor for three years I finally had a WTF moment and remembered that there are two folding saw horses in the wood working shop. Really miss sitting on the roll around stool with my chin stuck between my knees trying to see what I'm doing.

Steve.

 
  • Like
Reactions: Nightster

curtisfox

Well-Known Member
Dec 29, 2008
6,082
4,056
113
minesota
THAT IS REALY TURNING OUT BEAUTIFULL. AWESOME! Amayzing waht a little paint will do after all that hard work,gets it all one color ..............Curt
 

fasteddy

Well-Known Member
Feb 13, 2009
7,475
4,962
113
British Columbia Canada
Got the tank lined today. They were very specific about the working temperature and even being very careful I was just able to get it lined and after pouring out the excess, the excess was setting up. It was really hot when you held the container so it wasn't happy about something.
Mix was right on as far as I could tell. Sure went through the leaks in the seams nicely. Pretty much had seam problems where I thought they were. Should have called in the team of Tinsmith & Silverbear to build it. Maybe the next one.

Tomorrow I'll sand it up a bit and prime it and smooth out the dents where the piece of fender that I used to form the top bent in as it was clamped down. Shouldn't take any more that a quart of bondo. :)
Also I'll get started on the upholstery for the seat. The last words are,"This shouldn't take long". Really shouldn't though since once the buttons are done the rest is putting the liner into the seat and tacking the cover to the seat it's self.

Early in the week I hope to get the motor in the bike and start it. Try and get a video if I can.

That's All Folks!

Steve.
 

fasteddy

Well-Known Member
Feb 13, 2009
7,475
4,962
113
British Columbia Canada
Hi P.S.D.,

I used the Caswell kit. First tank I've lined and I was very impressed with how easy it was to use. 2 Door recommended it as the only one to use and Silverbear used it and found it very good.
I'm certainly happy with the results as well. I'll recommend it to everyone.

Steve.
 

fasteddy

Well-Known Member
Feb 13, 2009
7,475
4,962
113
British Columbia Canada
I have the upholstery in the back of the passenger seat of the tri car done. I'll get the seat bottom done tomorrow and it will be finished.
I did a few seats when I was restoring horse drawn equipment and the owners didn't want to pay the professional upholsterer I used to do them. What made this one interesting is that it a 1/2 barrel shape and not flat. Not perfect but the person sitting in it will never notice.

I still have to put brass upholstery tacks around the top and down the arms of the seat to cover the staples and then trim off the excess material around the tacks. Would I do it again? In a New York minute but now it's fresh in my mind, not 40+ years in the past.
The velocar will probably have the same kind of seat I'm sure.

Steve.


silverbear

The Boy Who Never Grew Up
Jul 9, 2009
8,325
670
113
northeastern Minnesota
That seat is going to look great on the tri-car. You have a lot of things coming together.

Regarding the tank liner, you have me mixed up with some other Silverbear. I used a liner from KBS Coatings that was easy to use and did a good job. This was for the steel American Flyer gas tank. The Indian Hiawatha tank made of copper did not get a liner.

Once the engine is in place, the gas tank is mounted and that seat is, too, it is going to be almost all the way there... do you have the clutch from Rick yet? That's about all there is left to do, isn't it?
SB
 

fasteddy

Well-Known Member
Feb 13, 2009
7,475
4,962
113
British Columbia Canada
Thanks Silverbear. I'm glad to see the seat done and I'll be even happier when it's on the bike.

I remember now you mentioned it that Tom recommended the Caswell kit but you has already bought the other one. I won this round since it was new but the Caswell instructions say to put a hand full of sheet rock screws in the tank and shake it for a few minutes to clean any rust off the sides and to rough up a plastic tank so it adheres better. Wash it out with a pint of lacquer thinner or acetone and let it dry and then mix up the kit and roll it around to coat all the surface in the tank for about two minutes and pour it out.
It stuck to every thing quickly and well from what I can see in the tank. They are very specific about time and temperature and as I found out for good reason. You just have enough time to coat the tank. No rolling it around for twenty minutes. Tape any seam or holes to prevent leaks.

I'm going to order parts to make a made a quick drive line since Rick has his hands full being that it's summer time. I'll address pedal starting in the fall when things slow down for us all.

Steve.
 
Jul 15, 2009
594
1
0
waukegan IL. U.S.A.
I've had real good luck lately with the casewell stuff ,only downside is the cost...it would be cool to see a side by side test of the copule tank treatments out there.

The indian looks amazing ,just better with every photo (john and i are impresed for sure) and every one who see's me checking it out always ask a million questions.
Keep after it and you'll be in the wind in no time...
 

fasteddy

Well-Known Member
Feb 13, 2009
7,475
4,962
113
British Columbia Canada
Hi P.S.D.
This was the first tank I did but when Tom recommended it I went with it. I'm sure he has been through quite a few different tank sealers or knows people who have had problems with different ones. He also has built street rods and has a lot of friends who have so the word about good and bad spreads pretty fast.

What I like about the Caswell kit is there isn't three of four steps to get the tank ready. Shake the drywall screws around to get the tank ready, wash it out with lacquer thinner or acetone to clean it, let it dry and coat it. It coated so easy that even I got it right.
Some landed on the garage floor and I can vouch for how hard it is to get off the concrete. I hit it with a 3 pound hammer and it didn't mark. Used an old wood chisel and it had all it could do to get it to move and there is still some there that isn't coming up unless the concrete does.

Yes, the cost is stiff. They do have a good deal if you buy 6 kits so if you can pool enough people together to buy them you are OK.

I'm pleased that you like the way the build is going. The feed back is always a great help since I'm so close to it that often I don't really see how it looks.
Didn't get the seat bottom done today like I had hoped. Couldn't find the decorative brass nails anywhere so I went to an upholstery wholesaler and bought a box of them. I have about 850 of them left if you need some. :) They were 1,000 for $20.00. By the time I got home and did the nails on the seat back and arms it was to late to do the seat.

I'll try and get photos tomorrow.

Steve.
 

RicksRides

Member
Feb 22, 2012
864
6
18
osceola IN
Steve, I only use caswell on older tanks on the tanks I build new I use Redcoat it only runs 25$ a quart and does a great job.
Just a FYI for you, Rick.
 

fasteddy

Well-Known Member
Feb 13, 2009
7,475
4,962
113
British Columbia Canada
Thanks Rick. I looked it up and I can buy it here in British Columbia. That sure cuts the shipping down.

It will be a while before I do another tank but I have the information book marked.

Steve.