PeteMcP
Well-Known Member
Holy cow, 11 quid is just $15.71... is it real brass???? That compass will almost give it a steampunk look.
Yep. Real brass. India can still make anything in metal. They haven't jumped on the plastic bandwagon just yet.

Holy cow, 11 quid is just $15.71... is it real brass???? That compass will almost give it a steampunk look.


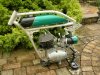
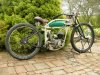
FRAME BACK FROM WELDERS. TANK NOW PAINTED...
Collected the frame from welder Paul after he finished-up TIG-ing the various water-jet profiled alloy fillets and motor mounts to their locations. What a killer frame! Been prevaricating whether to paint the frame RAL Mint Turquoise or black - but I'm so impressed with the neatly welded result I'm seriously wanting to polish this aluminium frame rather than paint it.
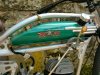
While the frame was away, I took the opportunity to prime, paint and clear-coat the tank, air filter's shroud and fenders. Really pleased with the RAL Opal Green and Black colour combo, set off with a gold pin-stripe and those lovely polished alloy trim strips. So pleased in fact, I can't bring myself to contemplate my original plan to patina this tank. My longed-for patina'd finish will have to wait for another build. Right now I'm just waiting for the paint to cure sufficiently before I add the Gnome Rhone decals to the tank sides.
Hastily shot some pics in between rain showers today to show how it's coming along. (Alloy trim strips yet to be added to the tank's left side).
View attachment 98194
View attachment 98195 View attachment 98196 View attachment 98198
")