Electric Terratrike Rover

GoldenMotor.com

oldtimer54

Member
May 15, 2010
540
6
18
On a bike
Hello, Oldtimer54,
Great to see you back again. Still a bunch of us that have been here for a while. Are you still messing around with bikes?

Steve.
Hi Steve glade to see your still here. I still have three bikes I work on. A huffy 50cc, my 212cc cruiser with torque converter and jack shaft and a Schwinn mountain bike with a 99cc flat head side push rod Iam building in remembrance of my grandfather who road a Indian motorized bike from Oklahoma to MT Shasta CA around the year of 1900. I ended up buying a Chinese dual sport and have been modding the heck out of it. Since the last time I posted here I lost nearly everything I owned including my home and my life. But I was able to hold on to my bikes (and my life lol) and I now have a new home and my health is much better so Iam able to work on the bikes again. (great therapy)
 
Last edited:

silverbear

The Boy Who Never Grew Up
Jul 9, 2009
8,325
670
113
northeastern Minnesota
Well, this is beginning to feel like a reunion of some kind. I like it! Well seasoned kids from the old neighborhood getting together for a virtual bike ride is good and looking over each other’s rides is fun and informative.

All right, now back to our regular programming… where was I with this electric Rover? The fenders part has been set to the side for other considerations.

I spent a good bit of time thinking about where to put the lithium batteries and inside of what, having read that it is best to keep weight low and to protect the lithium cells from damage. When I learned that they are known to catch on fire or even explode if shorted I got a little paranoid and early on had the idea that an ammo can might work to keep them in. I looked at both the 30 caliber and 50 caliber sizes at Harbor Freight and bought a couple of each. I’ll eventually have a total of four rides requiring batteries (2 tadpoles, 1 quad and 1 bicycle) and figured I’d find a use for all of them. Caching goes the cash register…
D0C7A27E-684F-4960-A019-89D455B6CFA7.png


(Note the u bolt under the seat which is there to help keep the seat from inching backwards which is a known issue with the Rover model, easily corrected with the couple dollar u bolt. Some people use a hose clamp.)

A6C54695-5232-467F-A485-0882DBA4ABED.png
35C1134F-4389-4082-BB98-64B377C69C3F.png

I removed the handle on a 30 caliber size can and painted it black. It is bolted on to another aluminum plate which in turn is held to the boom with U bolts. It is both secure and fire safe. Battery to motor cable comes out the upper back of the can through a hole drilled for that purpose with additional venting holes drilled under the latch assembly. Battery can be removed for charging or left in place for charging. I plan to leave the batteries in place. If possible theft was a problem I’d remove it for charging, but I can just pull the trike in the garage and charge it there. The inside of the can is now lined in rubber so there can be no electrical contact with the metal can.
36C7DE20-4D65-4068-90AB-BB1D70E1CE2F.png

I also prepared a 50 caliber sized can and set it on the rear rack to see if it would work there. It puts more weight higher up, but it also looks pretty good I think. I drilled a hole and installed a lock so that it is secure from theft. Could be used for tools, spare inner tube, camera or a larger battery. It too has been drilled for venting and running a power cable to the motor. Decisions, decisions… More staring and consideration is called for I think.

Also notice that the rear rack now has a vertical support. I knew I wanted something that was an “L” shape and was on the lookout for something free either in my stuff or from the local landfill. Didn’t see anything that was right and thought about bending metal stock to shape… then while doing something else out in the car garage I noticed a couple unused curtain rods and realized that if cut to length they would make an L shape. But would they be strong enough? I cut one and beefed it up inside with part of the other section which slides inside to adjust a curtain rod to length. Then painted it black and drilled holes for small bolts to hold it to the aluminum plate above and below to the bike frame. Turns out it is very strong and works perfectly. And the price was right!

Now what… ah yes, the motor… hmmm…
SB
(to be continued)
 

Attachments

silverbear

The Boy Who Never Grew Up
Jul 9, 2009
8,325
670
113
northeastern Minnesota
The electric motor is a 750 watt Bafang to be powered by a 52 volt lithium battery. As you can see in the photos it replaces the pedal crank assembly in the bottom bracket. You keep your own pedals, but other than that everything else is part of the kit. Mine came from Luna Cycles out of Southern California. I could have bought direct from China for less money, but figured having reputable customer service stateside was a value. I don’t recall what I paid, but over $450.00 I believe. Don’t feel like looking it up and no doubt the price would be different anyway if you were to place an order. Shipping was timely, but they were sold out of all batteries. Supply chain blues. For the actual process of replacing the bottom bracket and installing the motor there are different videos on line which are quite thorough. Utah Trikes has a good one on a recumbent tadpole of a different make, but the procedure is pretty much the same. The kit is made for an upright two wheeler, so there are some additional issues to be addressed with a longer frame and greater distance between battery and motor… wiring extensions bought or made. You might want to have a bike shop remove the bottom bracket unless you purchase the right tools and do it yourself. I bought Park tools and they made it a pretty simple job. Again, look up the procedure online and it will be much clearer to watch a video than have me use a thousand words to describe a pretty simple thing. Without the right tools you’re in for some misery. Once the original bottom bracket is out, installing the motor is straight forward.

Out with the old…

8ED47C11-66C5-4FB8-A182-021B5DA224FC.png

…and in with the new.

7FA710D5-6ADD-4F50-BBF4-FF1C2D279A49.png


55A8434E-B94D-495A-95A5-0F4F98D70BFF.png


Instructions that came with the kit are pretty clear and the wiring is simple to connect. Since the controller is built into the motor part of the wiring connections are already made. There is a wiring harness that pugs into a connector at the motor and from the wiring harness connectors which are both color coded and different from each other for the display computer, throttle speed indicator, brake lever controlled motor shutoff and power wires to the battery. On my Rovers the wiring for the speedometer was short and required ordering an extension. If you don’t care about your speed or miles ridden then you can forget about that. I ordered the extension. Wiring to the battery was not long enough and the battery connector I was using was not compatible with the kit connector. I’m using XT90 connectors which are fool proof and guard against electric arcling which I am told can be deadly for the electronics. And I’m using the smaller XT60 connectors for the charger. Additional battery wire was purchased at Napa… 12 gauge copper multi strand (not a solid single wire as in house wiring). Everything made of copper is pricey now, but there’s no real alternative. Wiring splices were silver soldered. Luna Cycles has a user forum which is informative and there are some very helpful tips on wiring and connectors there. Unless you’re savvy with wiring, it would be a good thing to become familiar with. The kit also comes with two brake levers to replace the stock ones. As a safety feature they are designed to temporarily shut off juice to the motor when you squeeze the brakes. The wiring supplied was able to connect to the closest lever, but is too short for the second one. So, if you’re using both you need to order one brake wire extension. The brake levers on the Rover are the locking type so you can set them like a parking brake, which I like. So I left the right side brake lever original to have at least one locking brake and used the kit lever on the left hand side to take advantage of the motor shutoff feature. They are similar enough to not notice they are slightly different in appearance since they feel virtually the same. I guess that’s it on the wiring.
At this stage we temporarily zip tied wiring to keep it out of harms way and took a ride under electric power… oh boy! How do you spell fun?

(to be continued)
SB

8B92BFEE-0324-4D3C-B840-9471FFA7E475.png
 

silverbear

The Boy Who Never Grew Up
Jul 9, 2009
8,325
670
113
northeastern Minnesota
Having survived Xmas, New Years and my 77th birthday it is time for another installment on this thread. A recent cold snap here in northern Minnesota has given nighttime temps in the minus twenties with more to come so it is too cold for tinkering out in the workshop even with a fire in the wood stove, so that makes it a good time to hibernate and post some photos when feeling a little ambitious.

7BB4CAF8-0055-4727-A92F-8BA4AD394661.jpeg

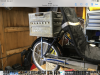
So at this point the motor has been installed, a re chargeable headlight and water bottle are in place and it feels like things are coming together. The first test ride proved that to be not quite true...
Note the position of the motor to the underside of the boom. Instructions made it clear that the motor needed to be firmly synched down to keep it from moving. The supplied hardware to guard against that was intended for an upright bike installation which is not adequate for the tadpole. As soon as I gave it juice the considerable torque pulled the motor up and back smashing the light and mangling the water bottle holder.

507874CB-FF02-4505-B429-F7B23F5A1B65.jpeg


Understand that the motor remained firmly attached in the bottom bracket with no indication of being at all loose. Same thing happened with the second trike, so I listened to what the trike was telling me and decided that if it wanted to be up top then so be it. I repaired the light and now it is under the boom. An aftermarket bracket to prevent this movement is available from Utah Trikes on line for $20.00 and after studying theirs I’m confidant that I can make one myself… but why? In the upright position it can’t go anywhere and as far as I can see it doesn’t matter. For now this is where it is going to stay, but I’ll keep thinking about it.

It was around this time that friends who live near our summer cabin on Eagles Nest Lake saw what we were up to with the electric trikes and did a search for used ones like ours. I told them I’d do the electric conversion on theirs for free if they wanted with them paying for kit, batteries and such. Lois found hers at a bike shop in Duluth and Jim located one on Craigs List in Minneapolis. (And I ordered kits and found batteries on line.) With winter coming on it was a good time to offer less than the asking price on both tadpoles. They offered $800.00 each and now had their own Rovers. And now I had four Rovers to convert. Winter in my part of the world lasts a long time with first snow in October and ice out on the lakes by May which makes for a shortish riding season, but longish building time. Having something to work on during what Fasteddie calls “the long cold dark” helps it pass by more quickly, particularly during this seemingly endless pandemic. With a fire in the wood stove, a cup of coffee and a project to tinker with I’m a happy boy. And thinking ahead to summer on the new bike trail through the forest gave me a smile, knowing that the four of us would have a chance to be kids again. They, too, had given up bicycle riding as age caught up with them. And it makes me feel good that I have an opportunity to help make their lives a little better in health and in fun. Indeed, life is good.

AFE7A59C-2471-4C70-AA4E-32DB87EA2A39.jpeg


Lois got an early Rover with the Nuvinci constant velocity hub and Jim’s is a later Rover with The Shimano Nexus 8 speed hub, both optional upgrades over what came as standard on Sue and my Rovers… Sturmey Archer 8 speeds. So Lois’ trike is like an automatic, Jim’s can be shifted while pedaling and with Sue and mine you need to pause pedaling while shifting gears, like on the old 3 speed English bikes from my teenage years. The pause is not a great hardship, but I understand that Lois’ Nuvinci hub is pretty desirable. So I won’t give it a try or I might want one.

At the time of this writing (now January) Sue and my trikes are in storage more or less done and Lois and Jim’s are in the workshop. Now, where was I? Ah yes, I wanted to talk about mounting the computer display…
where and how?
SB
(to be continued)
 

Tom from Rubicon

Well-Known Member
Apr 4, 2016
2,793
6,026
113
73
Rubicon, Wisconsin
Next motor you need to clamp down SB, cinch it. Those synched motors don't hold. :)
Loving every installment. If you get a line on any more Rovers let me know. $1,200 is the cheapest runner I have found. -5F here tonight, *14F Monday night.

Tom
 

silverbear

The Boy Who Never Grew Up
Jul 9, 2009
8,325
670
113
northeastern Minnesota
Next motor you need to clamp down SB, cinch it. Those synched motors don't hold. :)
Loving every installment. If you get a line on any more Rovers let me know. $1,200 is the cheapest runner I have found. -5F here tonight, *14F Monday night.

Tom
Tom,
Contact me at my email addy. [email protected]
I found a rover for you in Marshfield. Asking a thousand, but suggest offering $800.00. Looks like a nice one.
0B919479-CEE1-4D58-AE84-E02179B4DB8E.png
 

silverbear

The Boy Who Never Grew Up
Jul 9, 2009
8,325
670
113
northeastern Minnesota
Tom, I’d also suggest doing a search on Craig’s list. Be patient and you’ll find something affordable. Winter is a good time to be looking for a trike, just like buying a snowblower or snowmobile in the summer when people are instead buying boats at premium prices.

Okay, I wanted to address the problem of where to mount the thumb throttle, computer switch and the computer display. There’s very little real estate available on the handlebars of recumbent tadpoles. Some newer trikes have designed in accommodations for such, but on the older ones like rovers no plans were made for add on electronics. Finding something aftermarket that will extend handlebar space is a problem. Utah trikes has something and so does Grinn up in Canada, but not for cheap even if they are made of plastic. After some serious staring I got out a couple of water pipe fittings from my department of stuff. The handlebars are 3/4“ in diameter and copper water pipe (and plastic water pipe also has a 3/4” size. A coupling fits to the outside of the pipe and will also fit to the outside of the handlebar. I looked at a coupling in pvc and didn’t like it. Besides, I already had copper fittings holding up the fenders. And I do like the look of copper having utilized copper gas tanks on gas bike builds years ago. To my eye copper is the poor man’s gold… or was until copper prices went crazy a few months ago.
ADC4F92A-4D83-4CE5-B564-06008245225F.png

I fitted up a 3/4” elbow with a ground out notch into the lower side so it would fit onto the handlebar, then a couple inches of straight pipe, then another elbow, a few inches of straight and then a 3/4” to 1” reducer coupling, several inches of straight 1” pipe where the display rides and capped it at the end. Electrical tape temporarily holds everything together to see how it works.
F813E785-4F17-4611-AB6B-51470B9E5A7D.png

C9F1F94B-E9A0-4C64-8F06-C792A196FF47.png

I decided it was okay and I liked it better than plastic. The weak point is where it joins the handlebar so I drilled and tapped threads in 3mm. Three wee little bolts hold it firmly in place. The other pieces would normally be soldered together if the purpose was for plumbing. Once I decide just how I want the display to sit I’m going to try just gluing the fittings to each other with a few drops of thread lock. I don’t want things to move around and change position, but also want to be able to make a change if I want to. We’ll see how that works out. I think it looks okay to my eye and along with other bits and pieces of copper here and there on the trike the copper becomes a kind of artistic motif, so so I tell meself. Heh heh…
C0F00A63-6CC6-4AC1-BAFE-016F574B0511.png


For the heck of it I gave the other handlebar the same treatment in 3/4” fittings to mount a smart phone holder and anything else like a bell, light switch or such. Don’t know yet if I’ll leave it or ditch it. Now I have more real estate available anyway and most critically there is a place for the computer display. Already having some of the fittings helped in keeping the price reasonable. Next installment we’ll look at other real estate options for having places to stow stuff, always at a premium on bikes and trikes.
SB
(to be continued)
 

silverbear

The Boy Who Never Grew Up
Jul 9, 2009
8,325
670
113
northeastern Minnesota
If you do any looking on utube for videos of people going for group rides on their tadpoles you’ll see all sorts of different answers to stowage of water bottles, a jacket, phone or camera, bike tools & spare inner tube, and more. Some people set them up with trailers for camping gear or towing a pet. I considered a number of options for myself and asked Sue what she would like.

6AC6F2F3-2329-4C05-B405-19556354079A.png


She found this whatever it is at Target and I mounted it for her. It isn’t what I would have chosen, but it’s her trike and she can always change her mind later on. What I had in mind for myself was a set of vintage newsboy wire baskets that are kind of like saddlebags. Each one is of a size that a paper grocery bag will fit in nicely. Being wire it is kind of see through and to my eye less cumbersome looking than actual saddle bags made for a bicycle.

84E4D300-D8C1-40B6-AFB4-865A3CD79407.png

Other options were considered as well…
36A1C08D-65CE-4440-A0BD-56E425FF55B6.png 51A0548A-3CBC-49CC-B90E-AF4086460006.png

But at least for now this is what we have settled on. And there’s still room behind the seat for something like a small pack or waterproof pouch.

8188A103-A003-412B-BF98-B6BD2D090D52.png


SB
(to be continued)
 

silverbear

The Boy Who Never Grew Up
Jul 9, 2009
8,325
670
113
northeastern Minnesota
Another option I considered was using a milk crate on the rack behind the seat. Lois trike (below) came with one on a terratrike rack. Seemed pretty big to me, but I thought I’d try sitting one on Jim’s on the rack I made for his trike.
FBD34417-AB2A-4EE1-933A-CAC5FA98F486.jpeg


While looking through my stuff I pulled out a couple of metal ones I’d saved from Eagles Nest Lakes Resort. I liked them because they were originally from a creamery in Duluth and had that stamped into the metal. I’d used them for stowing stuff, but never really looked at the rest of the lettering…
E2B62A74-04B1-450E-812B-9666DDD2C6AB.jpeg

It wasn’t until I set it up on Jim’s trike that I took a good look and couldn’t believe what else it said.

C200C056-9204-457D-AAEE-30CDE2C16103.jpeg

“Pinkerton”!!! Holy Moly What a cool surprise. I gave it a coat of black enamel to see if I like it that way and I do!
90E998A5-9FCB-40FB-A924-BF05F4B16E38.jpeg

I pictured it with the newsboy wire carriers to each side and think it might just work. One things for sure…I’d be the only kid on my block with one of those!

So help me out, here. What do you think? Is it too much? One thing about these trikes; there’s no making one look vintage or like a tribute to Harleys or Indians of bygone days. They are tadpoles and you can do whatever you want and they’ll still be tadpole trikes. Nobody’s going to ask what year it is. Who cares. That gives a kid a lot of freedom I think. A little whimsy is fun. Of course if a Pinkerton agent tracks me down that could be troublesome. Hmmm

In looking at Lois’ Terratrike rack I have to say I think mine looks better. A downside is that it being connected directly to the seat “stays” or whatever they would be called… pretty well makes it so the seat needs to stay locked into position and though it can be adjusted for angle and how far forward or back is right for you then you’ll have to relocate the upright support at the back end of the rack. Lois‘ rack is independent of the seat support. But the price is right on mine. So there…

SB
(to be continued)
 

silverbear

The Boy Who Never Grew Up
Jul 9, 2009
8,325
670
113
northeastern Minnesota
Looks like a nice trail to ride and makes me a little anxious for spring thaw. Still lots of snow up my way and awfully cold yet, but that should get better soon with it warm enough to light a fire in the shop wood stove and do some tinkering on the trikes in readiness for spring. Melting of the snow pack should start at the end of March into early April. I’m tired of winter for sure, but March is a beautiful month in northern Minnesota.
SB
 

Greg58

Well-Known Member
May 1, 2011
5,353
2,575
113
65
Newnan,Georgia
I've been spoiled the last couple of weeks, untill today I wore short sleeves, our problem in the south is the temperature fluctuates so much, last Saturday I was getting sunburn working outside in shorts and tee shirt, today I need a heavy coat. I tip my hat to you fellows that live in the colder area's.
 

Tom from Rubicon

Well-Known Member
Apr 4, 2016
2,793
6,026
113
73
Rubicon, Wisconsin
Don't worry Greg, we dress for the weather. Winter is just the season running around nekid is no fun.

I posted Tom Bradshaw's set up for Silver Bear to ponder on. The idea of having you tubes of trail riding in Northern Wi to watch while pedaling your Tadpole in the comfort of your family room just kinda blew me away conceptually. Makes that 70" screen a kinda indispensable (^)

Still a 3spd hub Rover asking $600 just a half hour south of me. I may need a bullet proof vest if I buy another toy.

Tom
 

Greg58

Well-Known Member
May 1, 2011
5,353
2,575
113
65
Newnan,Georgia
I spent all day working in my shop, not on bikes but on lights. I stopped in harbor freight this morning and picked up three of the led fixtures they had on sale. I got home and put one up and wow what an improvement, there’s no way I was going to keep the fluorescent lights. While I put up the three my wife stopped and picked up six more, after putting up those I decided to change the work bench light as well and went back and got three more. Now I need to clean my shop good, with the lights so bright dirt shows bad. 4 foot led 5000 k fixture is $15.99 ends tomorrow.