Cranbrook Springer Forked BTR YD100 Replica Build (without fabrication)

Ridley did a bullet proof engine mounting system. Ridley Vintage Motorbikes : Models :: The MP (ridleymotorcycle.com)
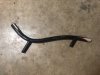
The Bike Berry work around sucks as usual. OB did a clever thing. You got any of the upper tube hanging around?
Tom
Like this? lol, yup, I do

this is My best option right now.

what about one of those CNC mounts that’s built for a 1.5 inch tube? Would I be able to put some shims on the inside of one of those and make it work with a 1”’ tube?
 

Attachments

  • 633F0327-99FC-413C-92BC-E8EEBCB0ECA4.jpeg
    633F0327-99FC-413C-92BC-E8EEBCB0ECA4.jpeg
    73.1 KB · Views: 224
You said at the git go, it was a project thang. Chain line dominates all engineering choices. Your reference to paper clips as a wrist pin retainer, even a Wisconite would think twice.
I didn’t mean I was gonna use paper clips, I meant the retainer clips look like paper clips ;)

I may have found a solution to the front motor mount. If this won’t work I still have another idea.

Two questions. Do you all think this will be solid enough?

and

can I put the CDI this close to the exhaust?
 

Attachments

  • 7FAA6361-BDEE-4C40-9527-85E97DAE2B7F.jpeg
    7FAA6361-BDEE-4C40-9527-85E97DAE2B7F.jpeg
    73.7 KB · Views: 244
  • F481B50C-3C64-4B0D-9DD7-5314E666B1B2.jpeg
    F481B50C-3C64-4B0D-9DD7-5314E666B1B2.jpeg
    72.6 KB · Views: 225
  • A0271C53-559F-4ECA-9920-C2AB0FEC253D.jpeg
    A0271C53-559F-4ECA-9920-C2AB0FEC253D.jpeg
    74.9 KB · Views: 229
  • DDB6A069-22FD-409D-B69A-C247B8A914A9.jpeg
    DDB6A069-22FD-409D-B69A-C247B8A914A9.jpeg
    77.3 KB · Views: 242
Last edited:
I think I’ve come up with my best motor mount yet.

wanted to put a nut where the copper washers are at, but it was very difficult to get everything threaded and started.
 

Attachments

  • F38A0AF2-C43D-4C8F-9C25-7B242A8254D3.jpeg
    F38A0AF2-C43D-4C8F-9C25-7B242A8254D3.jpeg
    66.6 KB · Views: 225
  • 0AE175FD-4B47-4DB7-9276-26F55A5AEF5A.jpeg
    0AE175FD-4B47-4DB7-9276-26F55A5AEF5A.jpeg
    70.8 KB · Views: 210
  • 5DE34F88-5C85-4B8B-82C9-0C2CF1F6CFC1.jpeg
    5DE34F88-5C85-4B8B-82C9-0C2CF1F6CFC1.jpeg
    59.1 KB · Views: 230
More jewelry .shft.

This is on top of the filler cap. I’ll be removing the copper paint in favor of this brass pin.
 

Attachments

  • 2CB21E67-40C1-404C-A9FB-1050A2CA2E4F.jpeg
    2CB21E67-40C1-404C-A9FB-1050A2CA2E4F.jpeg
    67.7 KB · Views: 207
  • 93176373-0AF4-4A0C-B107-FC5E55849DC6.jpeg
    93176373-0AF4-4A0C-B107-FC5E55849DC6.jpeg
    75.3 KB · Views: 228
Got a new steering stem today.

also, I’ve taken the top part of the motor off and all the side covers. Have a strange rough spot on top of the piston. Cylinder walls look pretty good as do the exhaust and intake ports.
 

Attachments

  • F7C24F2D-0967-4F1D-9290-E2CC9F7D5C2C.jpeg
    F7C24F2D-0967-4F1D-9290-E2CC9F7D5C2C.jpeg
    76.7 KB · Views: 214
  • 574A2282-1626-41CD-A6A9-862E30C76393.jpeg
    574A2282-1626-41CD-A6A9-862E30C76393.jpeg
    62.5 KB · Views: 175
  • 0CD1E4CF-5785-4B68-8C62-4730D7C9B38F.jpeg
    0CD1E4CF-5785-4B68-8C62-4730D7C9B38F.jpeg
    48.9 KB · Views: 199
  • 9AD231B7-D34A-409E-973C-9645C2C33FA6.jpeg
    9AD231B7-D34A-409E-973C-9645C2C33FA6.jpeg
    63.7 KB · Views: 197
  • E6798D10-462F-4D9A-8E22-4CED8081C70A.jpeg
    E6798D10-462F-4D9A-8E22-4CED8081C70A.jpeg
    64.1 KB · Views: 169
  • A4D664C3-C009-495F-B2DF-F055C8FAED5C.jpeg
    A4D664C3-C009-495F-B2DF-F055C8FAED5C.jpeg
    45.1 KB · Views: 197
  • 1C0F8E27-0159-4DFC-8768-C859D7B3765B.jpeg
    1C0F8E27-0159-4DFC-8768-C859D7B3765B.jpeg
    52.8 KB · Views: 188
  • A54BB3AA-E4F8-45F3-8E1E-5D48A83EE370.jpeg
    A54BB3AA-E4F8-45F3-8E1E-5D48A83EE370.jpeg
    49.7 KB · Views: 203
  • 8CD1A4D8-63E5-4CD6-A574-DFF9F61BD4B7.jpeg
    8CD1A4D8-63E5-4CD6-A574-DFF9F61BD4B7.jpeg
    41.4 KB · Views: 185
  • 0633C941-7442-4D18-BD7F-79016D0E06AA.jpeg
    0633C941-7442-4D18-BD7F-79016D0E06AA.jpeg
    65.7 KB · Views: 189
More
 

Attachments

  • 9F6F1BEA-8E3A-40EA-B0CC-D1F750073E8A.jpeg
    9F6F1BEA-8E3A-40EA-B0CC-D1F750073E8A.jpeg
    70.4 KB · Views: 210
  • 7A27DC63-2CB9-45E2-A61A-D38FE1B8619E.jpeg
    7A27DC63-2CB9-45E2-A61A-D38FE1B8619E.jpeg
    46.9 KB · Views: 194
  • 14AB521B-7B01-4F88-AC16-ED18D41F71CD.jpeg
    14AB521B-7B01-4F88-AC16-ED18D41F71CD.jpeg
    93.8 KB · Views: 164
  • 62CDAAEE-6AF1-4EF1-82CB-163181A16DC1.jpeg
    62CDAAEE-6AF1-4EF1-82CB-163181A16DC1.jpeg
    72.1 KB · Views: 173
  • E76B5AB2-9290-426B-86C3-285A40CC512B.jpeg
    E76B5AB2-9290-426B-86C3-285A40CC512B.jpeg
    99.3 KB · Views: 179
Caveat. I'm not ever a 2smoke mechanic. What is with the ten heat/stress marks in the combustion chamber?
If like Harbor Freight engines. A good gas or mineral spirit flush is in order. The latter is preferable.
Tom
 
"Is that what that is at the top of the jug? If so that’s not a good sign."
Dunno. Wiser heads will I hope prevail. Could be molding sinks. The color contrast caught my eye. Like a different metal crystal structure. Symmetry is interesting. Top of head photo will be most telling.
Tom
 
"Is that what that is at the top of the jug? If so that’s not a good sign."
Dunno. Wiser heads will I hope prevail. Could be molding sinks. The color contrast caught my eye. Like a different metal crystal structure. Symmetry is interesting. Top of head photo will be most telling.
Tom
No markings on the top of the head or in between any of the fans at the top of the head, but the jug has been painted.

what about The imperfection on the top of the piston. Should I try to sand that down with some very fine sandpaper or emery cloth?
 

Attachments

  • 9E438276-639C-4DC7-8A3E-87AB622D041E.jpeg
    9E438276-639C-4DC7-8A3E-87AB622D041E.jpeg
    77.3 KB · Views: 166
Back
Top